When I have writing some articles comparing Spring and Micronaut frameworks recently, I have taken a note of many comments about lack of built-in ORM and data repositories support in Micronaut. Spring provides this feature for a long time through Spring Data project. The good news is that the Micronaut team is close to complete work on first version of their project with ORM support. The project called Micronaut Predator (short for Precomputed Data Repositories) is still under active development, and currently we may access just the snapshot version. However, the authors are introducing it is as more efficient with reduced memory consumption than competitive solutions like Spring Data or Grails GORM. In short, this could be achieved thanks to Ahead of Time (AoT) compilation to pre-compute queries for repository interfaces that are then executed by a thin, lightweight runtime layer, and avoiding usage of reflection or runtime proxies.Currently Micronaut Predator provides runtime support for JPA (Hibernate) and SQL (JDBC). Some other implementations are planned in the future. In this article I’m going to show you how to include Micronaut Predator to your application and use its main features for providing JPA data access.
1. Dependencies
The snapshot dependency of Micronaut Predator is available at https://oss.sonatype.org/content/repositories/snapshots/, so first we need to include it to the repository list in our pom.xml together with jcenter:
<repositories>
	<repository>
		<id>jcenter.bintray.com</id>
		<url>https://jcenter.bintray.com</url>
	</repository>
	<repository>
		<id>sonatype-snapshots</id>
		<url>https://oss.sonatype.org/content/repositories/snapshots/</url>
	</repository>
</repositories>
In addition to the standard libraries included for building web application with Micronaut, we have to add the following dependencies: database driver (we will use PostgreSQL as the database for our sample application) and micronaut-predator-hibernate-jpa.
<dependency>
	<groupId>io.micronaut.data</groupId>
	<artifactId>micronaut-predator-hibernate-jpa</artifactId>
	<version>${predator.version}</version>
	<scope>compile</scope>
</dependency>
<dependency>
	<groupId>io.micronaut.configuration</groupId>
	<artifactId>micronaut-jdbc-tomcat</artifactId>
	<scope>runtime</scope>
</dependency>
<dependency>
    <groupId>org.postgresql</groupId>
    <artifactId>postgresql</artifactId>
    <version>42.2.6</version>
</dependency>
Some Micronaut libraries including micronaut-predator-processor have to be added to the annotation processor path. Such a configuration should be provided inside Maven Compiler Plugin configuration:
<plugin>
	<groupId>org.apache.maven.plugins</groupId>
	<artifactId>maven-compiler-plugin</artifactId>
	<version>3.7.0</version>
	<configuration>
		<source>${jdk.version}</source>
		<target>${jdk.version}</target>
		<encoding>UTF-8</encoding>
		<compilerArgs>
			<arg>-parameters</arg>
		</compilerArgs>
		<annotationProcessorPaths>
			<path>
				<groupId>io.micronaut</groupId>
				<artifactId>micronaut-inject-java</artifactId>
				<version>${micronaut.version}</version>
			</path>
			<path>
				<groupId>io.micronaut.data</groupId>
				<artifactId>micronaut-predator-processor</artifactId>
				<version>${predator.version}</version>
			</path>
			<path>
				<groupId>io.micronaut</groupId>
				<artifactId>micronaut-validation</artifactId>
				<version>${micronaut.version}</version>
			</path>
		</annotationProcessorPaths>
	</configuration>
</plugin>
The current newest RC version of Micronaut is 1.2.0.RC:
<dependencyManagement>
	<dependencies>
		<dependency>
			<groupId>io.micronaut</groupId>
			<artifactId>micronaut-bom</artifactId>
			<version>1.2.0.RC2</version>
			<type>pom</type>
			<scope>import</scope>
		</dependency>
	</dependencies>
</dependencyManagement>
2. Domain Model
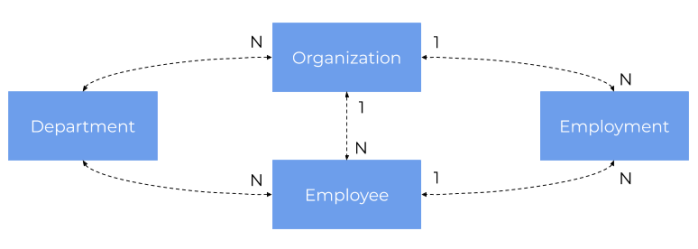
Our database model consists of four tables as shown below. The same database model has been used for some of my previous examples including those for Spring Data usage. We have employee table. Each employee is assigned to the exactly one department and one organization. Each department is assigned to the exactly one organization. There is also table employment, which provides history of employment for every single employee.
Here is the implementation of entity classes corresponding to the database model. Let’s start from Employee class:
@Entity
public class Employee {

	@Id
	@GeneratedValue(strategy = GenerationType.SEQUENCE, generator = "employee_id_seq")
	@SequenceGenerator(name = "employee_id_seq", sequenceName = "employee_id_seq", allocationSize = 1)
	private Long id;
	private String name;
	private int age;
	private String position;
	private int salary;
	@ManyToOne
	private Organization organization;
	@ManyToOne
	private Department department;
	@OneToMany
	private Set<Employment> employments;

	// ... GETTERS AND SETTERS
}
Here’s the implementation of Department class:
@Entity
public class Department {

	@Id
	@GeneratedValue(strategy = GenerationType.SEQUENCE, generator = "department_id_seq")
	@SequenceGenerator(name = "department_id_seq", sequenceName = "department_id_seq", allocationSize = 1)
	private Long id;
	private String name;
	@OneToMany
	private Set<Employee> employees;
	@ManyToOne
	private Organization organization;

	// ... GETTERS AND SETTERS
}
And here’s Organization entity:
@Entity
public class Organization {

    @Id
    @GeneratedValue(strategy = GenerationType.SEQUENCE, generator = "organization_id_seq")
    @SequenceGenerator(name = "organization_id_seq", sequenceName = "organization_id_seq", allocationSize = 1)
    private Long id;
    private String name;
    private String address;
    @OneToMany
    private Set<Department> departments;
    @OneToMany
    private Set<Employee> employees;

	// ... GETTERS AND SETTERS
}
And the last entity Employment:
@Entity
public class Employment {

    @Id
    @GeneratedValue(strategy = GenerationType.SEQUENCE, generator = "employment_id_seq")
    @SequenceGenerator(name = "employment_id_seq", sequenceName = "employment_id_seq", allocationSize = 1)
    private Long id;
    @ManyToOne
    private Employee employee;
    @ManyToOne
    private Organization organization;
    @Temporal(TemporalType.DATE)
    private Date start;
    @Temporal(TemporalType.DATE)
    private Date end;

	// ... GETTERS AND SETTERS
}
3. Creating Repositories
If you are familiar with Spring Data repositories pattern, you won’t have any problems when using Micronaut repositories. The approach to declaring repositories and building queries is the same as in Spring Data. You need to declare an interface (or an abstract class) annotated with @Repository that extends interface CrudRepository. CrudRepository is not the only one interface that can be extended. You can also use GenericRepository, AsyncCrudRepository for asynchronous operations, ReactiveStreamsCrudRepository for reactive CRUD execution or PageableRepository that adds methods for pagination. The typical repository declaration looks like as shown below.
@Repository
public interface EmployeeRepository extends CrudRepository<Employee, Long> {

    Set<EmployeeDTO> findBySalaryGreaterThan(int salary);

    Set<EmployeeDTO> findByOrganization(Organization organization);

    int findAvgSalaryByAge(int age);

    int findAvgSalaryByOrganization(Organization organization);

}
I have declared there some additional find methods. The most common query prefix is find, but you can also use search, query, get, read or retrieve. The first two queries returns all employees with salary greater than a given value and all employees assigned to a given organization. The Employee entity is in many-to-one relation with with Organization, so we may also use relational fields as query parameters. It is noteworthy that both two queries return DTO objects as a result inside collection. That’s possible because Micronaut Predator supports reflection-free Data Transfer Object (DTO) projections if the return type is annotated with @Introspected. Here’s the declaration of EmployeeDTO.
@Introspected
public class EmployeeDTO {

    private String name;
    private int age;
    private String position;
    private int salary;

    // ... GETTERS AND SETTERS
}
The EmployeeRepository contains two other methods using aggregation expressions. Method findAvgSalaryByAge counts average salary by a given age of employees, while findAvgSalaryByOrganization counts avarage salary by a given organization.
For comparison, let’s take a look on another repository implementation EmploymentRepository. We need two additional find methods. First findByEmployeeOrderByStartDesc for searching employment history for a given employee ordered by start date. The second method find an employment without end date set, which in fact means that’s the employment for a current job.
@Repository
public interface EmploymentRepository extends CrudRepository<Employment, Long> {

    Set<EmploymentDTO> findByEmployeeOrderByStartDesc(Employee employee);

    Employment findByEmployeeAndEndIsNull(Employee employee);

}
Micronaut Predator is able to automatically manage transactions. You just need to annotate your method with @Transactional. In the source code fragment visible below you may see the method used for changing job by an employee. We are performing a bunch of save operations inside that method. First we change the target department and organization for a given employee, then we are creating new employment history record for a new job, and also setting end date for previous employment entity (found using repository method findByEmployeeAndEndIsNull).
@Inject
DepartmentRepository departmentRepository;
@Inject
EmployeeRepository employeeRepository;
@Inject
EmploymentRepository employmentRepository;

@Transactional
public void changeJob(Long employeeId, Long targetDepartmentId) {
	Optional<Employee> employee = employeeRepository.findById(employeeId);
	employee.ifPresent(employee1 -> {
		Optional<Department> department = departmentRepository.findById(targetDepartmentId);
		department.ifPresent(department1 -> {
			employee1.setDepartment(department1);
			employee1.setOrganization(department1.getOrganization());
			Employment employment = new Employment(employee1, department1.getOrganization(), new Date());
			employmentRepository.save(employment);
			Employment previousEmployment = employmentRepository.findByEmployeeAndEndIsNull(employee1);
			previousEmployment.setEnd(new Date());
			employmentRepository.save(previousEmployment);
		});
	});
}
Ok, now let’s move on to the last repository implementation discussed in this section – OrganizationRepository. Since Organization entity is in lazy load one-to-many relation with Employee and Department, we need to fetch data to present dependencies in the output. To achieve that we can use @Join annotation on the repository interface with specifying JOIN FETCH. Since the @Join annotation is repeatable it can be specified multiple times for different associations as shown below.
@Repository
public interface OrganizationRepository extends CrudRepository<Organization, Long> {

    @Join(value = "departments", type = Join.Type.LEFT_FETCH)
    @Join(value = "employees", type = Join.Type.LEFT_FETCH)
    Optional<Organization> findByName(String name);

}
4. Batch operations
Micronaut Predator repositories supports batch operations. It can be sometimes useful, for example in automatic tests. Here’s my simple JUnit test that add multiple employees into the single department inside organization:
@Test
public void addMultiple() {
	List<Employee> employees = Arrays.asList(
		new Employee("Test1", 20, "Developer", 5000),
		new Employee("Test2", 30, "Analyst", 15000),
		new Employee("Test3", 40, "Manager", 25000),
		new Employee("Test4", 25, "Developer", 9000),
		new Employee("Test5", 23, "Analyst", 8000),
		new Employee("Test6", 50, "Developer", 12000),
		new Employee("Test7", 55, "Architect", 25000),
		new Employee("Test8", 43, "Manager", 15000)
	);

	Organization organization = new Organization("TestWithEmployees", "TestAddress");
	Organization organizationSaved = organizationRepository.save(organization);
	Assertions.assertNotNull(organization.getId());
	Department department = new Department("TestWithEmployees");
	department.setOrganization(organization);
	Department departmentSaved = departmentRepository.save(department);
	Assertions.assertNotNull(department.getId());
	employeeRepository.saveAll(employees.stream().map(employee -> {
		employee.setOrganization(organizationSaved);
		employee.setDepartment(departmentSaved);
		return employee;
	}).collect(Collectors.toList()));
}
5. Controllers
Finally, the last implementation step – building REST controllers. OrganizationController is pretty simple. It injects OrganizationRepository and using it for saving entity and searching it by name. Here’s the implementation:
@Controller("organizations")
public class OrganizationController {

    @Inject
    OrganizationRepository repository;

    @Post("/organization")
    public Long addOrganization(@Body Organization organization) {
        Organization organization1 = repository.save(organization);
        return organization1.getId();
    }

    @Get("/organization/name/{name}")
    public Optional<Organization> findOrganization(@NotNull String name) {
        return repository.findByName(name);
    }

}
EmployeeController is a little bit more complicated. We have implementation that exposes four additional find methods defined in EmployeeRepository. There is also method for adding new employee and assign it to the department, and changing the job implemented inside SampleService bean.
@Controller("employees")
public class EmployeeController {

    @Inject
    EmployeeRepository repository;
    @Inject
    OrganizationRepository organizationRepository;
    @Inject
    SampleService service;

    @Get("/salary/{salary}")
    public Set<EmployeeDTO> findEmployeesBySalary(int salary) {
        return repository.findBySalaryGreaterThan(salary);
    }

    @Get("/organization/{organizationId}")
    public Set<EmployeeDTO> findEmployeesByOrganization(Long organizationId) {
        Optional<Organization> organization = organizationRepository.findById(organizationId);
        return repository.findByOrganization(organization.get());
    }

    @Get("/salary-avg/age/{age}")
    public int findAvgSalaryByAge(int age) {
        return repository.findAvgSalaryByAge(age);
    }

    @Get("/salary-avg/organization/{organizationId}")
    public int findAvgSalaryByAge(Long organizationId) {
        Optional<Organization> organization = organizationRepository.findById(organizationId);
        return repository.findAvgSalaryByOrganization(organization.get());
    }

    @Post("/{departmentId}")
    public void addNewEmployee(@Body Employee employee, Long departmentId) {
        service.hireEmployee(employee, departmentId);
    }

    @Put("/change-job")
    public void changeJob(@Body ChangeJobRequest request) {
        service.changeJob(request.getEmployeeId(), request.getTargetOrganizationId());
    }

}
6. Configuring database connection
As usual we use Docker image for running database instance locally. Here’s the command that runs container with Postgres and expose it on port 5432:
docker run -d --name postgres -p 5432:5432 -e POSTGRES_USER=predator -e POSTGRES_PASSWORD=predator123 -e POSTGRES_DB=predator postgres
After startup my Postgres instance is available on the virtual address 192.168.99.100, so I have to set it in the Micronaut application.yml. Besides database connection settings we will also set some JPA properties, that enables SQL logging and automatically applies model changes into database schema. Here’s full configuration of our sample application inside application.yml:
micronaut:
  application:
    name: sample-micronaut-jpa

jackson:
  bean-introspection-module: true

datasources:
  default:
    url: jdbc:postgresql://192.168.99.100:5432/predator?ssl=false
    driverClassName: org.postgresql.Driver
    username: predator
    password: predator123

jpa:
  default:
    properties:
      hibernate:
        hbm2ddl:
          auto: update
        show_sql: true
Conclusion
The support for ORM was one of the most expected features for Micronaut Framework. Not only it will be available in release version soon, but it is almost 1.5x faster than Spring Data JPA – following this article https://objectcomputing.com/news/2019/07/18/unleashing-predator-precomputed-data-repositories created by the leader of Micronaut Project Graeme Rocher. In my opinion the support for ORM via project Predator may be the reason that developers decide to use Micronaut instead of Spring Boot.
In this article I have demonstrated the most interesting features of Micronaut Predator. I think that it will be continuously improved, and we see some new useful features soon. The sample application source code snippet is as usual available on GitHub: https://github.com/piomin/sample-micronaut-jpa.git.
