Introduction
In this article, I am going to share my experience with the Angular-Material configuration with Require.js(AMD). This article will cover the following points given below:
- Require.Js configuration for Angular material
- Call the angular material calendar control in html page
- Provide the source code
Background
Viewers should have intermediate knowledge of angular JS, Require JS, HTML 5, CSS 3. Require.js is a JavaScript class which is used as a modular script loader. Modular script loader will improve the speed and quality of your code.
To know more about the require js, click here.
To know more about the Angular material design, click here.
Using the Code
I am going to use Visual Studio 2013 IDE to create a new angular-material app. You can use any IDE and use the node package manager (npm) to download these packages. I would like to start creating a new app using angular.js, angular-material.js and require.js. So let's start. Open your VS 2013 and create a new empty webapplication and name as DemoApp.
Now add some js framework from nuget packages. Let me share the list of packages.
<packages>
  <package id="Angular.Material" version="1.1.1" targetFramework="net451" />
  <package id="angular-moment" version="0.10.3" targetFramework="net451" />
  <package id="jQuery" version="3.1.1" targetFramework="net451" />
  <package id="Moment.js" version="2.15.1" targetFramework="net451" />
  <package id="RequireJS" version="2.3.2" targetFramework="net451" />
</packages>
I have added one more library named as ui-router to route in angular.js. I downloaded this package from node console. You can also download it directly from here.
Now I am going to share my folder structure as given below:
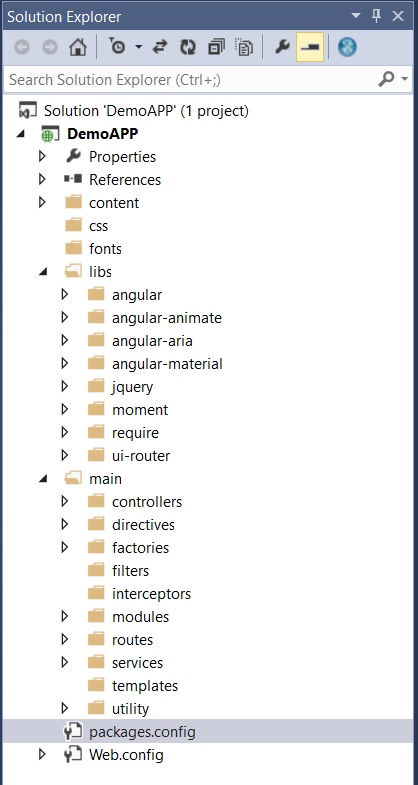
Well, let me explain the folder structure line by line. First one is the content folder having the CSS files for angular-material.css, next one is the CSS folder to be used for custom css, next one is font folder, then libs folder, libs is used for all the js framework for angular, angular-material , Jquery and so on..
Next one is the main folder which keeps all custom js files like controller, directive, filters and so on.
Now, I am going to add two more js files in the main folder named as main.js and app.js file.
Let's start with main.js file to be used for configuring all js libraries. The code is given below.
require.config({
    urlArgs: "v=" + new Date().getTime(),
    waitSeconds: 300,
    baseUrl: "/",
    paths: {
        app: "main/app",
        angular: "libs/angular/angular.min",
        uirouter: "libs/ui-router/angular-ui-router.min",
        jquery: "libs/jquery/jquery-3.1.1.min",
        ngMaterial: 'libs/angular-material/angular-material.min',
        'ng-animate': 'libs/angular-animate/angular-animate.min',
        ngAria: 'libs/angular-aria/angular-aria.min',
        ngMessages: 'libs/angular-messages/angular-messages.min',
        'hammer': 'libs/hammer/hammer.min',
        'hammerProxy': 'main/hammer-proxy'
    }
Create the require object and call the config method. In config method, our first parameter is urlArgs -> "v=" + new Date().getTime(). This parameter is used for versioning the js files at time of loading, it will resolve the caching problem.
Now, the next one is waitSeconds : n milliseconds. It is used to tell require js to wait for n number of seconds before giving up on loading a script. By default, it's 7ms.
Next one is baseUrl: baseUrl is normally set to the same directory as the script used in a data-main attribute for the top level script to load for a page. data-main attribute is defined in an index.html page or default.html page.
<!--
<script data-main="scripts/main.js" src="scripts/require.js"></script>
Next section is paths: Path object contains the key - value pair of library name and path, you can define name by yourself and paths are library path.
shim: {
        app: {
            exports: "app",
            deps: [
                "angular", "ngMessages", "ngMaterial",
                "uirouter",  "hammer", "hammerProxy"
            ]
        }
Next section is Shim: shim configure the dependencies, exports, and custom initialization. Shim configuration is used for non - amd scripts only. Inside the shim config app object is used to load the important dependencies at the time of intialisation of index or default page. Once the dependencies have been loaded, it will export the global variable app as module level. Exports is used to create an empty object for the module that is available immediately for reference by other modules.
Now let us share the code of main.js file.
require.config({
    urlArgs: "v=" + new Date().getTime(),
    waitSeconds: 300,
    baseUrl: "/",
    paths: {
        app: "main/app",
        angular: "lib/angular/angular.min",
        uirouter: "lib/ui-router/angular-ui-router.min",
        jquery: "lib/jquery/jquery-3.1.1.min",
        ngMaterial: 'lib/angular-material/angular-material.min',
        'ng-animate': 'lib/angular-animate/angular-animate.min',
        ngAria: 'lib/angular-aria/angular-aria.min',
        ngMessages: 'lib/angular-messages/angular-messages.min',
        'hammer': 'lib/hammer/hammer.min',
        'hammerProxy': 'main/hammer-proxy'
    },
    shim: {
        app: {
            exports: "app",
            deps: [
                "angular", "ngMessages", "ngMaterial",  "uirouter",  "hammer", "hammerProxy"
            ]
        },
        angular: {
            exports: "angular"
        },
        jquery: {
            exports: "$"
        },
        uirouter: {
            deps: [
                "angular"
            ]
        },
       'ng-animate': {
            deps: ['angular']
        },

        ngAria: {
            deps:[ 'angular']
        },
        ngMessages : {
                deps: ['angular']
        },

        hammerProxy:
        {
            deps: ['hammer']
        },
        hammer:{
            exports: "Hammer"
        },
        ngMaterial: {
            deps: ['angular', 'ng-animate', 'ngAria']
        }
    }
});
deps: deps first resolve the dependency of dependent module, then it will load the actual module. Like ngMessages require to load angular.js first.
Now few more lines of code:
require(["app", "jquery",
"main/routes/route", "main/utility/menuUtility"], function () {
angular.element(document).ready(function () {
angular.bootstrap(document, ["angbaseApp"]);
});
});
In the above lines of code, I am injecting the global module app, jquery and few more files. All these scripts are required before the dom is ready. Now our main.js is ready.
Now, I am going to create an app.js file.
define(["app"], function () {
var app = angular.module("angbaseApp", [ "ui.router",
"ngAnimate", "ngAria", "ngMessages", "ngMaterial"]);
app.config(function ($routeProvider, $controllerProvider, $provide, $compileProvider, $filterProvider, $httpProvider) {
app.register = {
controller: $controllerProvider.register,
directive: $compileProvider.directive,
filter: $filterProvider.register,
factory: $provide.factory,
service: $provide.service
};
});
app.config(function($mdThemingProvider) {
$mdThemingProvider.theme('dark-blue').backgroundPalette('blue').dark();
});
return app;
});
In the above lines of code, I am using the define to be used to define module, in requirejs modules are an extension of module pattern (JavaScript).
In the first line, I have defined the global app module. If in case there are more modules, those are having dependency on this one, then we will define those ones too for example.
define(["app", "main/services/accountService", "main/utility/requestHeader"] like here, I have defined an accountService and requestHeader module.
In app.js file, we will inject all the angular modules and we will do all the angular configurations required.
Now, I am going to add one route.js file to route for our angular app. Code is given below:
define(['app'], function (app) {
    'use strict';

    return app.config(['$stateProvider', '$urlRouterProvider',
              function ($stateProvider, $urlRouterProvider) {
        $urlRouterProvider.otherwise('/')

        $stateProvider
           .state('RequireLand', {
               url: '/RequireLand',
               templateUrl: 'view/partial/view_demo.html',
               resolve: {
                   load: function ($q, $rootScope) {
                       var defer = $q.defer();
                       require(["main/controllers/requireEnableCtrl"], function () {
                           defer.resolve();
                           $rootScope.$apply();
                       });

                       return defer.promise;
                   }
               },
               controller: "MainCtrl"
           })
    }]);
});
Define is already discussed. Here, I did a separate configuration for route as I am using the ui.route and injecting '$stateProvider' and '$urlRouterProvider', I am not going to discuss about the ui.route library here. Please read the online documentation of ui-route.
In the above line of code, I defined a state named as 'RequireLand', define the url for route, the template url and resolve the controller into this state. It will resolve the controller file and their dependencies.
Now, I am going to add one more js file for angular controller named as 'requireEnableCtrl' and module name is MainCtrl. I am going to share my code below.
define(["app"], function (app) {
app.register.controller("MainCtrl", function ($scope, $rootScope, $state) {
$scope.myDate = new Date();
$scope.minDate = new Date(
$scope.myDate.getFullYear(),
$scope.myDate.getMonth() - 2,
$scope.myDate.getDate());
$scope.maxDate = new Date(
$scope.myDate.getFullYear(),
$scope.myDate.getMonth() + 2,
$scope.myDate.getDate());
$scope.onlyWeekendsPredicate = function (date) {
var day = date.getDay();
return day === 0 || day === 6;
};
});
});
Now, I am going to add menuUtility.js file to use for defining the default route or you can used it for your basic initialization like for dynamic menus and all. Code of this file is given below.
I used this to redirect the route.
define(["app"], function (app) {
app.controller("MenuCtrl", function ($scope, $rootScope, $state) {
$state.go('RequireLand');
});
});
Now I am going to add a folder structure for View. It should be like view -> partial for partial views and view -> shared for shared views for menus, header, footer and all.
Let me share my html codes here. First, I want to add a default.html file for my landing page and then I will add partial view file. Code for both the files are given below.
//code for default.html file<!DOCTYPE html>
<html xmlns="http://www.w3.org/1999/xhtml">
<head>
    <title>Report System</title>

    <link href="content/angular-material.min.css" rel="stylesheet" />

</head>
<body ng-controller="MenuCtrl">

    <script data-main="main/main.js" src="libs/require/require.js"></script>
    /* ng-clock directive and other ui-view directive
       read the online documentation of angular and ui-router documentation */
    <div ng-cloak>
        <ui-view></ui-view>
    </div>

</body>
</html>
Now, I am going to add one more HTML page named as view_demo.html which is a partial page. Code is given below.
<div layout="column" layout-align="center center">
    <md-card  md-theme-watch>
        <md-card-title>
            <md-card-title-text>
                <span class="md-headline">Card with image</span>
                <span class="md-subhead">Extra Large</span>

            </md-card-title-text>
        </md-card-title>
        <md-card-content layout="row" layout-align="space-between">
            <div class="md-media-xl card-media">
                <div flex-gt-xs>
                    <h4>Standard date-picker</h4>
                    <md-datepicker ng-model="myDate" md-placeholder="Enter date"></md-datepicker>
                </div>
            </div>

            <md-card-actions layout="column">
                <md-button class="md-icon-button" aria-label="Favorite">
                    <md-icon md-svg-icon="img/icons/favorite.svg"></md-icon>
                </md-button>
                <md-button class="md-icon-button" aria-label="Settings">
                    <md-icon md-svg-icon="img/icons/menu.svg"></md-icon>
                </md-button>
                <md-button class="md-icon-button" aria-label="Share">
                    <md-icon md-svg-icon="img/icons/share-arrow.svg"></md-icon>
                </md-button>
            </md-card-actions>
        </md-card-content>
    </md-card>
</div>
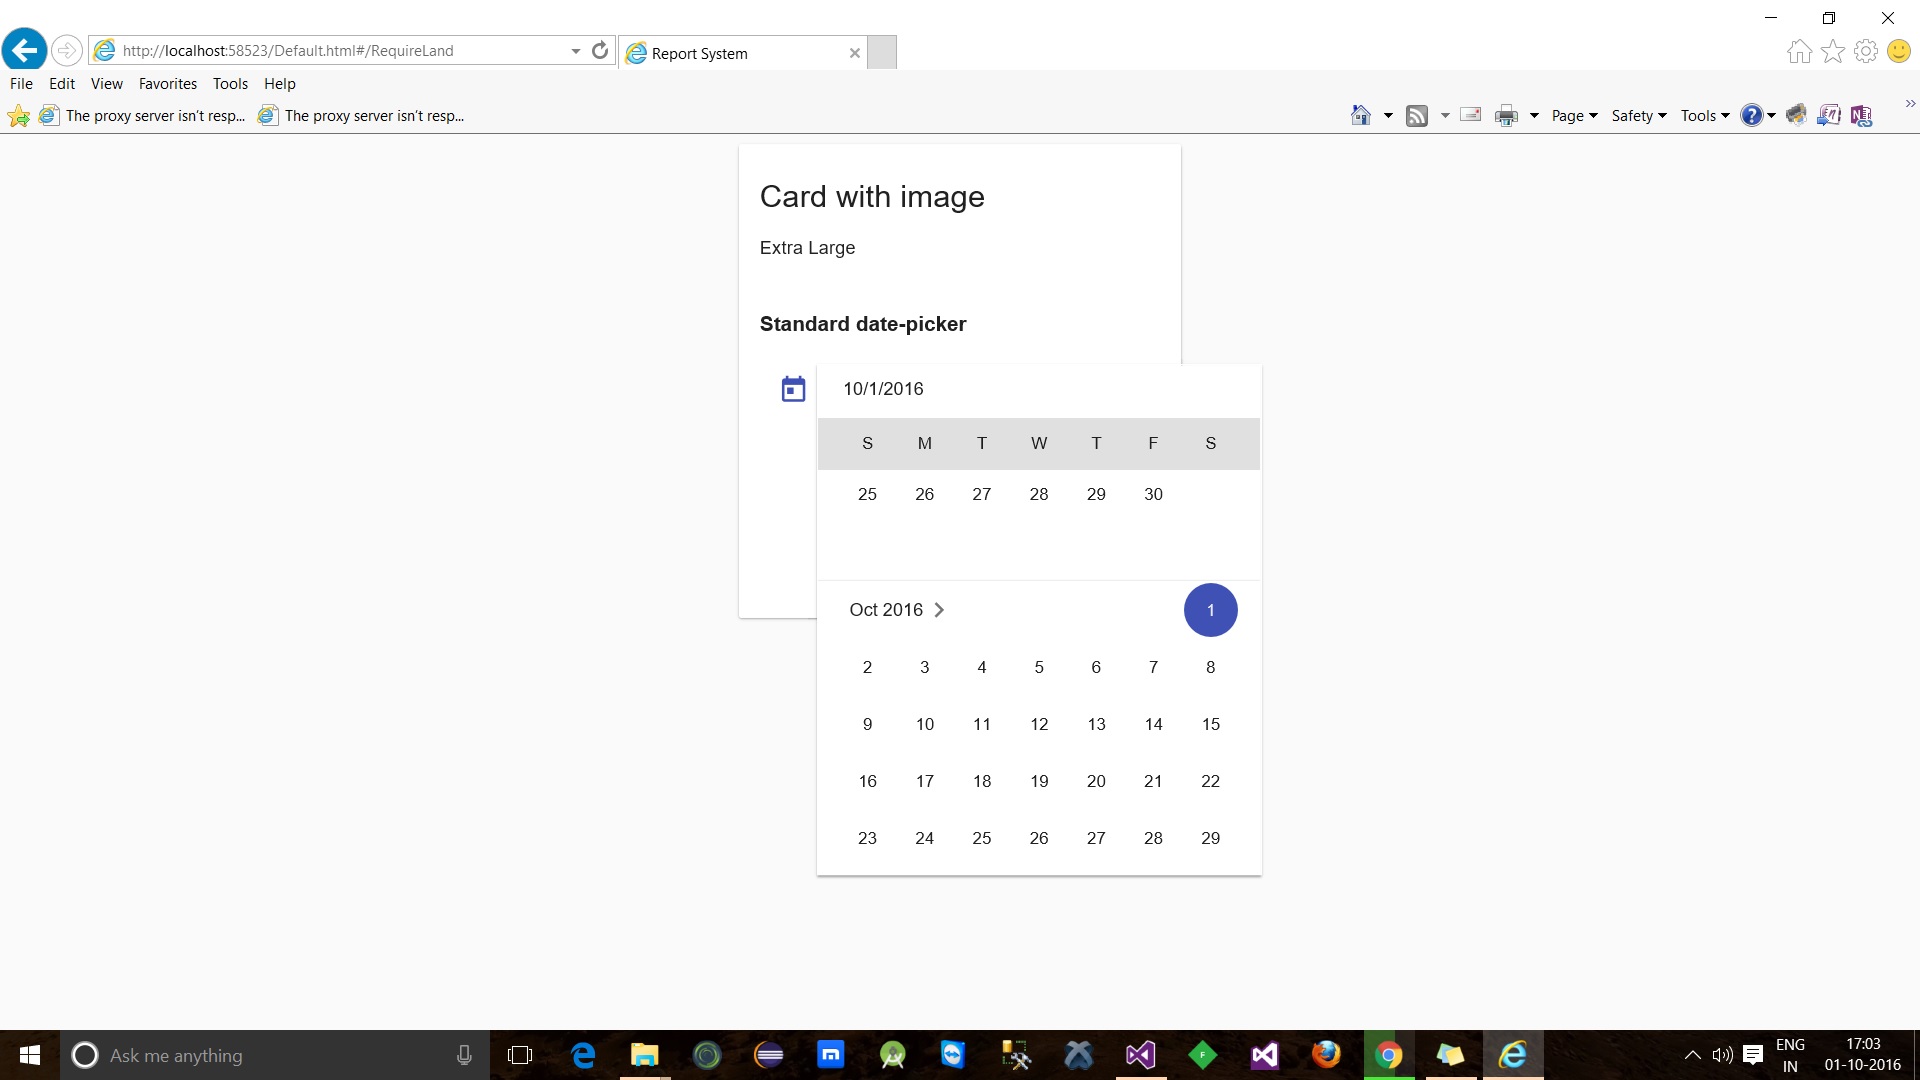
This page defines the inbuilt angular-material directive. For more details, you can check online documentation for it. I am creating a card with datepicker control.
Now we will call the main.js file inside the script element using the attribute data-main and require.js file using the src attribute. You need to write this line in your main page like in my case, I have written this line in my default.html page.
<script data-main="main/main.js" src="libs/require/require.js"></script>
Now, I am going to browse my default.html.
Points of Interest
Well, I hope you have enjoyed this article. The source code is attached. I am trying to cover the basic require configuration to know more about requirejs, angularjs, angular-materialjs. Read the online documentation provided by them.
- Require - Click here
- Angular - Click here
- Angular-Material - Click here
Angularjs basically provides a module based injection and Requirejs provides a class (js files) based injection.
If this post helps you somewhere, please upvote this article. Thank you.
History
- 5th October, 2016: Initial version
This member has not yet provided a Biography. Assume it's interesting and varied, and probably something to do with programming.


 General
  News
News  Suggestion
  Question
  Bug
Bug  Answer
  Joke
Joke  Praise
  Rant
Rant  Admin
Admin 


