In this article, we show how to develop apps with the Angular 2 MockBackend class, providing a way for front-end teams to become independent of the back end, and a useful interface that reduces the risk of structural changes.
Getting your front-end and back-end teams up to full speed is certainly something each company is looking for. Often, though, teams fall into the pit of blocking dependencies. Those are situations where the upcoming work of one team is blocked by a user story owned by the other team.
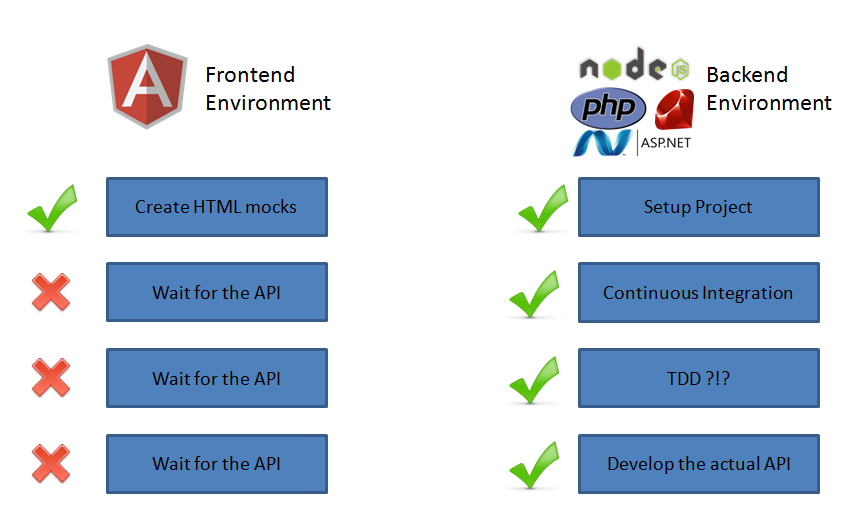
One of those examples is the communication process between the front- and back-end. Over recent times, REST APIs have ascended the throne of so-called communication standards. The benefit of using JSON, a simple yet effective data transfer format, is that front-end workers don’t need to care about the actual back end anymore. Whatever crosses the wire is directly consumable and may be leveraged to bring data into your application. So it’s not surprising that those elementary entities often don’t get modeled at all on the front end and are consumed as they arrive. This brings us to the fundamental problem of having to wait for the back-end team to provide something useful. As depicted in the following figure, we see that both teams start in parallel, but at a certain time one team is kept waiting for the other to catch up.

Besides this, having no kind of fixed structure makes each change a potentially dangerous one. So the focus of this article is to present a way that front-end teams can become independent of the back end and at the same time provide a useful interface which reduces the risk of structural changes.
This article has been updated in line with the recent release of version 2.1.2 of Angular. The linked Plunkr example app has also been updated.
A Ticketing System without a Real Back End
In order to achieve that independence, it’s imperative to start thinking upfront about your project. What entities are you going to use? What communication endpoints result therefore?
This can be done by creating a small table highlighting the necessary REST endpoints and describing their purpose. Remember the reason we’re doing that upfront is for both parties to agree upon a common structure for communication. That doesn’t mean it has to be perfectly done, but it should help you get started with the most important steps. As time passes, just update your interface accordingly with the new routes needed.
The actual process of creating a back-endless environment is to capture all HTTP requests and instead of letting them go out into the wild, and reply with a fake response containing the information we’d like to have. This article will demonstrate the approach by describing a simple ticketing system. It uses the endpoints shown in the following table.
Note that the example utilizes the POST verb for both the update and create route. Another option would be to leverage PUT for the update process. Keep in mind, though, that PUT should be idempotent, meaning every consecutive call has to produce the same result. Feel free to choose whatever suites your needs.
| Method | Route | Request body | Description |
|---|---|---|---|
| GET | /ticket | None | Request all tickets |
| GET | /ticket/:id | None | Request a single ticket via the provided :id parameter |
| POST | /ticket | Ticket entity | Create a new or update an existing ticket |
| DELETE | /ticket/:id | None | Delete a ticket, identified by the :id parameter |
Table 1: Consumed endpoints of the ticketing system
The Ticket entity is a simple TypeScript class containing some basic ticket information:
export class Ticket {
  public _id: string;
  public title: string;
  public assignedTo: string;
  public description: string;
  public percentageComplete: number;

  constructor(id: string, title: string, assignedTo: string,
    description: string, percentageComplete: number) {
    this._id = id;
    this.title = title;
    this.assignedTo = assignedTo;
    this.description = description;
    this.percentageComplete = percentageComplete;
  }
}
ticket.entity.ts describing the ticket entity
You may find the complete code as well as a preview for this example on Plunker:
The Angular 2 Project Setup
Enough theory, let’s get our hands dirty with some coding. The project structure shown here is built upon the proposed Angular 2 Getting Started guide. As such, we won’t waste too much time explaining every part of it. If you’re searching for a introductory article, take a look at Getting Started with Angular 2 using TypeScript. For this article, you can just open up the above-mentioned Plunker to follow the code parts explained below.
As most single page applications start with an index.html file, let’s take a look at that first. The first section imports the necessary polyfills. Followed by that we can see another reference to system.config.js which, amongst other things, configures third-party dependencies and Angular’s application files. The Reactive Extensions (Rx) aren’t actually a true dependency but simplify the work with Angular’s observables, which are the replacement for the previously used Promises. I highly recommend this article by Cory Rylan to learn more about this topic.
Note that manual script referencing is not the recommended way to create production-ready apps. You should use a package manager like npm or jspm. The later one works hand in hand with SystemJS, described in section two. SystemJS is a module loader previously based on the ECMAScript 2015 draft and now part of WHATWG’s Loader specification. As such, it enables the use of the import x from 'module' syntax. In order to use it properly we need to configure it inside the previously mentioned file system.config.js and then import the application’s main entry point app, which points to the file app/boot.ts.
This article won’t deep dive into details of the system.config.js as those are just an example, based on the Angular Quickstart example.
Finally, we create the app by using a custom tag named my-app. Those are called Components and are somewhat comparable to Angular.JS 1.x directives.
<!DOCTYPE html>
<html>

  <head>
    <title>ng2 Ticketing System</title>

   <!-- 1. Load libraries -->
     <!-- Polyfill(s) for older browsers -->
    <script src="https://unpkg.com/core-js/client/shim.min.js"></script>

    <script src="https://cdnjs.cloudflare.com/ajax/libs/lodash.js/3.10.1/lodash.min.js"></script>

    <script src="https://unpkg.com/zone.js@0.6.25?main=browser"></script>
    <script src="https://unpkg.com/reflect-metadata@0.1.8"></script>
    <script src="https://unpkg.com/systemjs@0.19.39/dist/system.src.js"></script>

    <!-- 2. Configure SystemJS -->
    <script src="system.config.js"></script>
    <script>
      System.import('app')
            .then(null, console.error.bind(console));
    </script>

    <meta charset="utf-8"/>
    <link href="vendor/bootstrap/css/bootstrap.min.css" rel="stylesheet"/>
    <link rel="stylesheet" href="styles.css"/>

  </head>

  <!-- 3. Display the application -->
  <body>
    <my -app>Loading ...</my>
  </body>
</html>
The file boot.ts is used to bootstrap Angular into the my-app component. Together with all application-specific code, it’s located inside the folder app. Inside boot.ts we’re going to perform the first steps necessary in order to leverage a mocked back end, which will act as a substitute for the real back end.
We start by creating a root module, to house our application. Its provider section is used to tell Angular’s DI (dependency injection) system which actual instance of a class we’d like to use and what dependencies it requires. BaseRequestOptions provides general http helpers and MockBackend registers an instance of a mock implementation, which we’re going to use to create our fake replies. If we look at the third provider configuration, creating a custom instance of the Http service, we can see that the requested dependencies (deps) are passed on to the useFactory method. Those are then used to create a new instance of Http.
The imports property is then used to declare additional module dependencies, followed by the declarations, registering all availble components of the root module. This module-wide registration enables each component to know what’s available, without having to explicitely state directive requests as in previous versions of Angular 2. The last property, bootstrap, is used to state which component should be the entry point.
Finally, the method bootstrapModule is used to kickstart the app.
import { platformBrowserDynamic } from '@angular/platform-browser-dynamic';
import { BrowserModule } from '@angular/platform-browser';
import { NgModule } from '@angular/core';
import { MockBackend } from '@angular/http/testing';
import { Http, BaseRequestOptions } from '@angular/http';
import { FormsModule }   from '@angular/forms';

import {AppComponent} from './app.component';
import {TicketComponent} from './ticket.component';

@NgModule({
  providers: [
     BaseRequestOptions,
     MockBackend,
     {
       provide: Http,
       deps: [MockBackend, BaseRequestOptions],
       useFactory: (backend, options) => { return new Http(backend, options); }
     }
  ],
  imports: [BrowserModule, FormsModule],
  declarations: [ AppComponent, TicketComponent ],
  bootstrap: [AppComponent]
})
export class AppModule { }

const platform = platformBrowserDynamic();
platform.bootstrapModule(AppModule);
The class MockBackend is originally meant to be used in unit testing scenarios, in order to mock real server calls and therefore keep unit test runs quick and isolated. You can read more about this in the official Http Documentation.
Working with Components
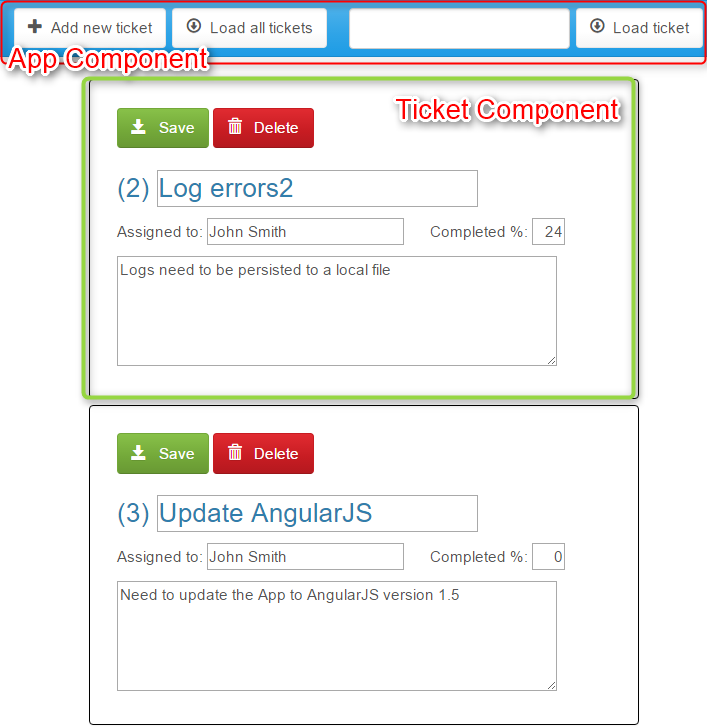
It’s now time to take a look at the finished application to identify the components we’re going to work with. As with every Angular 2 application, there’s a so-called AppComponent, which acts as the main entry point into the application. It also can be used as a container, showing the general navigation and hosting sub-components. Speaking of these, we can see the TicketComponent being used repeatedly to display multiple ticket entities.

The app component is configured to be used with the selector my-app, loading the template index.html located in the templates subfolder. Finally, providers tells Angular’s DI that we’d like to obtain an instance of the TicketService.
...
@Component({
  selector: 'my-app',
  templateUrl: 'app/templates/index.html',
  providers: [TicketService]
})
export class AppComponent {
Next we define a db class property, which will hold a set of fake Tickets.
// Fake Tickets DB
private db: Ticket[] = [
new Ticket(
  '1', 'Missing Exception', 'John Smith',
  'Method XYZ should throw exception in case ABC', 0),
new Ticket(
  '2', 'Log errors', 'John Smith',
  'Logs need to be persisted to a local file', 24),
new Ticket(
  '3', 'Update AngularJS', 'John Smith',
  'Need to update the App to AngularJS version 1.5', 0),
new Ticket(
  '4', 'Border is missing', 'Jane Doe',
  'The element div.demo has no border defined', 100),
new Ticket(
  '5', 'Introduce responsive grid', 'Jane Doe',
  'Implement reponsive grid for better displays on mobile devices', 17)
];
The constructor now receives the injected TicketService as well as the fake back end. In here, we now subscribe to the connections stream. For each outgoing request we’re now going to check its request.method and request.url in order to find out what type of endpoint is requested. If the proper route is matched, we reply using the mockRespond method, with a new Response containing the expected result as body which is initialized with the class ResponseOptions.
constructor(private service: TicketService, private backend: MockBackend) {
this.backend.connections.subscribe( c => {

  let singleTicketMatcher = /\/api\/ticket\/([0-9]+)/i;

  // return all tickets
  // GET: /ticket
  if (c.request.url === "http://localhost:8080/api/ticket" && c.request.method === 0) {
    let res = new Response( new ResponseOptions({
      body: JSON.stringify(this.db)
    }));

    c.mockRespond(res);
  }
When requesting a single ticket, we use the singleTicketMatcher defined above in order to perform a regex search on the request.url. After that, we search for the given ID and reply with the corresponding ticket entity.
// return ticket matching the given id
// GET: /ticket/:id
else if (c.request.url.match(singleTicketMatcher) && c.request.method === 0) {
let matches = this.db.filter( (t) => {
  return t._id == c.request.url.match(singleTicketMatcher)[1]
});

c.mockRespond(new Response( new ResponseOptions({
  body: JSON.stringify(matches[0])
})));
}
In case of updates and the creation of new tickets, we get the ticket entity delivered via the request body instead of a query parameter or URL pattern. Besides that, the work is pretty simple. We first check whether the ticket already exists and update it, otherwise we create a new one and send it back with the response. We do this in order to inform the requester about the new Ticket ID.
  // Add or update a ticket
  // POST: /ticket
  else if (c.request.url === 'http://localhost:8080/api/ticket' && c.request.method === 1) {
    let newTicket: Ticket = JSON.parse(c.request._body);

    let existingTicket = this.db.filter( (ticket: Ticket) => { return ticket._id == newTicket._id});
    if (existingTicket && existingTicket.length === 1) {
      Object.assign(existingTicket[0], newTicket);

      c.mockRespond(new Response( new ResponseOptions({
        body: JSON.stringify(existingTicket[0])
      })));
    } else {
      newTicket._id = parseInt(_.max(this.db, function(t) {
        return t._id;
      })._id || 0, 10) + 1 + '';

      this.db.push(newTicket);

      c.mockRespond(new Response( new ResponseOptions({
        body: JSON.stringify(newTicket)
      })));
    }
  }
  // Delete a ticket
  // DELETE: /ticket/:id
  else if (c.request.url.match(singleTicketMatcher) && c.request.method === 3) {
    let ticketId = c.request.url.match(singleTicketMatcher)[1];
    let pos = _.indexOf(_.pluck(this.db, '_id'), ticketId);

    this.db.splice(pos, 1);

    c.mockRespond(new Response( new ResponseOptions({
      body: JSON.stringify({})
    })));
  }

});
}
Last but not least, the page life cycle hook ngOnInit will trigger the loading of all tickets when the component is fully rendered.
public ngOnInit() {
    this.service.loadAllTickets();
  }
}
In a real production app, you’d separate the mock setup into a separate service and inject it as a dependency into the AppComponent. Or even better, you’d create a whole new module housing your fake server and add it to your app’s root module. This is omitted here in order to keep the demo simpler.
Looking at the TicketComponent we can see that nothing too interesting happens, besides the Component decorator. We define ticket as the selector and again point to a separate template file. Now, in contrast to the AppComponent, we expect a ticket tag to be created with an attribute named title as well and getting the to be rendered entity.
The constructor then finally gets the TicketService injected and assigns it to a class property service.
import {
  Component,
  Input
} from '@angular/core';

import {Ticket} from './ticket.entity';
import {TicketService} from './ticket.service';

@Component({
  moduleId: module.id,
  selector: 'ticket',
  templateUrl: 'templates/ticket.html',
  //providers: [TicketService] < -- this would override the parent DI instance
})
export class TicketComponent {
  @Input('ticket') ticket: Ticket;

  constructor(private service: TicketService) { }
}
The Ticket Service
The last thing missing is the TicketService, used to abstract the Ajax calls away from the components. As we can see, it expects the http service to be injected. Now, remembering the initial boot.ts file, we know that the instance provided will be the one with the mocked back end. The actual request stays the same by leveraging the HTTP services request methods like post or get, mapping the result — which in this case will be the fake reply — and proceeding with the custom application logic.
import {Ticket} from './ticket.entity';
import {Injectable} from '@angular/core';
import {Http, Headers} from '@angular/http';
import 'rxjs/add/operator/map';

@Injectable()
export class TicketService {
  tickets: Ticket[] = [];

  constructor(private http: Http) {

  }

  addNewTicket() {
    var headers = new Headers();
    headers.append('Content-Type', 'application/json');

      var newTicket = new Ticket("0", 'New Ticket', 'Nobody', 'Enter ticket description here', 0);
    this.http
      .post('http://localhost:8080/api/ticket', JSON.stringify(newTicket), headers)
      .map(res => res.json())
      .subscribe(
        data => this.tickets.push(data),
        err => this.logError(err),
        () => console.log('Updated Ticket')
      );
  }

  saveTicket(ticket: Ticket) {
    ...
  }

  deleteTicket(ticket: Ticket) {
    ...
  }

  loadAllTickets() {
    ...
  }

  loadTicketById(id) {
    ...
  }

  logError(err) {
    console.error('There was an error: ' + err);
  }
}
Conclusion
Summing up, we saw how Angular’s dependency injection can help us to replace the default XHRBackend of the HTTP service with a mocked back end. Inside the AppComponent, we then created our fake database, intercepted every outgoing request, and replied with a custom fake response. The benefits we’ve gained are now complete independence from the back-end team and, at the same time, a defined interface. Now, once the production back-end is in place, all we need to do is to remove the dependency injection override and faked back end, and we’re good to go.
This article was peer reviewed by Dan Prince and Rabi Kiran. Thanks to all of SitePoint’s peer reviewers for making SitePoint content the best it can be!
Frequently Asked Questions (FAQs) about Angular 2 MockBackend
What is Angular 2 MockBackend?
Angular 2 MockBackend is a testing module provided by Angular, which allows developers to test HTTP requests in their applications without making actual calls to a server. It simulates the behavior of a real backend, allowing developers to ensure that their HTTP requests are working as expected. This is particularly useful in unit testing, where isolating individual parts of the application is crucial.
How does Angular 2 MockBackend work?
Angular 2 MockBackend works by intercepting HTTP requests made by the application and providing mock responses. This is done by creating a fake backend provider that replaces the actual HTTP backend. When a request is made, the MockBackend intercepts it and returns a predefined response, allowing developers to test how their application handles different server responses.
How do I set up Angular 2 MockBackend for testing?
Setting up Angular 2 MockBackend involves importing the MockBackend and MockConnection modules from ‘@angular/http/testing’, and the HttpModule and BaseRequestOptions from ‘@angular/http’. You then need to add a provider for the HTTP service that uses MockBackend as the backend. Once this is done, you can create instances of MockConnection to handle individual requests.
Can I use Angular 2 MockBackend for end-to-end testing?
While Angular 2 MockBackend is primarily designed for unit testing, it can also be used in end-to-end testing to simulate server responses. However, it’s important to note that this will not test the actual interaction between your application and the server, so it should be complemented with other testing methods.
What are the benefits of using Angular 2 MockBackend?
Using Angular 2 MockBackend allows you to test your application’s HTTP requests without the need for an actual server. This makes your tests faster and more reliable, as they are not dependent on the server’s state or availability. It also allows you to simulate different server responses, helping you ensure that your application can handle various scenarios.
Can I simulate different server responses with Angular 2 MockBackend?
Yes, Angular 2 MockBackend allows you to simulate different server responses. This is done by creating different instances of MockConnection, each with a different response. This allows you to test how your application handles different scenarios, such as successful requests, error responses, and server timeouts.
How do I handle errors with Angular 2 MockBackend?
Handling errors with Angular 2 MockBackend involves creating a MockConnection that returns an error response. You can then test how your application handles this error, ensuring that it behaves correctly in the face of server errors.
Can I use Angular 2 MockBackend with other testing frameworks?
Yes, Angular 2 MockBackend can be used with any testing framework that supports Angular. This includes popular frameworks like Jasmine and Karma, among others.
Is Angular 2 MockBackend suitable for production environments?
No, Angular 2 MockBackend is designed for testing purposes only and should not be used in production environments. In a production environment, you should use the actual HTTP backend to handle requests.
What are the alternatives to Angular 2 MockBackend?
There are several alternatives to Angular 2 MockBackend for testing HTTP requests, including libraries like nock and sinon. These libraries provide similar functionality, allowing you to intercept HTTP requests and provide mock responses. However, they may require additional setup and configuration compared to Angular 2 MockBackend.
 Vildan Softic
Vildan Softic is a consultant and software developer from Graz/Austria. He is passionate about developing Single Page Applications, grinding LOB Apps with .NET and is pushing more and more towards Node.JS development. Moreover, he is hopelessly in love with the Durandal Framework and, while still using other libraries in his day job, he's working hard contributing as a core team member as much as possible to Aurelia.


