At 8pm on Thursday, March 2, 2017, a long line of loyal Nintendo fans and eBay resellers already formed around the block at San Francisco’s SOMA Best Buy. The new Nintendo Switch dropped at midnight on March 3.
Naturally, we got in line, but unlike most fans who went home and played Zelda all night (and called in sick to work this morning), we raced to the Fictiv teardown operating room to bring you this breaking exposé as the newest in our beloved series of Nintendo Teardowns.
The Nintendo Switch system is a major evolution of the Wii platform. It’s both a home console and a handheld mobile device. The system is comprised of:
- Console, a touchscreen tablet
- Switch Dock, a charging station and interface to connect to a TV
- Left & Right JoyCons, controllers reminiscent of the Wii Remote
- JoyCon grip, converts the Left & Right JoyCons to a more classic gamepad controller
- Strap attachments for the JoyCons

+ Psstt, if you love Fictiv Teardowns, be sure to pre-order Teardown Vol 1, a visual collection (in physical book form) of our most popular teardowns:
Nintendo Switch JoyCons
Out of all the things that are new and shiny about the Switch, I’m most excited about these JoyCons. I love their Lego-like modularity, in addition to the many different ways they can be used right out of the box. I’m sure Nintendo has lots of add-on accessories to be unveiled in the coming months—I’m such a sucker for multi-use, convertible products.


Once you remove four #0 Y-tip security screws on the back of the JoyCon, the back enclosure comes right off.

The battery in each of the JoyCons takes up almost the entire width of the controller and has a capacity of 525 mAh. It’s pretty easy to get to this point if you have a Y-tip #0 screwdriver, making DIY battery replacement a breeze.

The JoyCon enclosure is effectively a 3-piece design:
- top enclosure
- bottom enclosure
- sidewall
The sidewall subassembly has the key mechanisms for attaching the JoyCon to the Console, grip, and other accessories. The sheet metal piece constrains a spring-loaded tab responsible for locking the JoyCon to the grip and Console. The flex cable is responsible for communication between the Console and the JoyCon.

The light pipes in the side wall are pretty nifty—four identical light pipes nest into a little black plastic holder that provides masking and separation, and then this whole subassembly nests into the side wall together. This is so much cheaper than co-molded light pipes.

Underneath the SL, SR, and sync buttons, we find small metal dome switches usually reserved for infrequent use.

Here we have the Left JoyCon main PCBA. I was very surprised to find that the conductive-pad style switches used in generations of Nintendo controllers were replaced by metal dome switches. Conductive-pad style switches are virtually undestroyable and perfect for hard core gaming—only time will tell whether this change is a step in the right direction. This will definitely impact button feel as well.
Between the dome switches and the rigid button tops, the elastomer middle layer is still there. However, instead of having a conductive function like the previous generations, these are just for spring back.

The trigger and shoulder switches are now just pushbutton switches. The trigger button uses two compression springs for spring back and as such, the travel distance is significantly reduced compared to older controllers.

The joystick switch is the biggest surprise—it’s lost a lot of weight! The new low profile module is also more dust-proof compared to the older generation.

Thanks to Apple leading the way with its Taptic Engine, everyone seems to be making more investment in high fidelity haptic feedback design. Eccentric rotating mass motors just won’t do anymore!
We found Nintendo’s own version of taptic engine in each JoyCon, called “HD rumble”. Although we didn’t fully open one up, it looks like a linear actuator, but several times larger than what we saw in the Apple watch.

Aside from the Left and Right JoyCons having different functional buttons, the main difference in the Right JoyCon is the added IR camera module and NFC reader/writer.


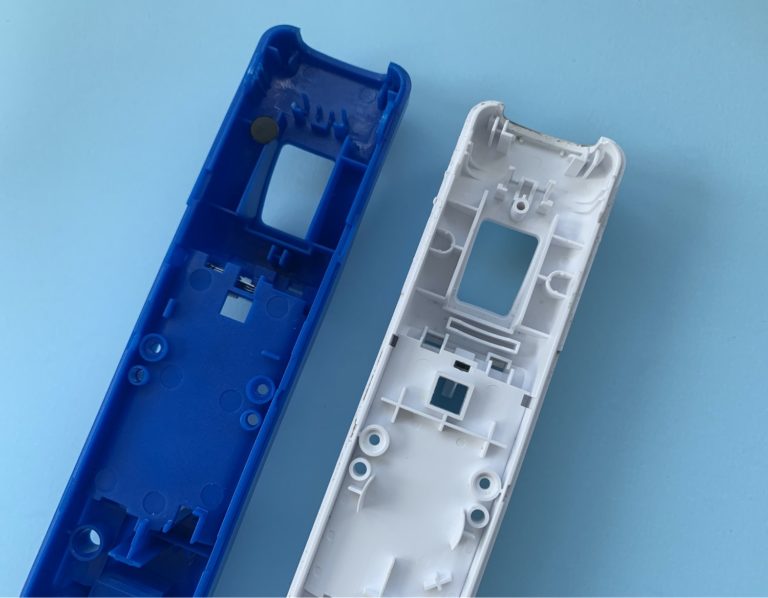
Lastly, let’s take a look at the mechanical enclosures again. They are made of PC-ABS and the walls are pretty stiff for being only 1.1mm thick in most places. Certifications and other markings are printed directly onto the plastic—the exteriors have a smooth matte finish achieved in-mold, but the interiors are unfinished, with the tool marks showing.

The top and bottom enclosures have small alignment features along the lip in lieu of snap fits that we commonly see.

Nintendo Switch Wrist Straps
The wrist strap accessories attach to the JoyCon when they’re used in a Wii remote-like fashion.
We can see weld lines (also known as knit lines or meld lines) on the black plastic housing pieces near the button and light pipe openings. Weld lines are caused by resin having to flow around a core pin (used to form holes). Tuning molding parameters can reduce their appearance, but sometimes they can’t be completely eliminated due to the design of the part and mold. So don’t give yourself a hard time when this happens to you in the future—even Nintendo has to live with this sometimes!
Here are some noteworthy features:
Spring-Like Connection Between Light Pipes
The spring-like connection between the light pipes allows the part to flex a little during assembly. The four individual light pipes have to each insert into a small window, and if it wasn’t for this spring-like design, the assembly would be crazy over-constrained and the tolerance stack up would cause huge headaches.

Wrist Strap Buttons
There are also two buttons on each wrist strap—because the wrist strap covers SL and SR buttons on the JoyCon, these two buttons provide pass-through button pushing. Two lightweight compression springs provide spring back.

Sheet Metal Rail
The U-shaped sheet metal railing mates with grooves on the JoyCon side wall. The sheet metal rail is pretty beefy at 1.1mm wall thickness.


Wrist Strap Lock
There is a small white piece where the nylon wrist cords enter the wrist strap housing. This is a clever lock for the wrist strap. Once you press it in, the wrist strap can’t come out even if you accidentally depress the unlock button.

The JoyCons and wrist straps fit together really well. They slide onto each other easily and once they lock, there’s only a barely noticeable amount of slack. Every mechanical engineer can appreciate how challenging and beautiful this is.
Nintendo Switch JoyCon Grip
Same as the wrist straps, the JoyCon grip is a purely mechanical accessory. It’s very empty. Is anyone surprised about this?
The housing pieces are all made of ABS plastic and the walls are more than twice as thick as the JoyCon housing pieces because space is not a constraint and we have stiffening ribs galore. ABS is cheaper than PC-ABS, but less stiff and impact resistant and in this accessory, we have room to beef up the walls to compensate.
The rails on the grip are similar, but not exactly the same as those found on the wrist straps. I would be more excited if the same railing could be used everywhere…

There are two elastomer bumpers that help constrain the JoyCon in place. This eliminates the need for super tight tolerance between the JoyCon and grip housing profiles.

I get unreasonably excited about cool light pipes. In the grip we have a 90 degree light pipe that turns the side-firing JoyCon indicator lights towards the player.


Nintendo Switch Console
The main Console is a rather heavy touchscreen tablet with attachment rails on the left and right sides. The attachment rails are painted black to blend into the rest of the console. Again, it’s not exactly the same part as the rails found on the wrist straps and the grip.

Before we get into the unit, let’s take a moment to appreciate how pretty these speaker grills are on the back:

However, after we take off the back enclosure, we discover these speaker grills are a big lie. They’re pretty much just stickers and what we see through the grill is just black tape. The speakers are not even located behind these grills. Why???!!!

The back enclosure has very thin walls to minimize the overall thickness of the tablet. There’s no room for stiffening ribs—you can see how much it bends.

The kickstand on the back is also quite thin at only 1.4mm, but it’s made of glass-filled nylon (one of the stiffer plastics used for injection molding). I can imagine the design engineers being given the requirement of not having the kickstand stick out of the back, but it needs to be strong so they had to optimize on material. I’m going to guess that if the kickstand were to fail, the hinge would be the culprit rather than the kickstand itself. The kickstand doubles as a cover for the microSD card slot.

As we venture further inside the Console, it’s clear why the back enclosure doesn’t need to be very stiff. We first remove a sheet metal shield, then the PCBAs come out.


The battery is 4310 mAh, which is undersized compared to the iPad Mini 4 (a tablet of similar screen size), which has a 5124 mAh battery.
Ultimately, all the interior components are fastened to a cast magnesium (AZ91D) skeleton. This gives the Console heft and all the rigidity it needs.

I’m also fascinated by the thermal management features inside the Console—the GPU must get so hot. Here we have some still-gooey thermal paste:

There’s a beefy heat pipe that travels from the main PCBA, past the fan, and terminates at an interesting heat sink, made of laser welded thin gauge sheet metal. The last product we tore down with such serious thermal management was the Ricoh Theta S 360 camera, but this takes the cake by a long shot.


The fan is larger than we expected, but it’s quiet enough when we spin the blades by hand. When we put this back together and play a few games, we’ll see how silent it really is.

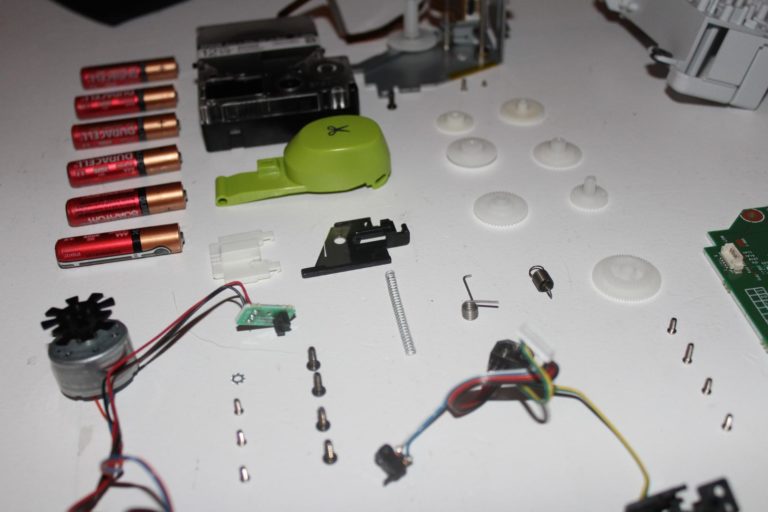
Finally, a look at all the rigid PCBAs.

You’ve probably already seen the full PCBA analysis from that factory leak, so i’ll leave it at that!
Nintendo Switch Dock
The dock is mostly empty space as well. A main PCBA provides a junction between the USB, A/C power, and HDMI. The Console docks into a USB-C connector; I’m happy to see the new standard finally catching on more and more.


The large housing pieces are all ABS plastic, no surprise there!

Main Takeaways
Every generation of Nintendo controllers gets more compact. The JoyCons are packed pretty tight; the new low-profile joystick switch must have been a godsend to help minimize the Z-stack.
It’s also interesting that the grip is mostly empty space. The existence of this very accessory shows that classic gamepad forms are not going anywhere anytime soon. However, the ergonomics are a bit of a compromise, the buttons are not as big, placements are just a bit off, it’ll take some getting used to.
In true Nintendo fashion, we also see evidence of design for assembly considerations everywhere. Even parts that could be installed agnostic of direction are provided with affordances and cues so that assembly can only be done one way. Nintendo engineers don’t do ambiguity.
Overall, I’m impressed (as usual) by Nintendo’s attention to detail—from a mechanical design perspective, it’s a hit. The modularity makes a big statement: this is not a product, it’s a platform.
We can’t wait for the next Nintendo teardown… in 5 years. If you want some more in the meanwhile, check out our other teardowns, and subscribe to the blog so you don’t miss the next one.