Integration with native iOS features and apps has always been one of Workflow’s strong suits. With an update released today, however, the Workflow team is considerably expanding the scope of the app to work with any web API, giving Workflow a virtually infinite feature set that goes beyond iOS alone.
Over the past couple of years, I’ve increasingly switched to web services that offer iOS clients and APIs for automation and cross-service integrations.
Here at MacStories, we pay for Slack, we use Trello for our editorial calendar, and I recently moved back to Todoist and started tracking my time with Toggl. Our articles start as drafts stored in multiple GitHub repositories, I read other websites’ stories with Inoreader, and I rely on Zapier as the glue that brings multiple services together. For both personal and professional usage, I realize that I have largely moved to web services with solid API offerings and native iOS clients in lieu of iOS-only apps that can’t communicate with each other.
This has been a problem for my Workflow experience. Despite the developers’ best efforts with web-based integrations as actions available in the app and the addition of IFTTT triggers, I always felt like I couldn’t get to that higher level of web automation because Workflow couldn’t handle arbitrary API calls to web services. This is changing today with a major update to the app’s ‘Get Contents of URL’ action.
In the latest version, Workflow can now interact with any API through POST and PUT requests with custom headers, which have been rolled into the ‘Get Contents of URL’ action in addition to existing support for GET requests.
For those who are only partially familiar with the terminology, this means that Workflow can communicate with the majority of modern services that come with a web API. If you’ve never worked with web APIs before, it’ll take you a few hours of reading and experiments with dictionaries, token authentications, form requests, and file uploads to get the gist of how it works. But, the Workflow team has managed to make what tends to be a visually unintuitive programming task – assembling dictionaries and structuring JSON – as simple and attractive as possible, abstracting many of the complexities that web developers have to deal with in desktop IDEs and command-line tools.
As usual, workflows speak louder than words. I have been able to play around with Workflow’s new version for the past week, and I’ve put together some examples to give you an idea of what can be built with Workflow and web APIs on iOS.
Toggl
I’ve been tracking my work hours with Toggl for the past couple of weeks. I’m not doing this for billable purposes – I don’t pay myself by the hour – but to understand where my time is going, calculate my personal ROI, and find patterns and bad habits I can optimize.
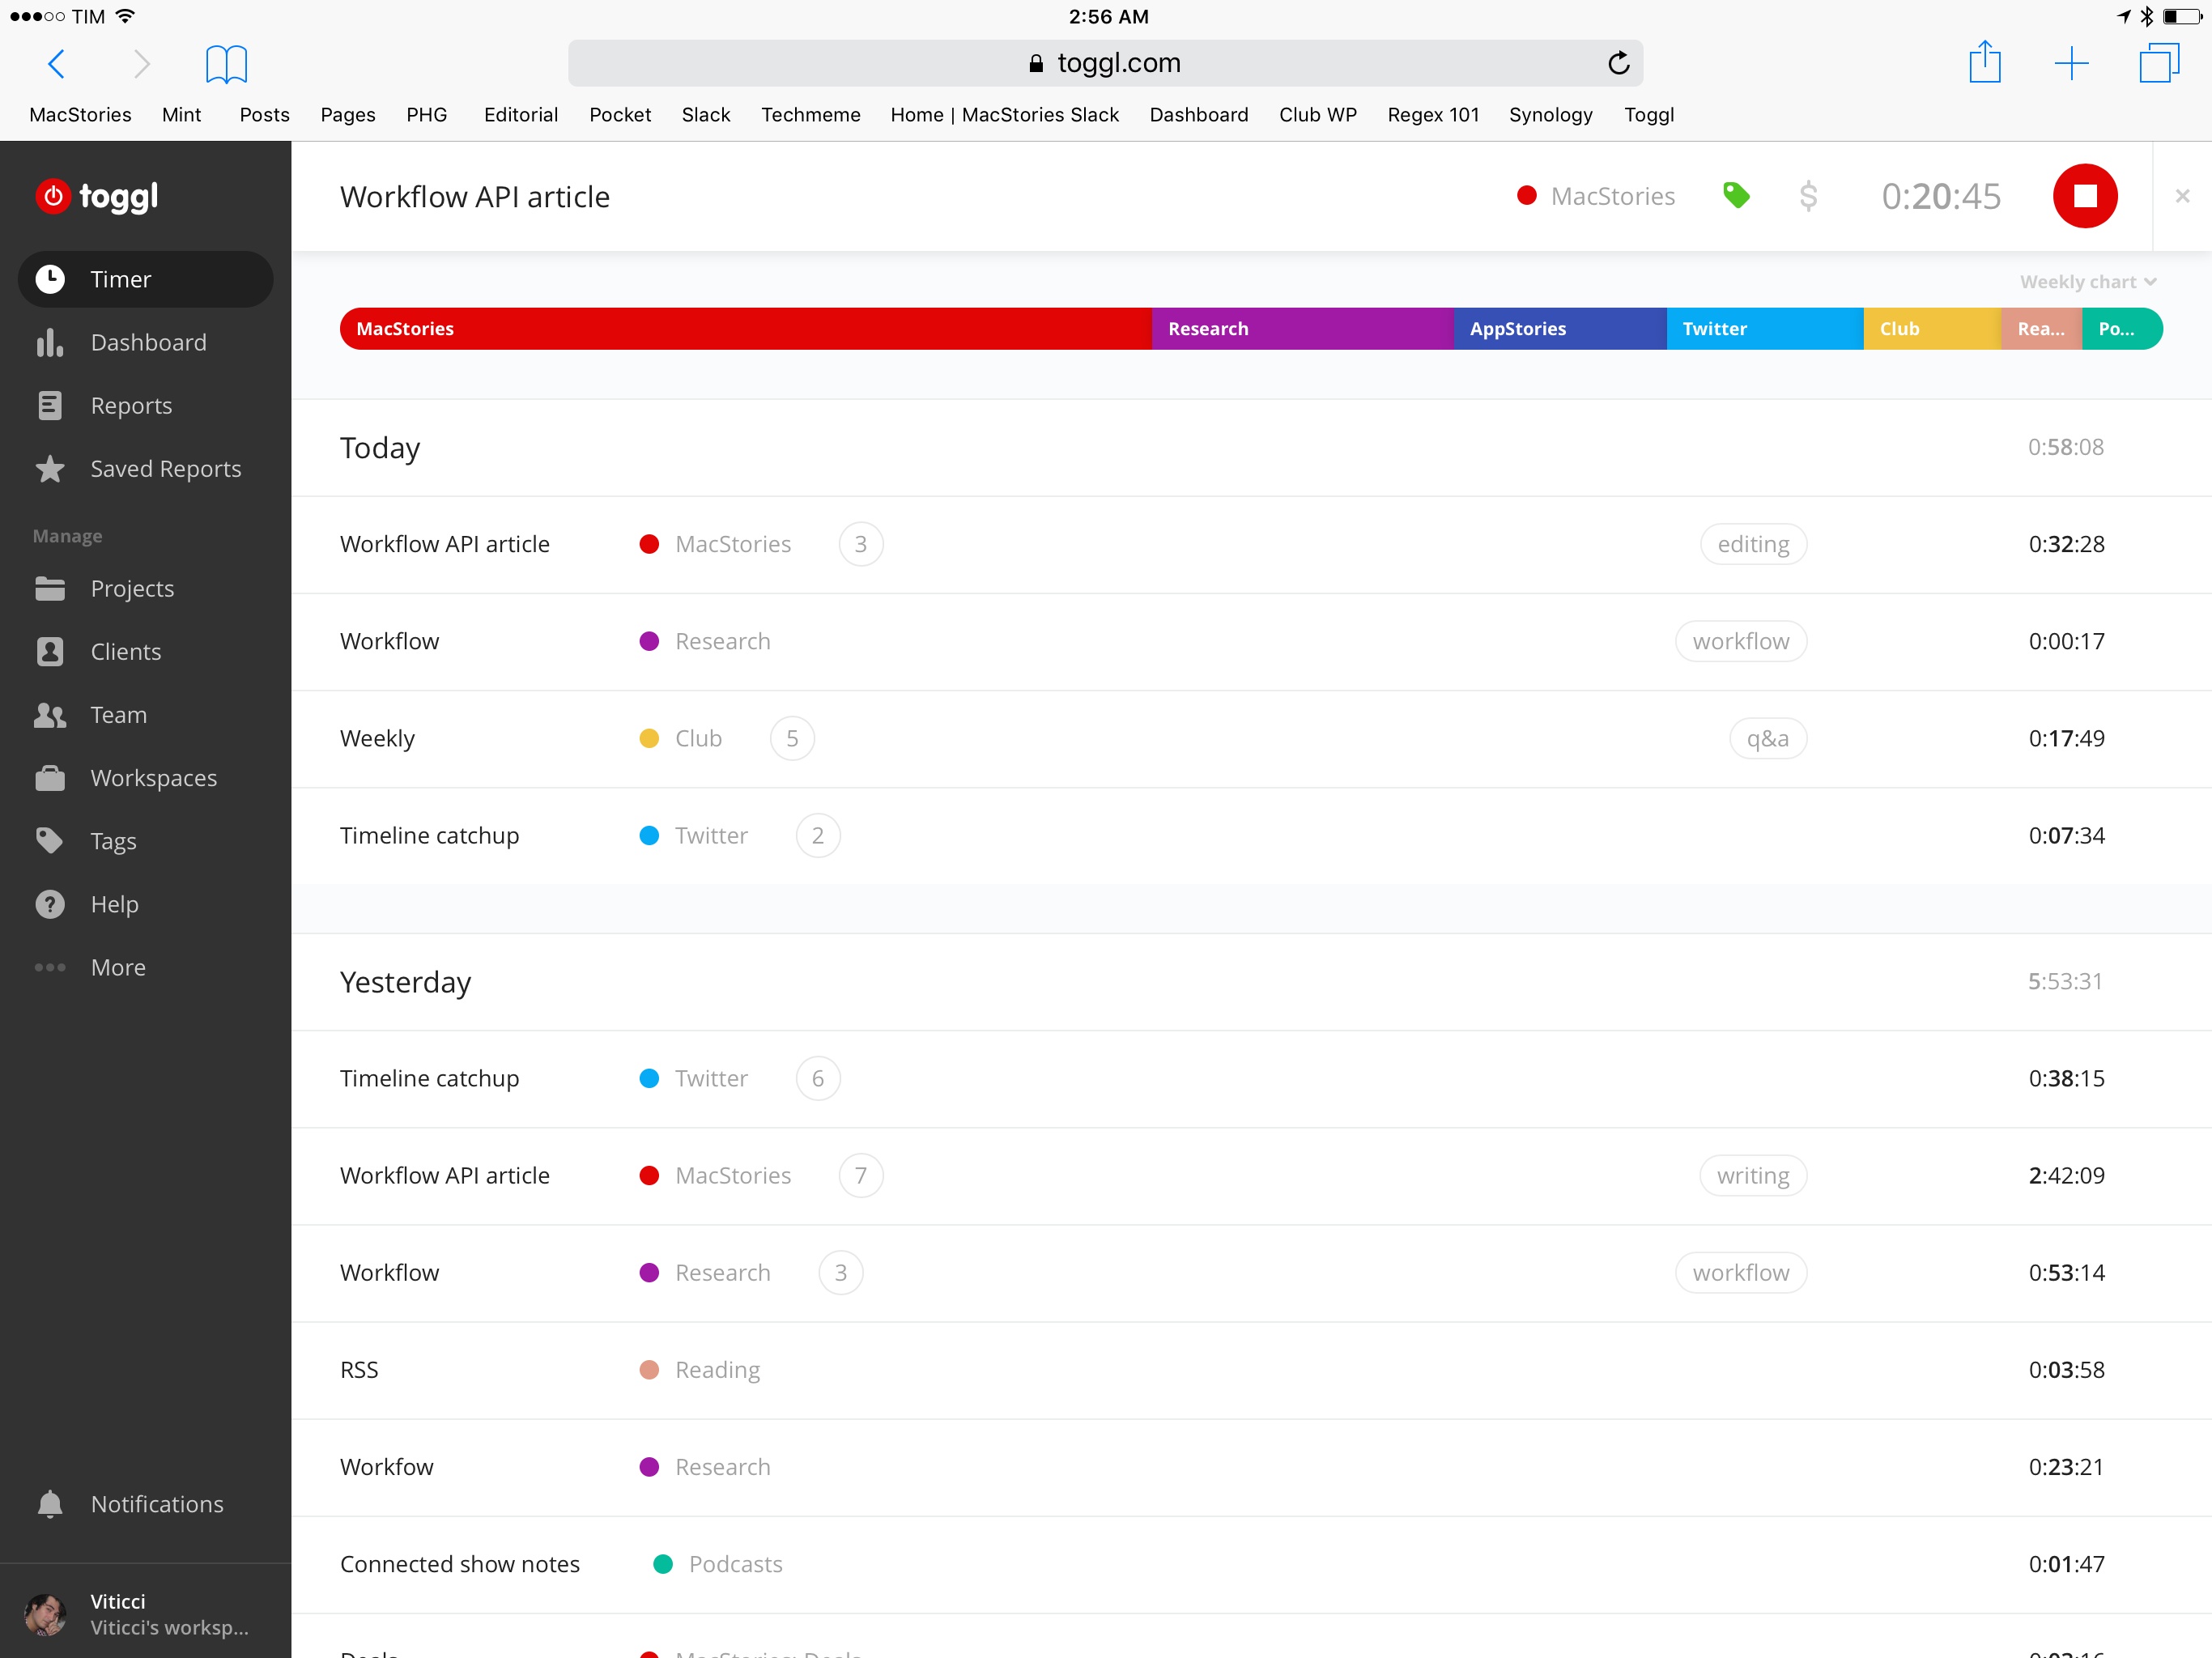
Unfortunately, Toggl doesn’t have an iPad app and their iPhone app isn’t great. I wanted an easy way to get details of the currently running timer, plus shortcuts to restart often-used timers, giving them a description, a project, and a tag.
With Workflow’s new API features, I was able to achieve this in two separate workflows.
Please note: You’ll need a Toggl API token to use the following workflows with your Toggl account. You can find it in your account’s preferences.
Get Details of Running Timer or Stop One
The first workflow, which I primarily trigger as a widget, lets me see what the current timer is and for how long it’s been running, with a button to stop it. This workflow has been a fantastic enhancement to my daily routine as it helps me jump from timer to timer and check how long I’ve been writing or researching a topic.
To get details of running timers, the workflow calls the Toggl API with GET requests. The basic step of an API call in Workflow is relatively straightforward: all you need is the URL endpoint in a ‘URL’ action that gets passed to ‘Get Contents of URL’. In the second action, you can specify the method (GET, POST, or PUT) and attach headers or a request body.
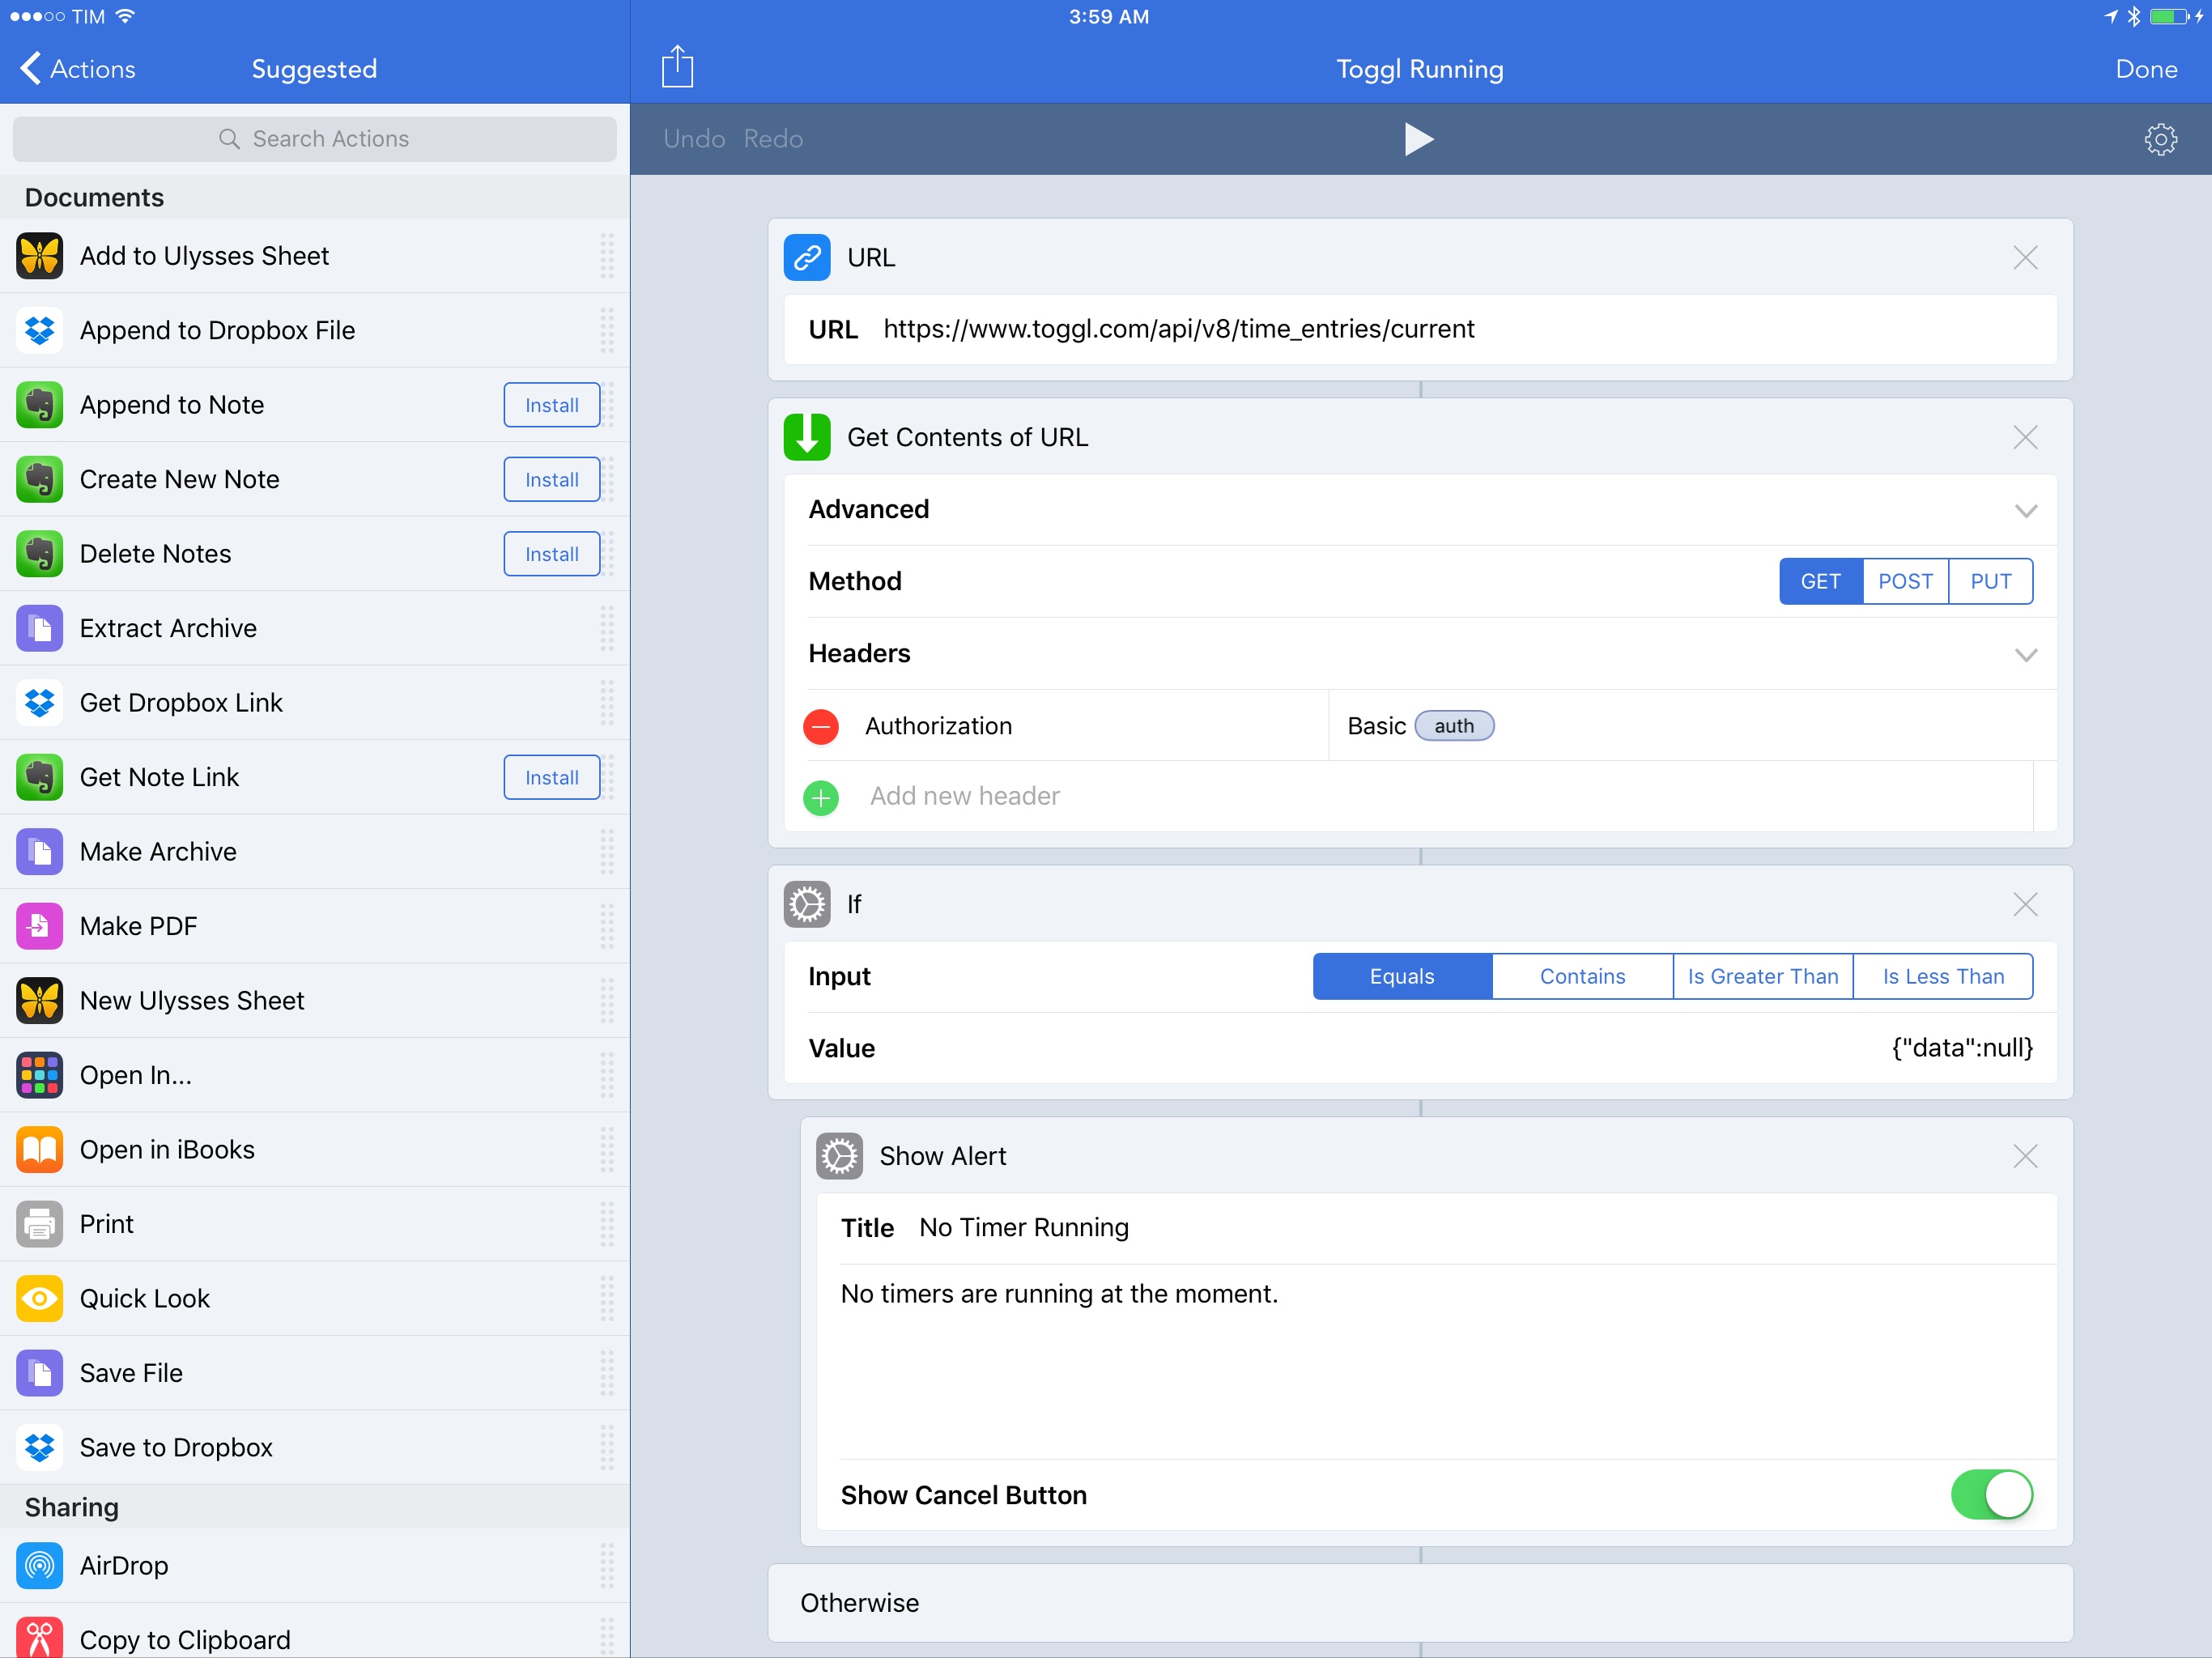
The workflow starts by encoding my Toggl login credentials in Base64, as required by the Toggl API. Then, using a standard Authorization: Basic header, Workflow authenticates with my Toggl account and returns a dictionary with information about the currently running timer.
A dictionary is made of key-value pairs. Workflow has been updated with new scripting actions to create dictionaries, set the value of a dictionary, and, more importantly, get details of a dictionary passed as input. Using the ‘Get Dictionary Value’ action, we can get a specific value from a dictionary by entering the associated key.1
The workflow then proceeds to extract various bits of information from the dictionary returned by Toggl (if a timer is running; otherwise, the dictionary will be empty). The timer’s description is saved to a variable; the duration is calculated by doing some math with the Unix Epoch time and the current date and time; the project’s name is fetched with another API call using the project’s ID as a parameter.
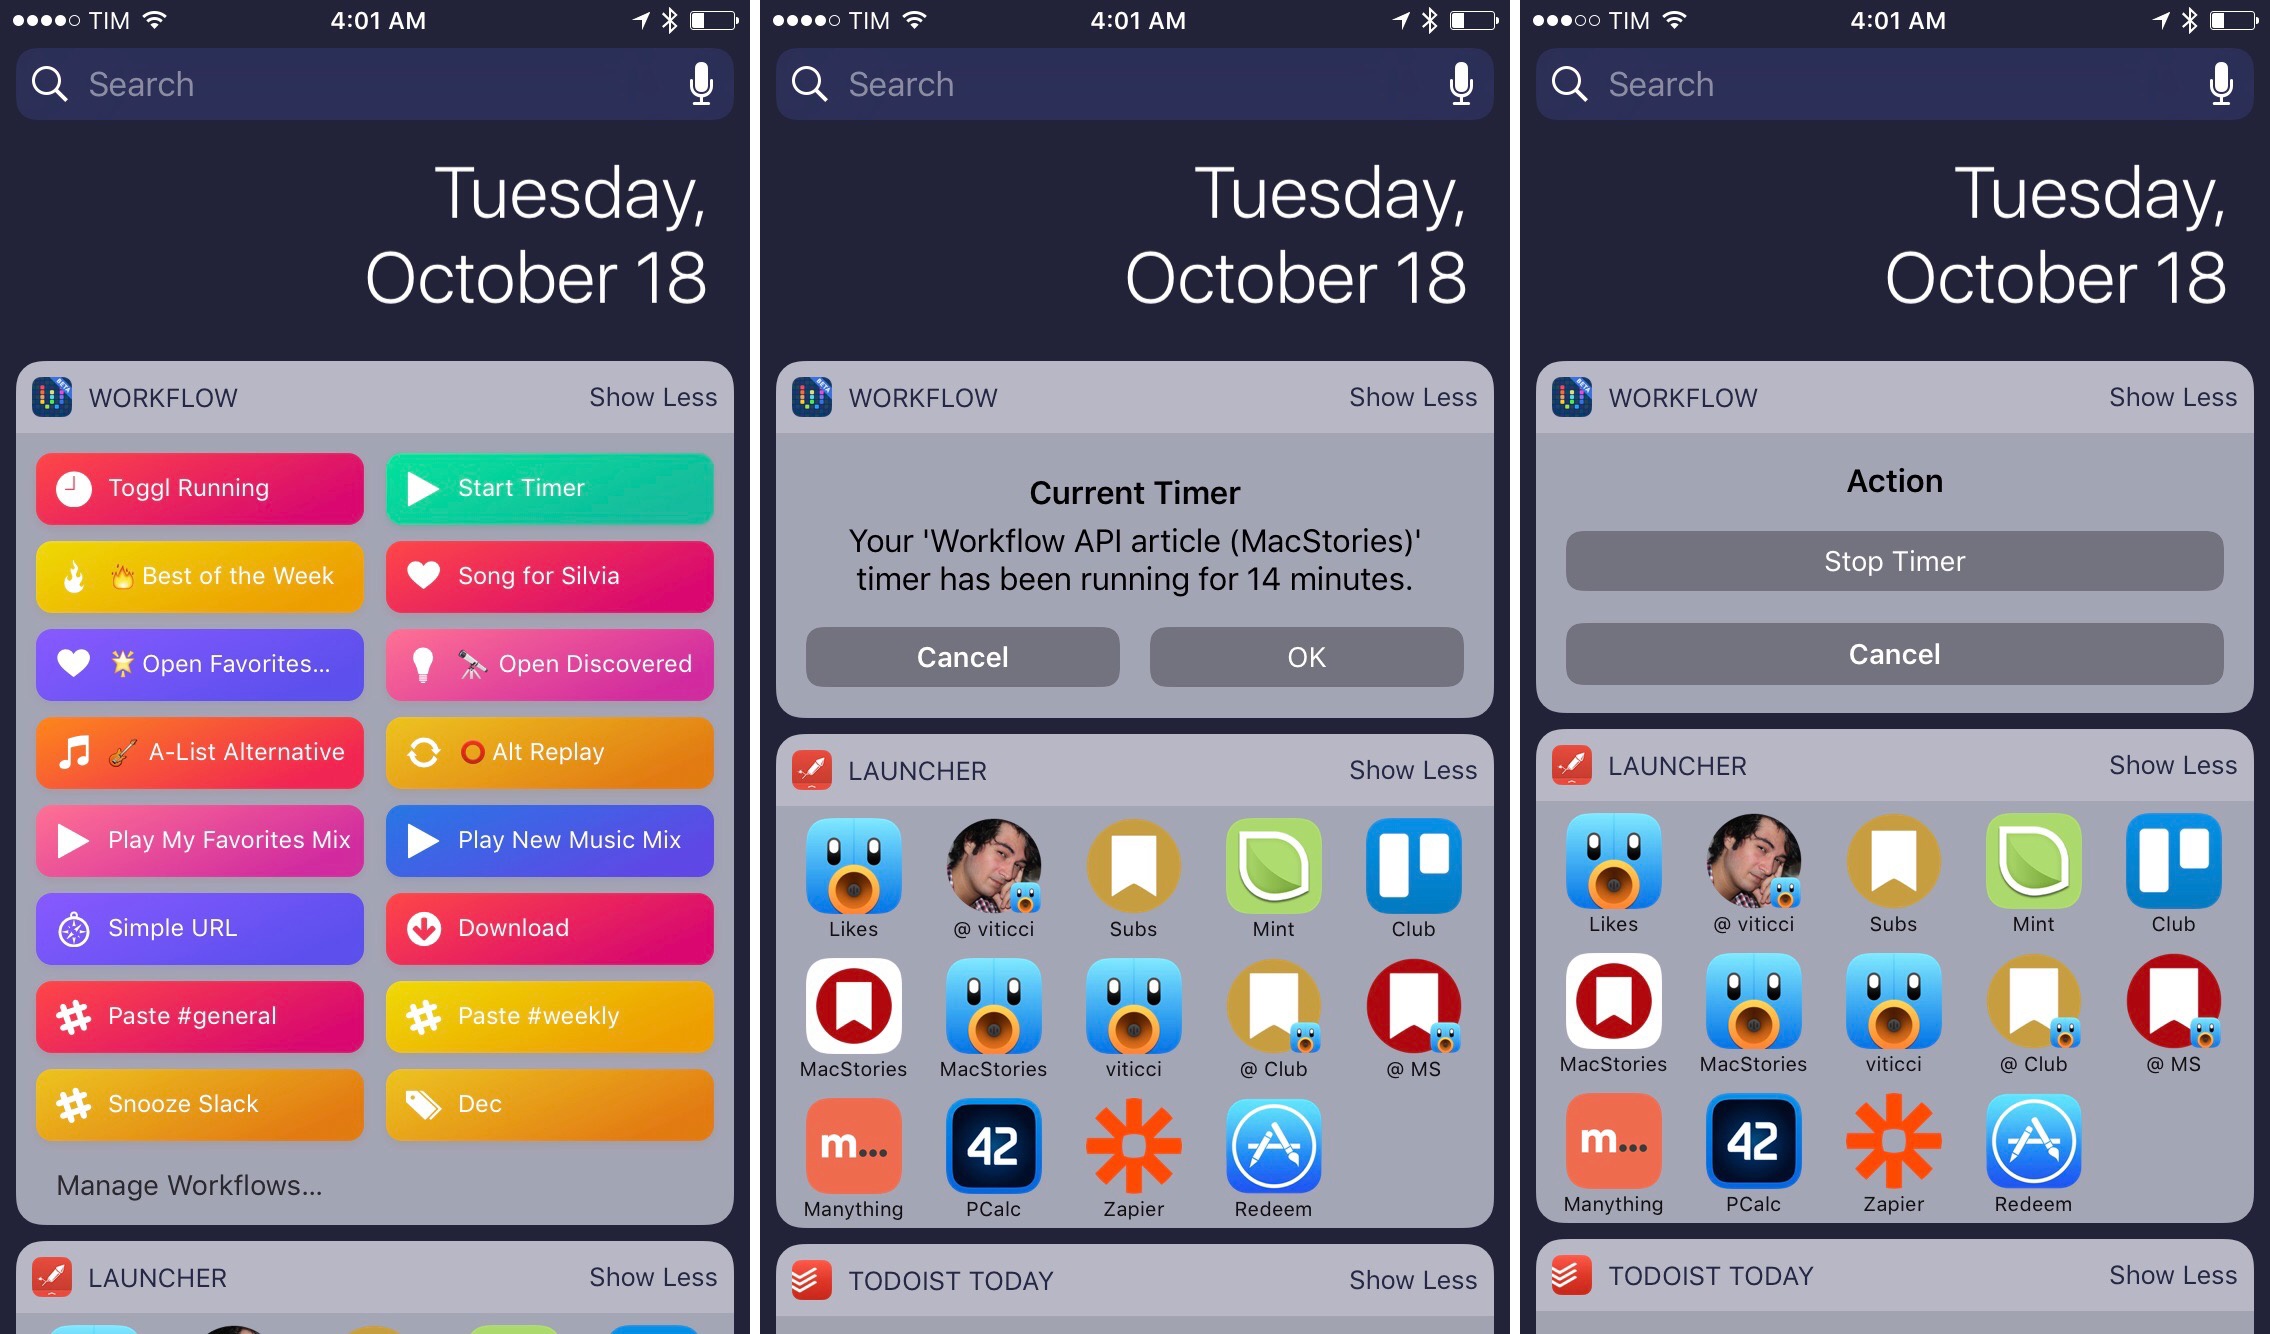
At the end, the workflow displays a message with details about a running timer and it asks to stop it. Stopping a timer is a PUT request, which also shows an alert – both in the Workflow app and the widget.
I’ve been using this workflow several times a day, and it’s an effective example of what can be accomplished with APIs in Workflow and minimal knowledge of programming languages.
Getting details of a Toggl timer with Workflow.Replay
You can get the workflow here.
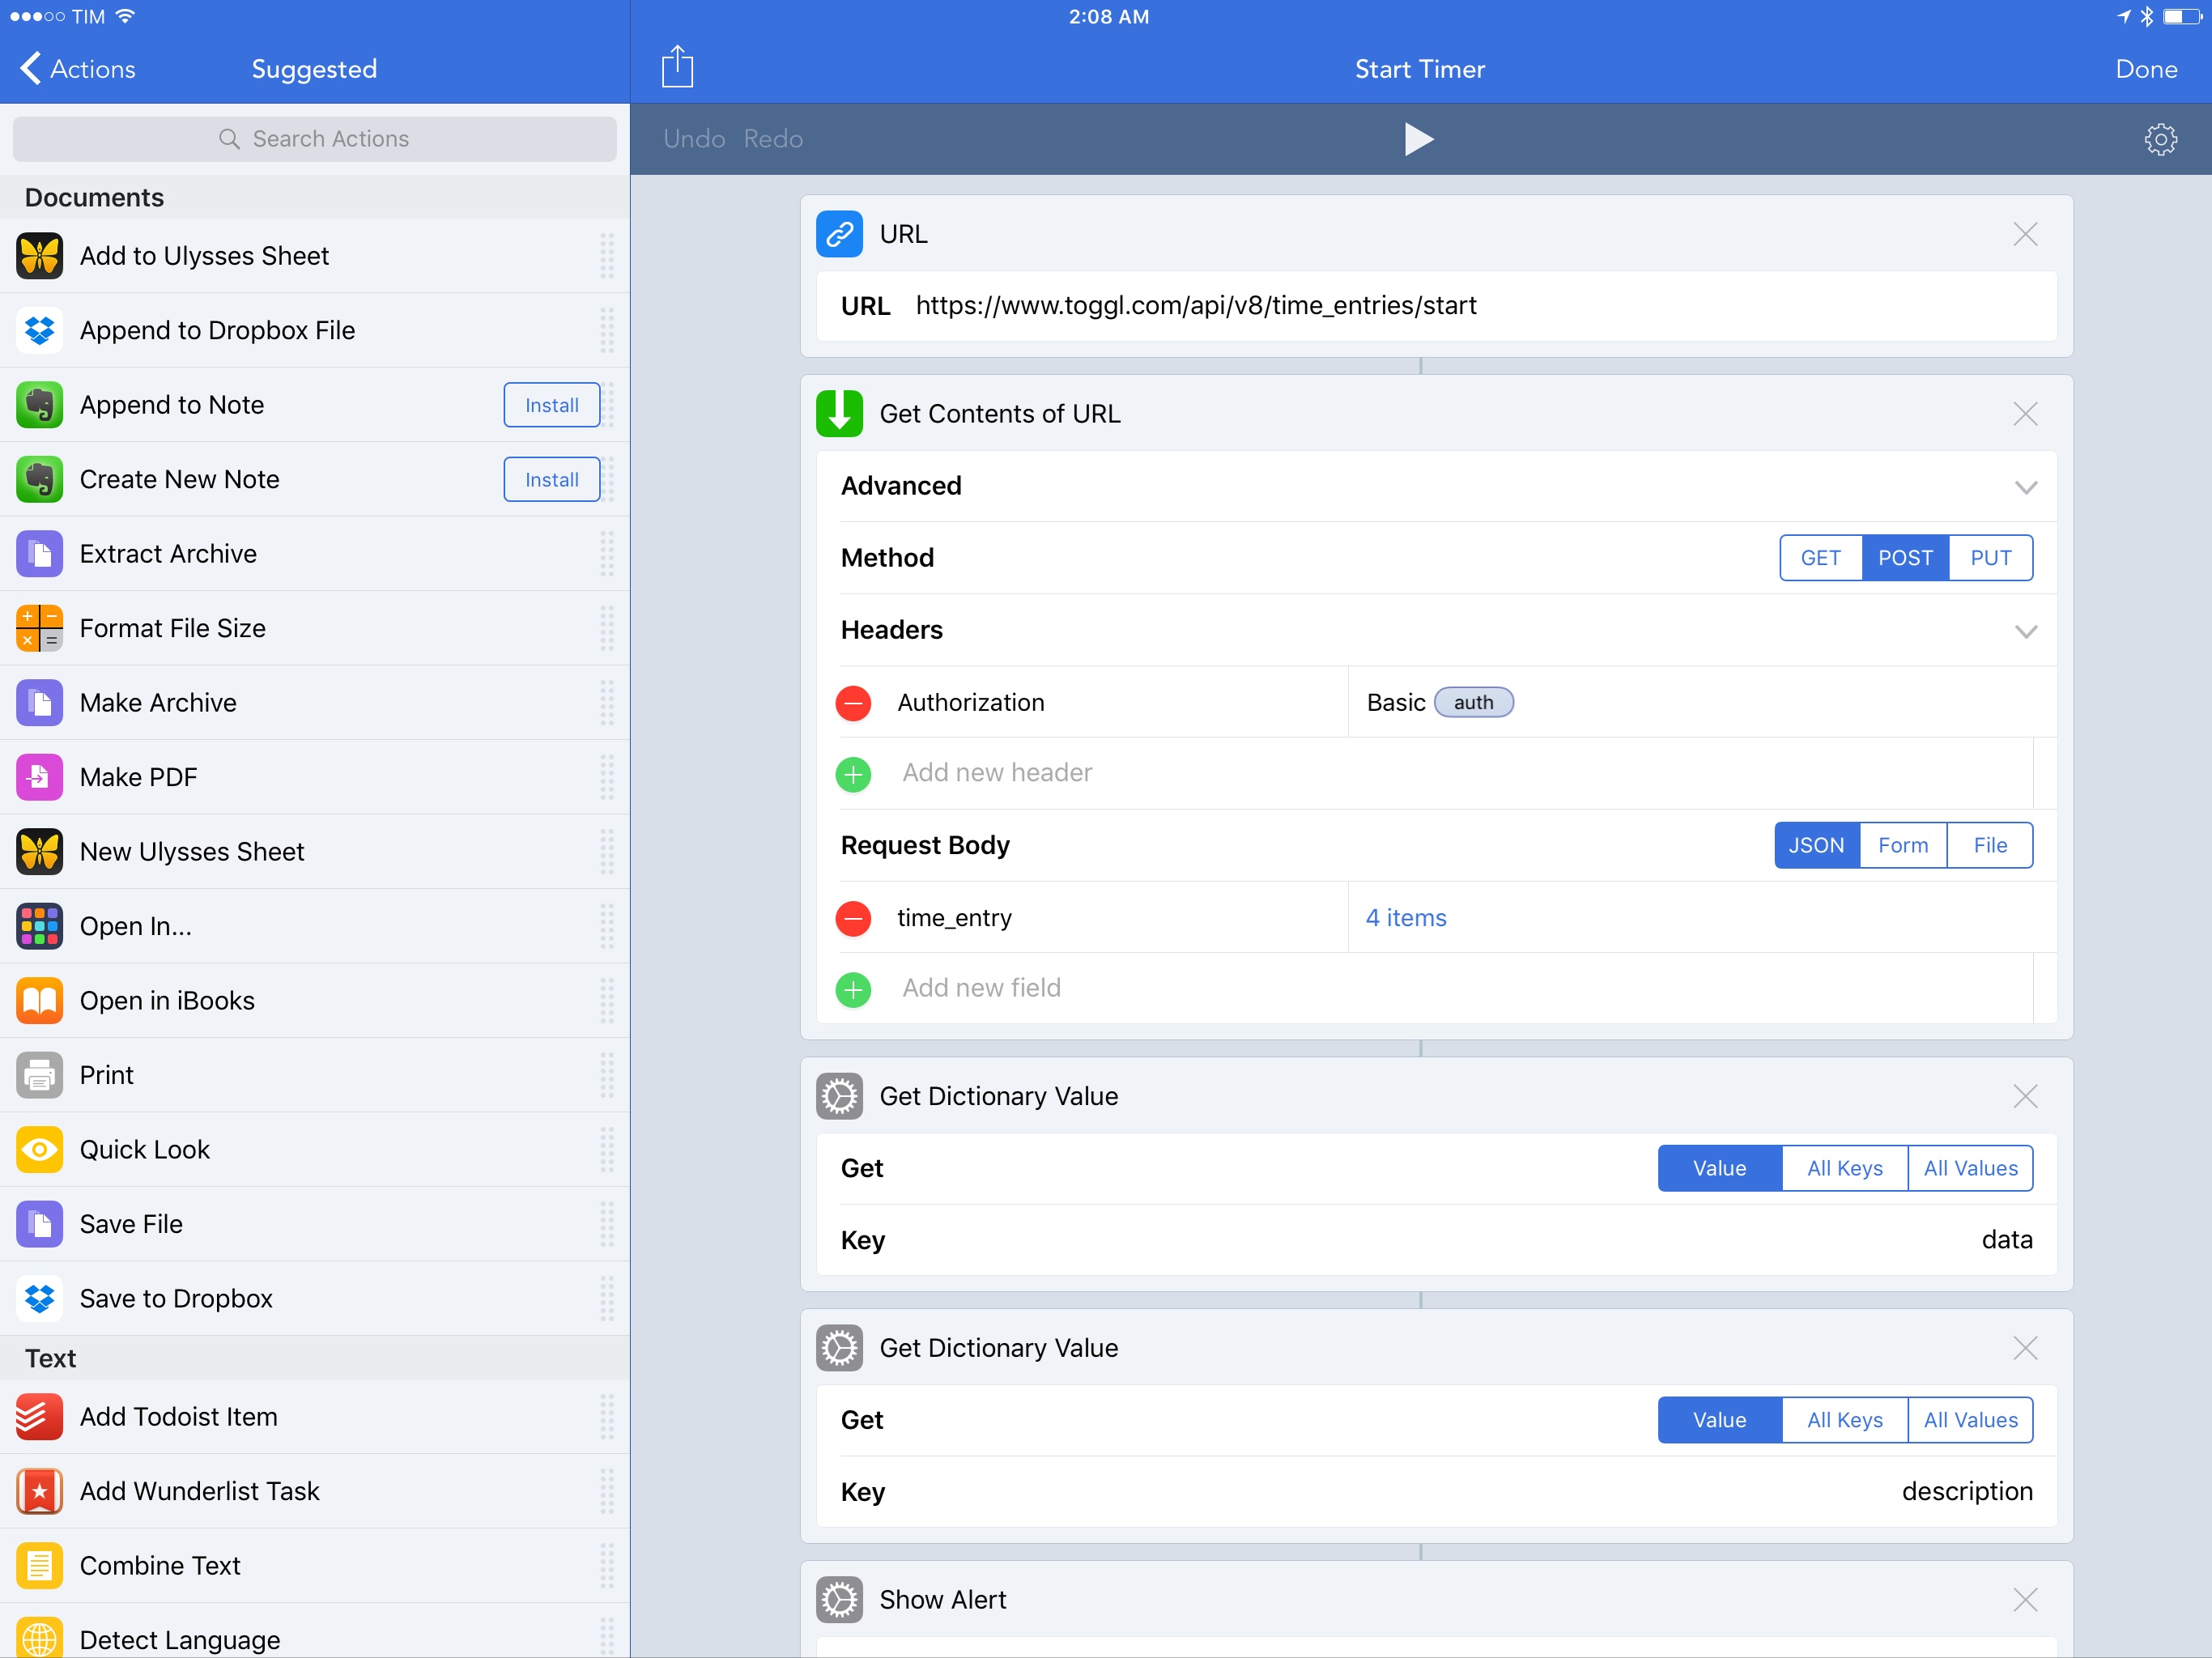
Start New Timer
The second Toggl workflow I created lets me start new timers with templates quickly. This removes much of the friction inherently involved with time tracking, and it’s a great companion to the Toggl website (which I use on the iPad) and iPhone app.
The workflow starts by authenticating with Toggl through a GET request and fetching my account data. This is a necessary step to return live data for each Toggl user instead of hardcoding project/tag names and IDs into the workflow.
If a timer isn’t already running, the workflow brings up a list of common activities I usually track with Toggl. I had to manually assemble this list as the Toggl API doesn’t expose frequently used descriptions (at least not through a specific call), and I found it easier to curate the activities I track myself.
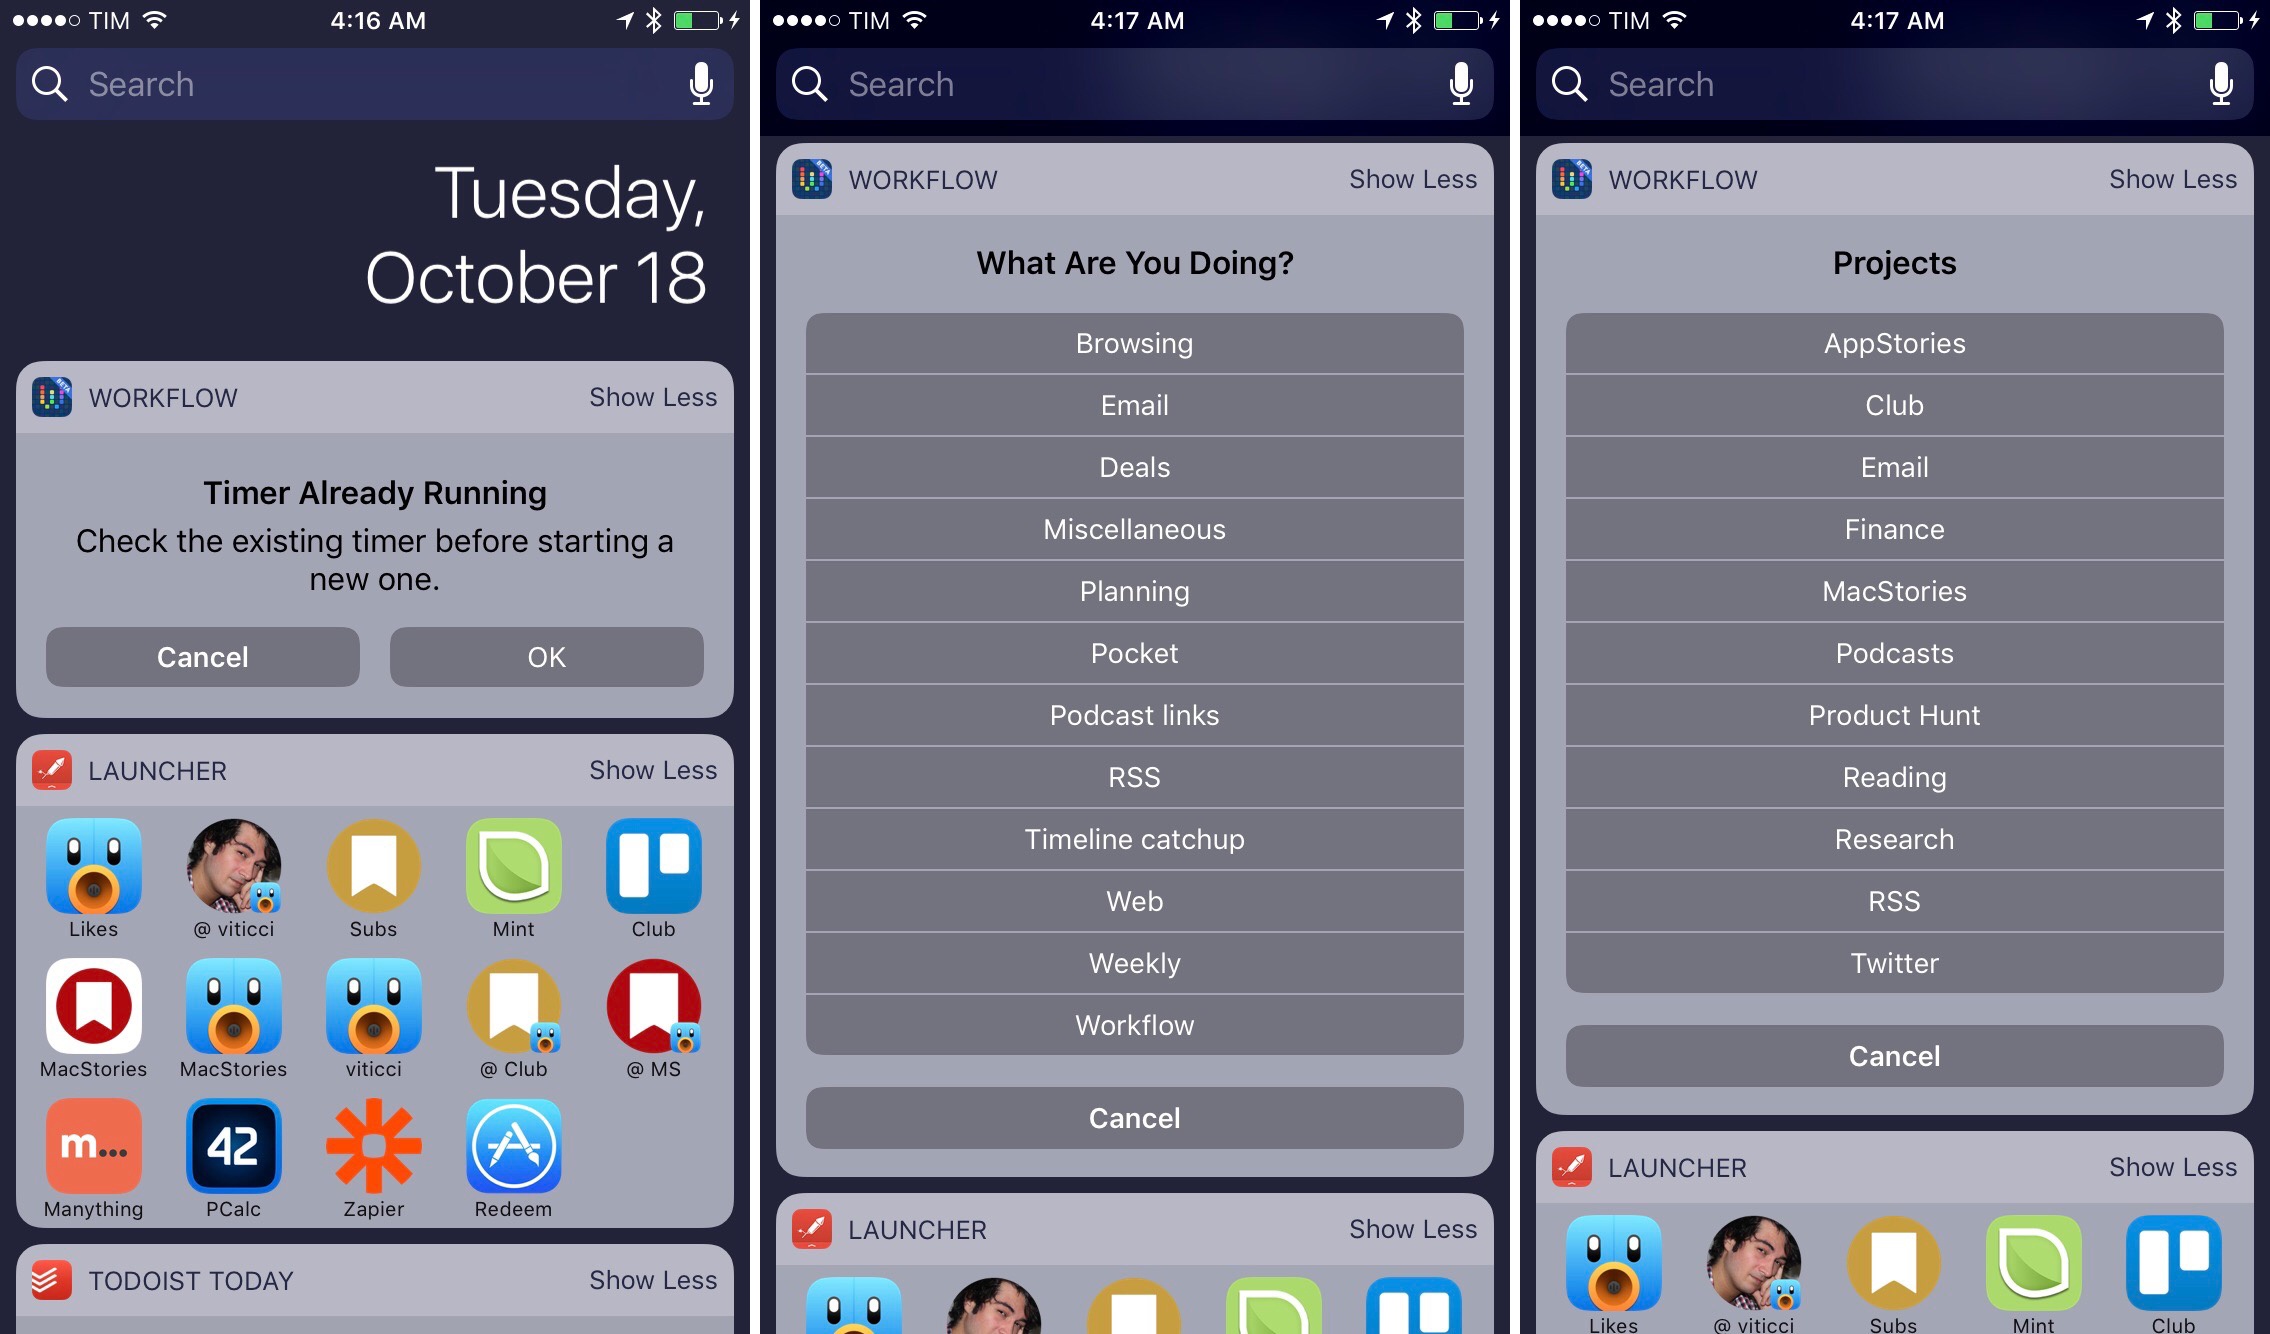
On the surface, the workflow is simple and can be run in seconds. First, it asks you “What Are You Doing?”; then, it brings up a list of projects, tags, and, finally, it starts a new timer. It’s a pleasure to use, especially from the Lock screen of my iPhone: as soon as I run it, I can see changes reflected on the Toggl website on my iPad, confirming that a timer has started running.
There are some interesting decisions I made behind the scenes. For projects and tags, I had to save their names and IDs into separate variables: with a first variable, I display the names in a list; then, a multiline regular expression isolates IDs that were previously paired to their respective project names in a repeat loop. It’s pretty neat, and it works well.
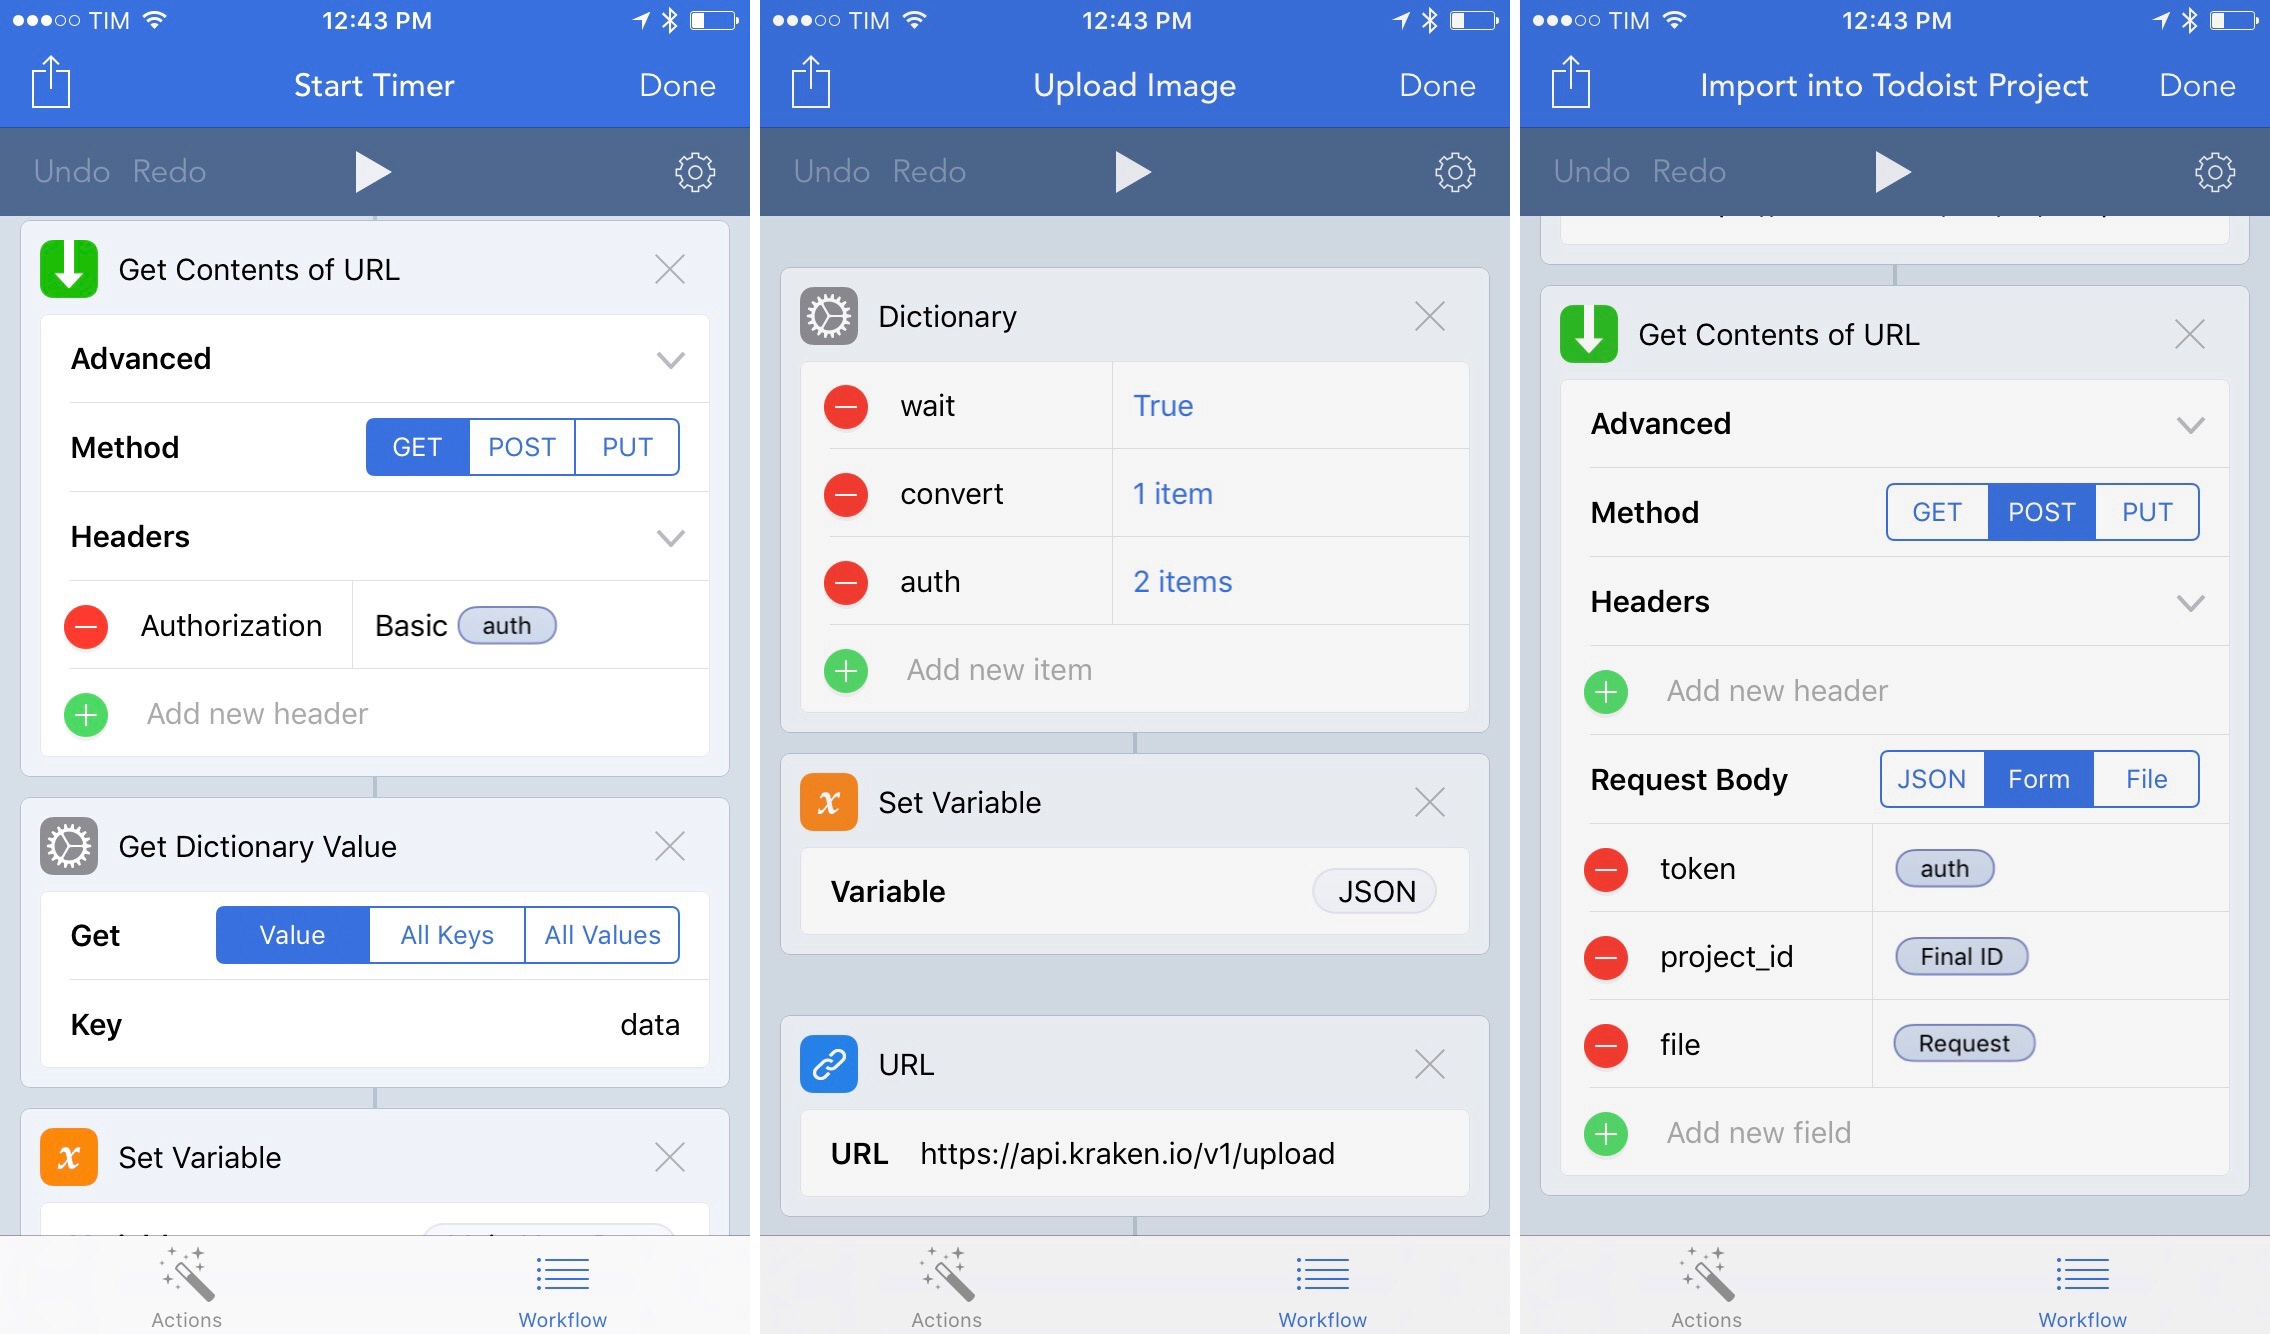
I’d also like to point out the final API call – the POST request to start a timer. This action contains a JSON request body made of a time_entry dictionary. The dictionary includes four items: a description (previously saved as a variable), the project ID (captured via regex), a ‘Workflow’ text string that indicates which app started the timer, and an array of tags.
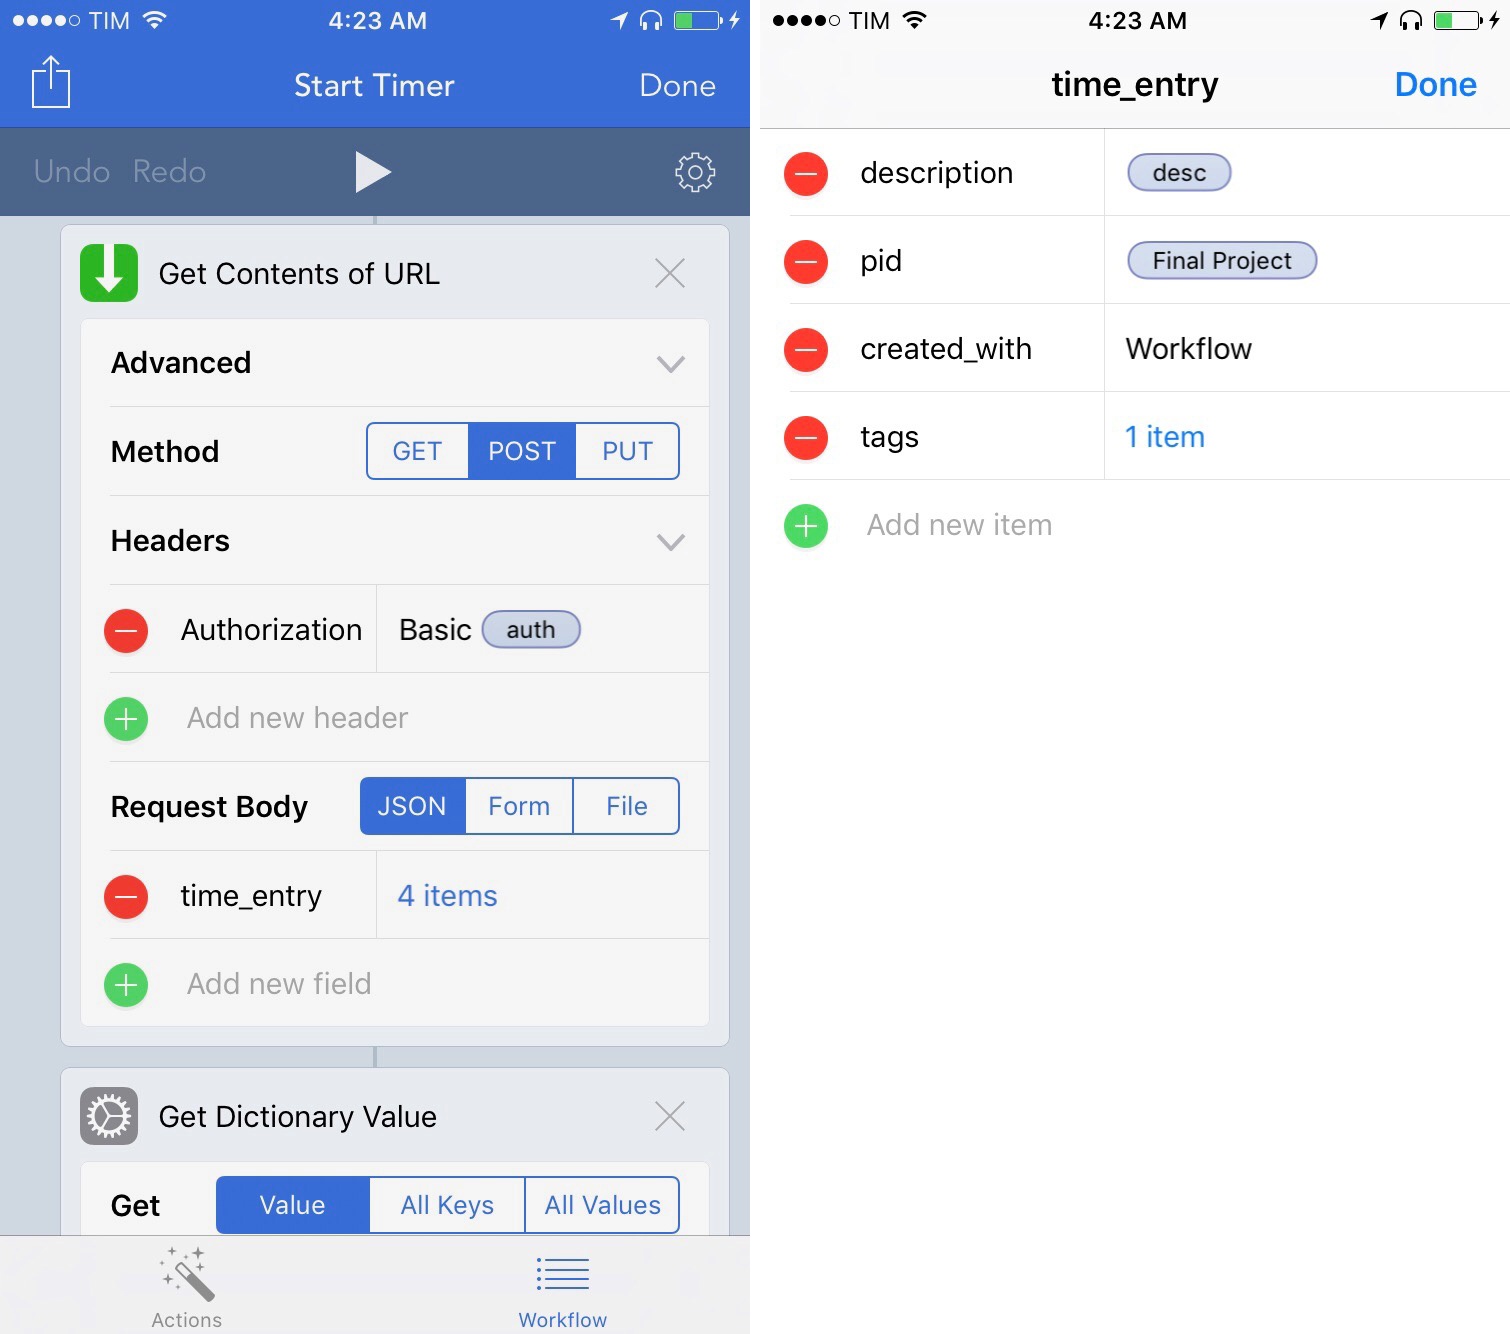
Normally, assembling such a request body would require paying attention to a precise syntax; with Workflow, it’s all done visually with the aid of variables.
Starting a new Toggl timer with Workflow.Replay
You can get the workflow here.
Todoist
As I mentioned on a past episode of Canvas, I switched back to Todoist as my task manager, largely because of its excellent integrations with other services.
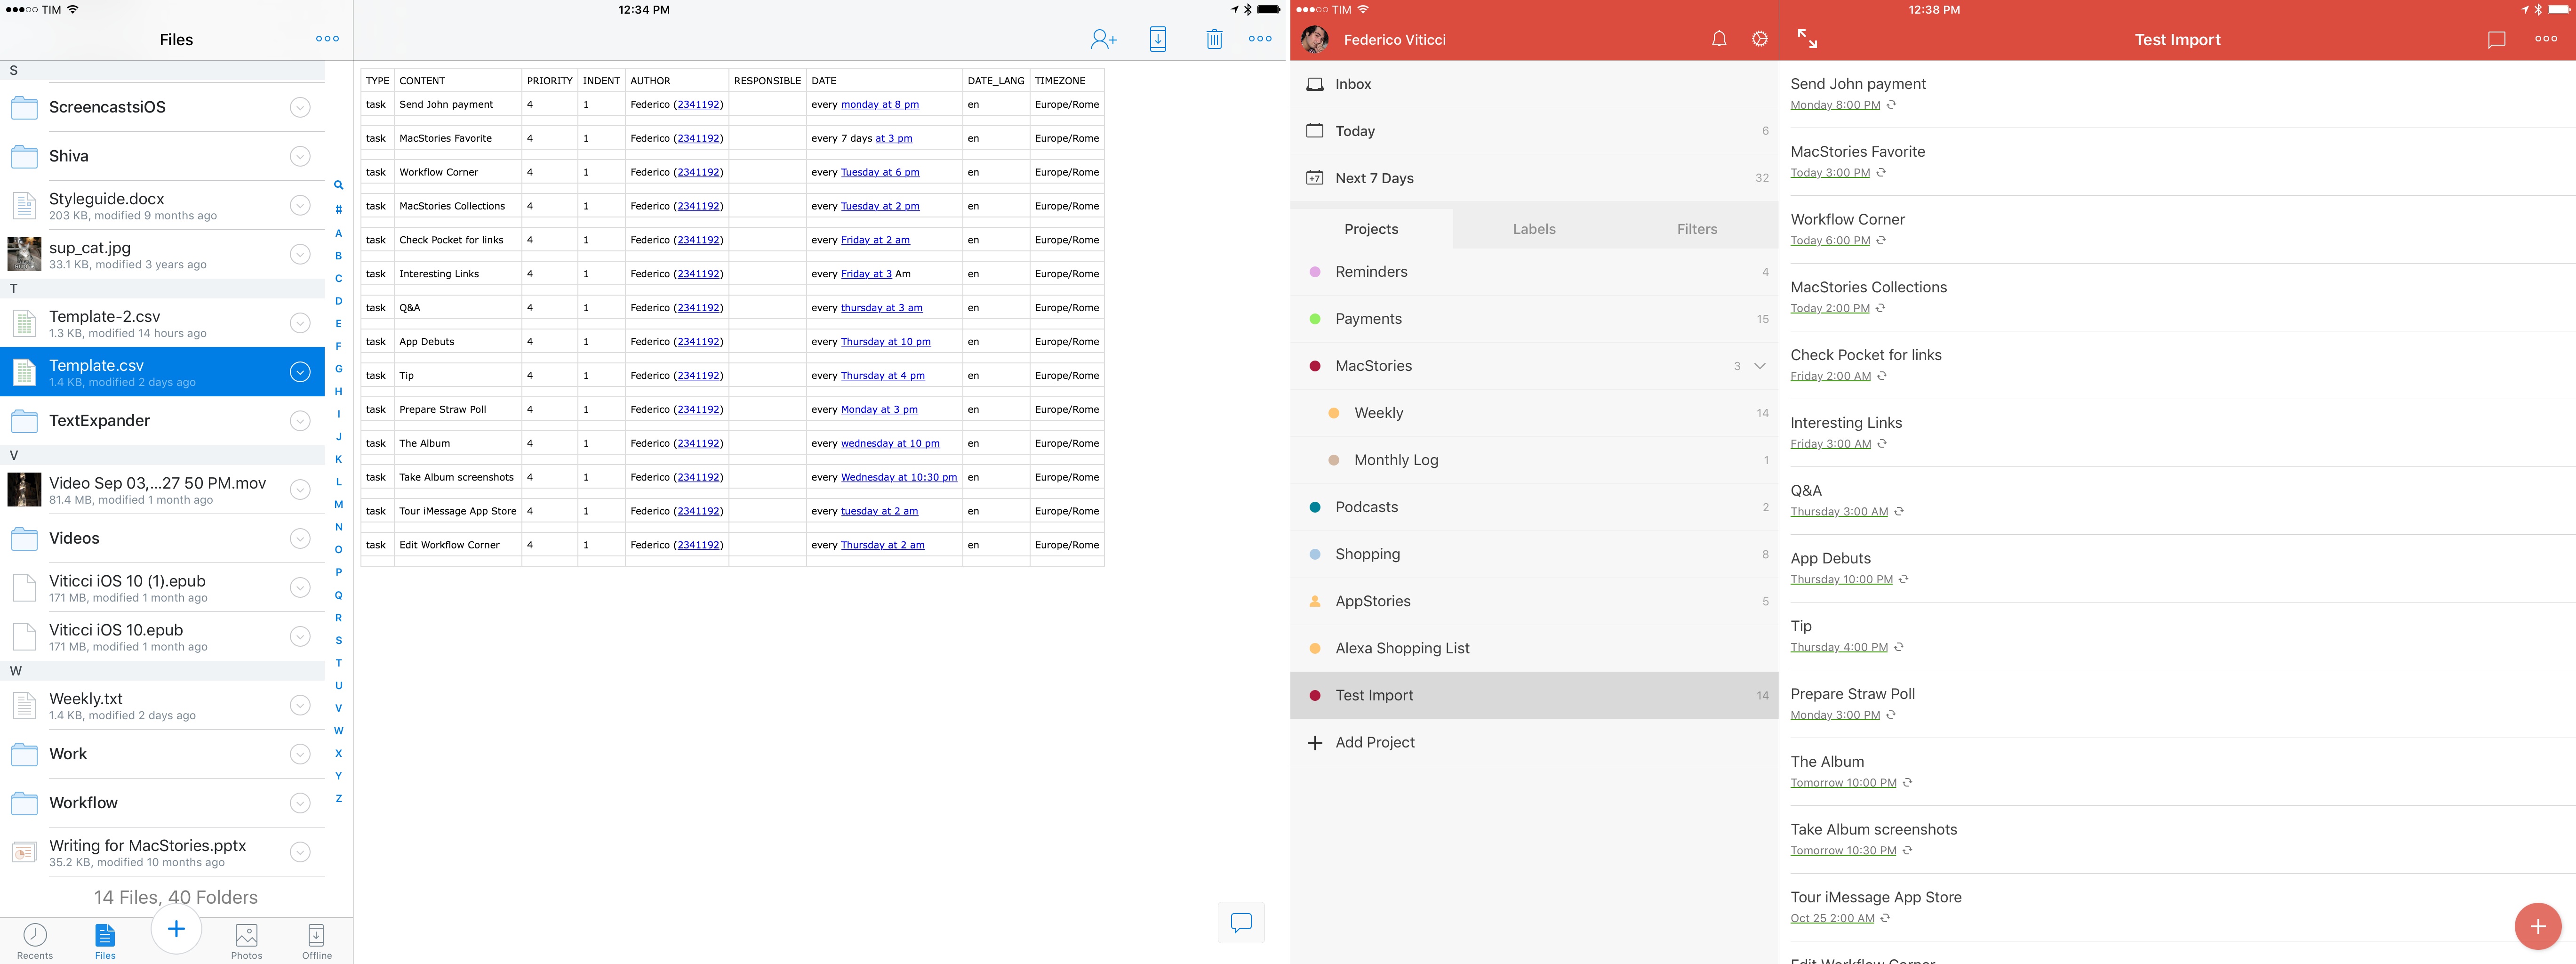
One of the most useful, albeit least known, features of Todoist, however, is the ability to export a project as a CSV template and later re-import it as a template into an existing project. This can be particularly handy to re-import travel lists, todo lists for annual projects, or checklists you don’t always want to be visible in your Todoist.
Downloading a file from an API, saving it, and uploading it sounded like a perfect job for Workflow.
Please Note: To use the Todoist API, you’ll need to create an app here and copy its Test Token, which is scoped to your own account.
Export Project as Template
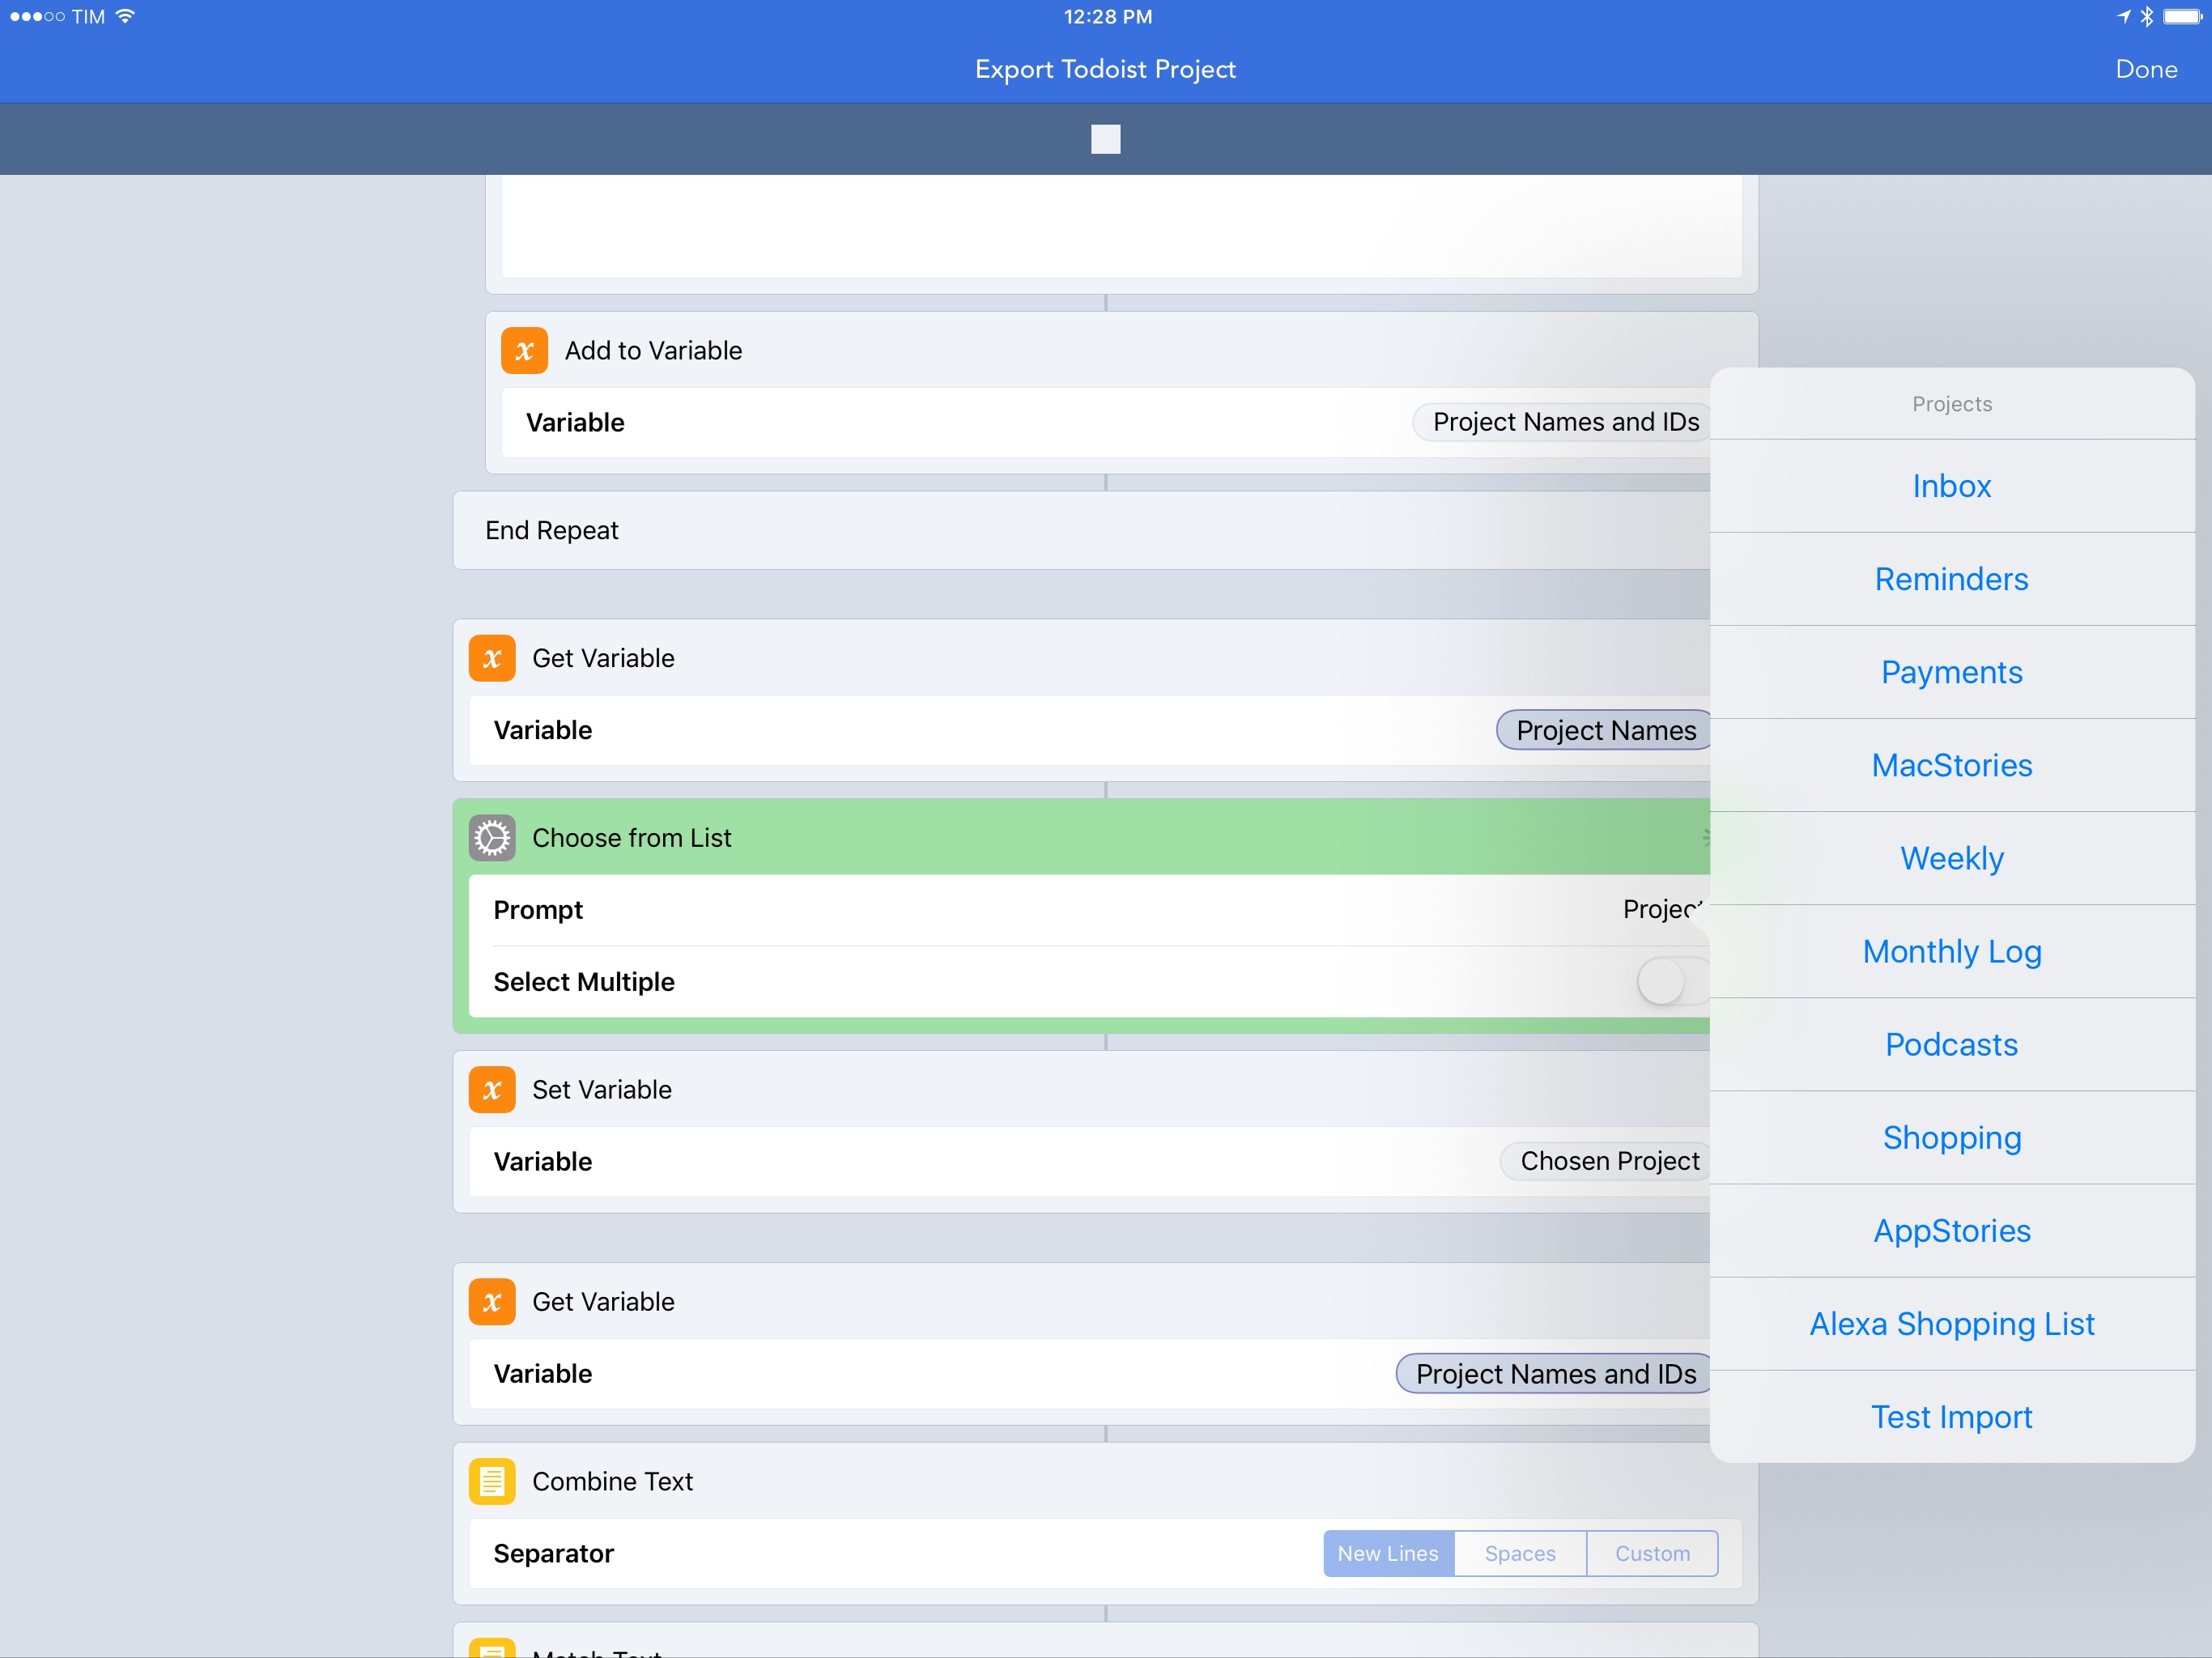
To export a project from Todoist, the workflow first needs to authenticate into an account and return all of its resource types as a dictionary. A ‘Get Dictionary Value’ action extracts the user’s projects, which are then saved, presented, and filtered using the same logic of the Toggl workflows. The final result is a project ID that gets passed to the request body of a POST request.
After downloading the file from the Todoist API, Workflow assigns it a name and extension with a ‘Set Name’ action, and then passes it to iOS’ Open In menu so you can save it elsewhere. Personally, I’ve been saving CSV templates for projects I may need in the future in my Dropbox account.
You can get the workflow here.
Import Template into Project
With a project template saved in Dropbox, a second workflow follows the same path of the first one to fetch projects and pick one to import the template into. Once the project has been picked and its ID saved into a variable, a POST request uploads the CSV file to Todoist, turning it into a series of tasks inserted into the chosen project.
A note on the POST request: Todoist requires a multi-part Form body that contains both text and file fields. Make sure to select ‘File’ when you’re attaching a variable to a field that requires uploading a file to an API; passing a file variable to text-type field will result in an error.
You can get the workflow here.
Slack
Slack has replaced iMessage and email for team communication at MacStories, but sometimes the influx of notifications can be overwhelming. Slack has a Do Not Disturb mode to snooze notifications, but, unfortunately, it takes too many taps to enable it.
With Workflow and its deeper API support, I created a faster way to snooze Slack notifications with two taps from anywhere on iOS.
Please note: You’ll need to generate test tokens for the Slack Web API for each of the teams you want to interact with.
Snooze Notifications
With this workflow, you’ll be able to snooze Slack notifications from a widget without ever needing to open the Slack app itself.2
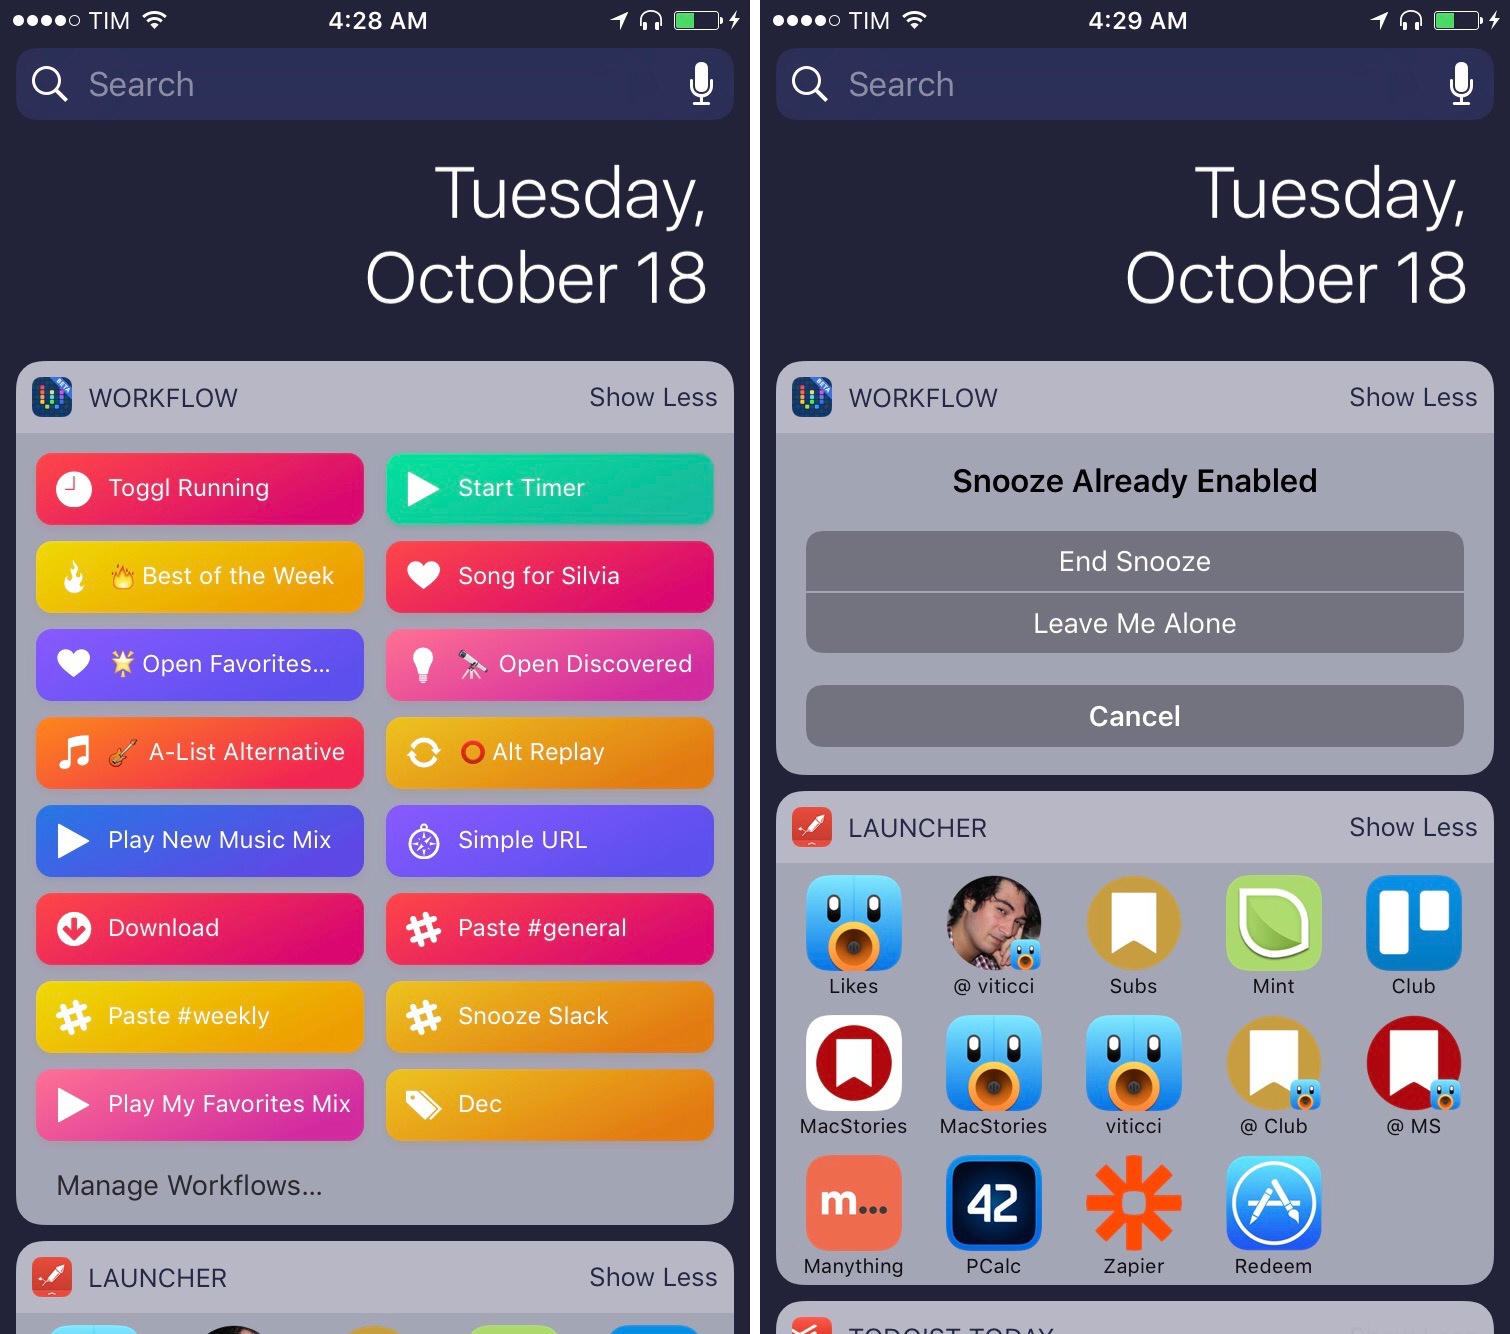
The workflow starts by checking whether snooze is currently active for the selected Slack team. If it is, it’ll let you stop it (resuming notifications) or leave it on. You can test this by opening Slack on one device and stopping snooze with Workflow on a second device; the change will be reflected in real time on Slack.
If snooze isn’t enabled, Workflow can turn it on for you with a POST request. The API requires a number of minutes to activate snooze; I included a template as a List action, which you can modify as needed.
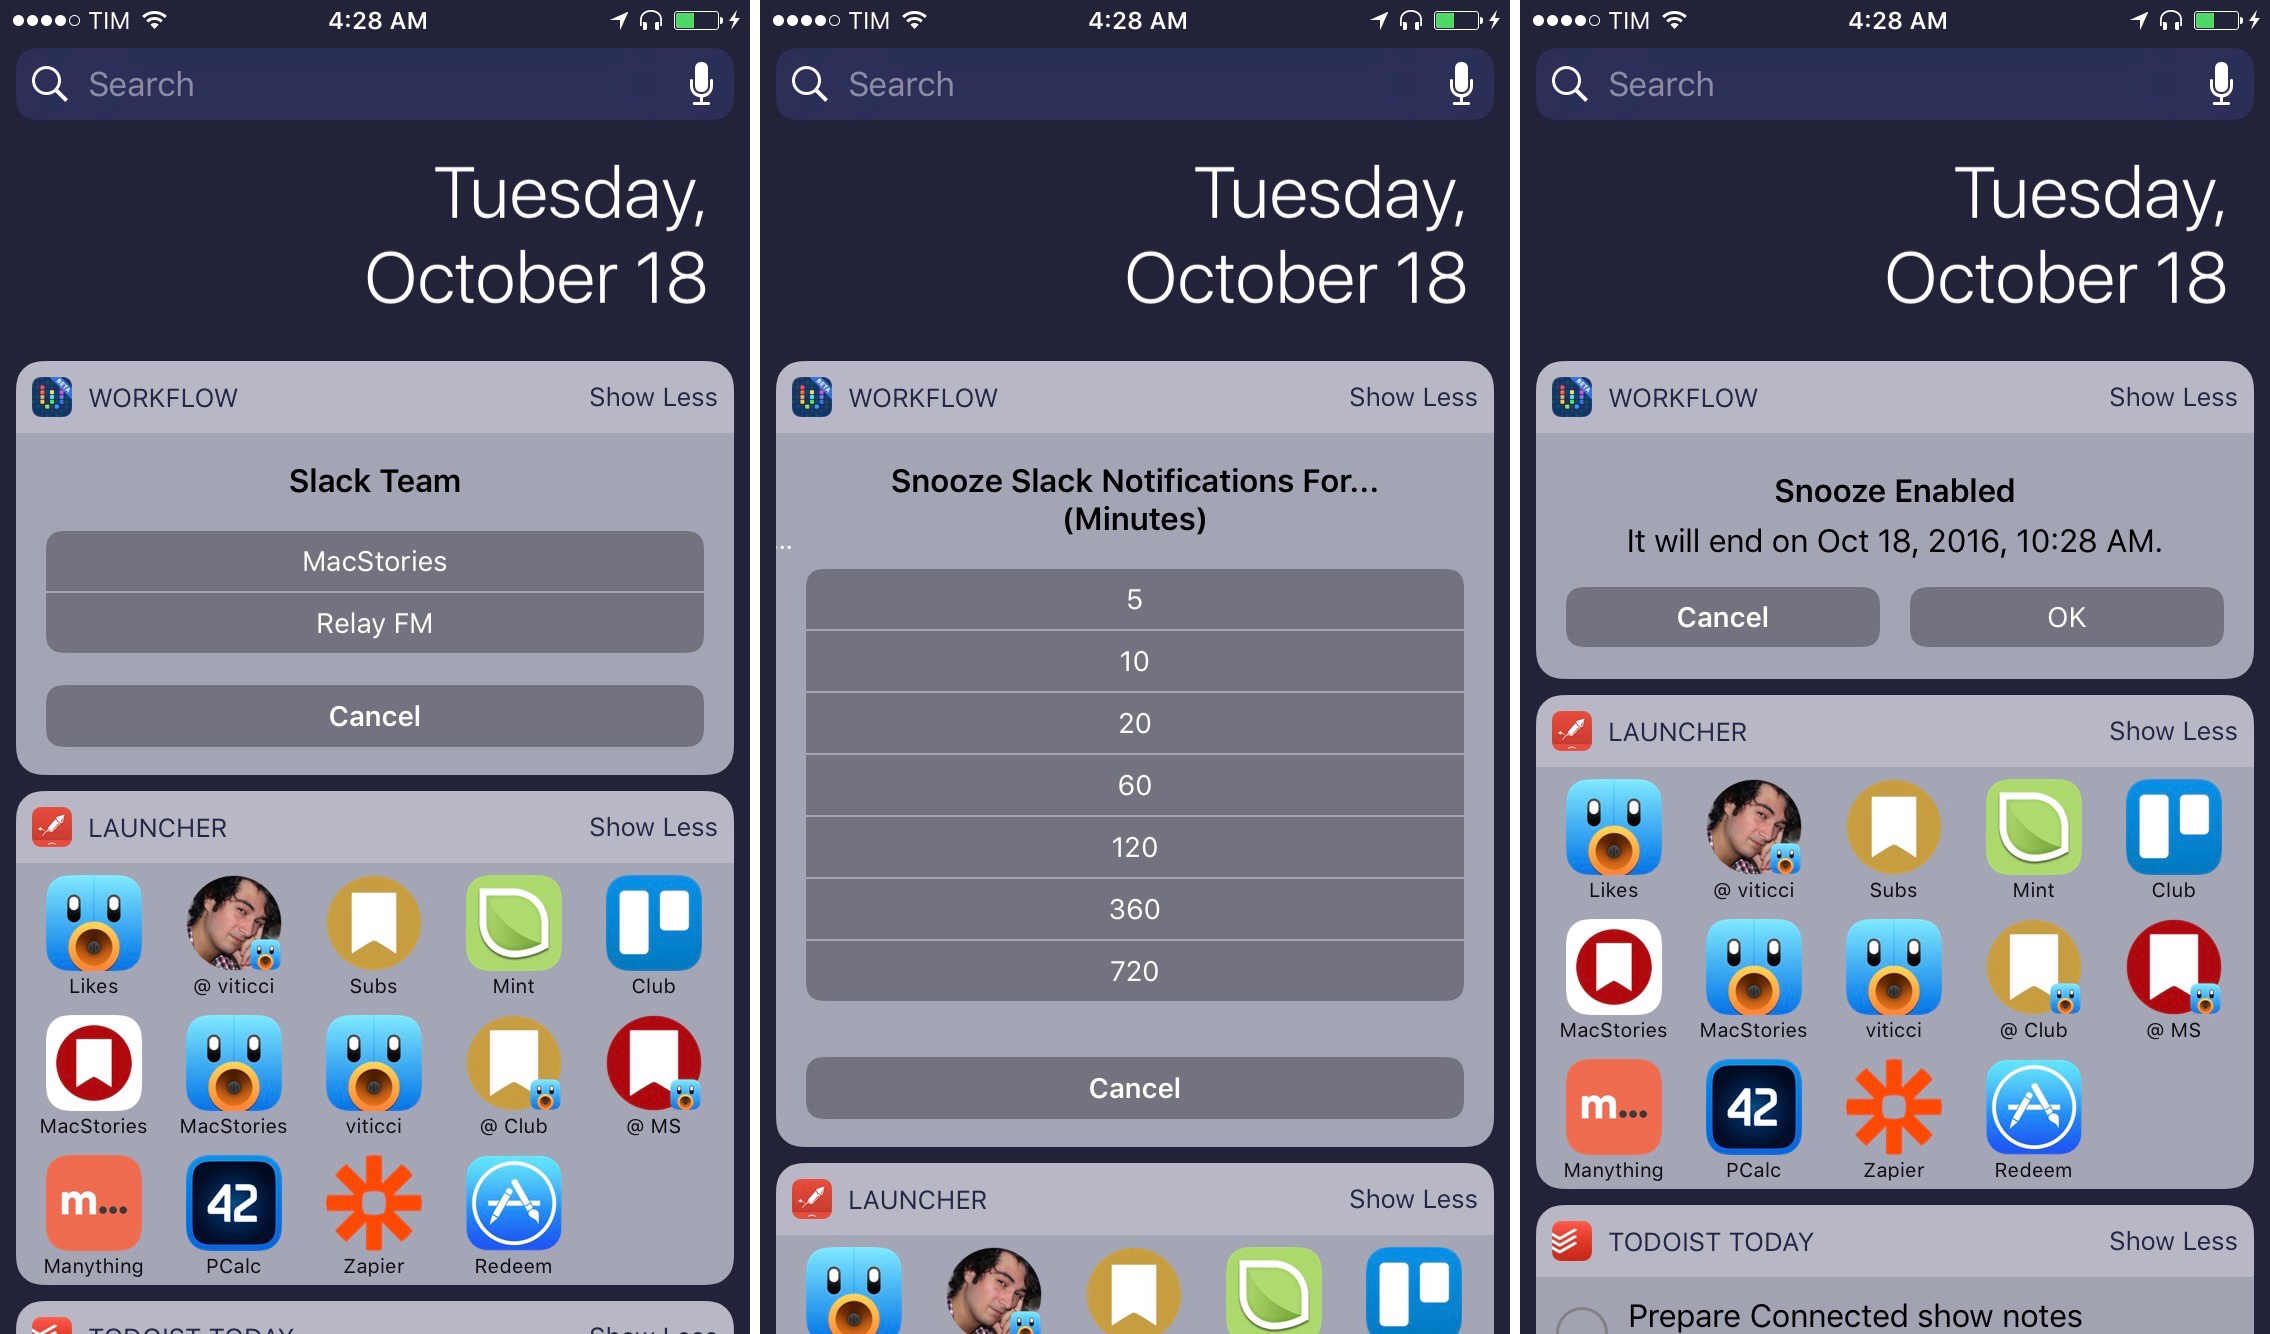
After snooze has been enabled, Workflow will calculate the end time with some date operations3 and display a dialog. I’ve run this workflow from the widget several times a day when I want to mute Slack, and it’s been a terrific improvement for my daily communications.
Snoozing Slack notifications with Workflow.Replay
You can get the workflow here.
The Programmable Web on iOS
The impressive aspect of Workflow’s deeper web API support isn’t only the sheer amount of possibilities that it opens up for iOS automation, but how it packages everything in a user-friendly interface integrated with the rest of iOS and the app’s features.
I worked with web APIs in Pythonista for iOS before, and it was neither pretty nor accessible. Not only does Workflow allow you to build API requests without typing their syntax manually – it also lets you chain them with variables, data types, and files constructed or fetched with other actions that take advantage of Workflow’s access to iOS frameworks.
As far as web automation goes, there’s never been anything like Workflow’s new API features for interacting with web services on iOS. While Workflow was a versatile and powerful tool before, it was mostly limited to built-in actions and supported apps. Now, as long as there’s an open web API to call, Workflow can be anything.
Today’s update is another important step for Workflow, as well as web development for iOS in general. Workflow 1.5.3 is available on the App Store.
- And also return all keys or all values as a list. ↩︎
- If you’re part of multiple Slack teams, you can put multiple Text tokens into a ‘Choose from Menu’ action and pick which one you want to manage snooze settings for. ↩︎
- Including a time zone optimization for Rome, Italy, that you’ll have to modify for your region. ↩︎