Last year, we saw quite a bit of media attention paid to blockchain startups. They raised money from the public, then most of them vanished without a trace (or product). Ethics and legality of their fundraising model aside, a few of the ideas they presented might be worth revisiting one day.
One idea in particular that I’ve struggled with is the synthesis of IoT and blockchain technology. Usually when presented with a product or technology, I can comprehend how and/or why someone would use it – in this case I understand neither, and it’s been nagging at me from some quiet but irrepressible corner of my mind.
The typical IoT networks I’ve seen collect data using cheap and low-power devices, and transmit it to a central service without more effort spent on security than needed (and sometimes much less). On the other hand, blockchains tend to be an expensive way to store data, require a fair amount of local storage and processing power to fully interact with them, and generally involve the careful use of public-private key encryption.
I can see some edge cases where it would be useful, for example securely setting the state of some large network of state machines – sort of like a more complex version of this system that controls a single LED via Ethereum smart contract.
What I believe isn’t important though, perhaps I just lack imagination – so lets build it anyway.
Blocky Peg, Round Hole

The first issue to solve is that it’s doubleplus impractical to use a whole embedded Linux system like a Raspberry Pi every time I want to enable secure, trustless, and distributed data storage for my toaster (for example). The boot time, power consumption, and cost would immutably spoil my appetite for toast.
As a compromise, lets consider an architecture where various IoT devices communicate via MQTT using some level of security with a server that holds the public and private keys for the various devices on the network (probably an on-site server). It would be possible to store the keys on each device, but since the server would need to have them in plaintext at some stage anyway, we may as well avoid transmitting the keys repeatedly. I could also add external key management hardware to an ESP8266 and sign transactions with reasonable security, but that’s a fair amount of work and beyond the scope of a quick test.
Anyhow, this architecture lets us handle all the ‘blockchain stuff’ from a single point per deployment, and leaves the IoT devices more or less as usual. We haven’t adhered to complete decentralization here, but I think the tradeoff is worth it. In any case, I previously built an Internet-connected barcode scanner, and given the interest in using blockchain for supply chains, it seems like a fun data source (more importantly, it means my toaster stays intact).
Centralized Decentralization Server
Normally, I would look at taking data from authorized devices sent via MQTT, and storing that in a database. What we’re interested in doing here, is pushing that data into a smart contract on Ethereum instead. Lets begin by importing the Python3 modules we’ll need to get this done:
from web3 import Web3, HTTPProvider, IPCProvider, WebsocketProvider
from flask import Flask
from flask_mqtt import Mqtt
import time
import json as json
I recently wrote about using Web2Py to stitch together quick APIs. Adding support for MQTT doesn’t look like fun, so we’ve moved on to Flask for this one. So far it looks really fantastic, but I’ve only begun to study it so we’ll barely be using it here. Web3 is the module that handles interaction with the Ethereum blockchain (Web2Py and Web3py are unrelated projects). In any case, lets start with a simple listener that processes MQTT messages on some topic:
app = Flask(__name__)
app.config['MQTT_BROKER_URL'] = 'yourbroker.com' # your broker address goes here
app.config['MQTT_BROKER_PORT'] = 1883 # default port for non-tls connection
app.config['MQTT_USERNAME'] = '' # No username set for now
app.config['MQTT_PASSWORD'] = '' # no password set for now
app.config['MQTT_KEEPALIVE'] = 5 # keepalive every 5 seconds
app.config['MQTT_TLS_ENABLED'] = False # set TLS to disabled for testing purposes

mqtt = Mqtt()
mqtt.init_app(app)

running = True

@mqtt.on_connect()
def handle_connect(client, userdata, flags, rc):
    print("connected")
    mqtt.subscribe('topic') #your MQTT topic here
while running == True:
    @mqtt.on_message()
    def handle_mqtt_message(client, userdata, message):
        data = dict(
            topic=message.topic,
            payload=message.payload.decode()
        )
        barcode = (data["payload"])
        barcode = int(barcode)
        print (barcode)
        #our function to store the MQTT payload on Ethereum goes here as store_results(barcode)
        print ("OK")
This works fine and returns messages sent to it, but it doesn’t actually do anything with the data other than print it.
A Simple Smart Contract
To do anything more, we’ll need a simple smart contract. I’ve written a simple one in Solidity that stores a single integer in a variable called ‘barcode’:
pragma solidity >=0.4.0 <0.6.0;
// the pragma line above indicates which version of Solidity can be used to compile this contract. Solidity is updated OFTEN so this is very useful.
// The below names the contract, and the defines the variables it contains and their type
contract Barcode {
    address public owner = msg.sender;
    uint public creationTime = now;
    uint barcode;
// Only allow the contract owner to push barcode data to the contract.
    modifier onlyBy(address _account)
    {
        require(
            msg.sender == _account,
            "Sender not authorized."
        );
// Do not forget the "_;"! It will be replaced by the actual function body when the modifier is used.
        _;
    }
// This function is what we will call to set the variable x. It costs Ether to do so, and only stores one value (although historical values are preserved on the blockchain)

    function set(uint x) public onlyBy(owner) {
        barcode = x;
    }
// This function returns the value of x, it costs no Ether to do so.

    function get() public view returns (uint) {
        return barcode;
    }
}
I find it useful to write and check smart contracts in Remix. After compiling it there (Solidity 0.5.4+commit.9549d8ff), you may notice a small button marked ‘ABI’. An ABI contains a description of the functions offered by your smart contract – Web3 will need this later on to interact with it. Click the button to copy it to your clipboard, and paste it into a file. In this example we’ll use the file barcode.json.
You’ll also need to add your smart contract to the blockchain. After creating an account on the Ropsten Test network, you can do this using the Ethereum wallet.
Returning to Our Application
Next we’ll need to have the Web3 module push data from our MQTT topic to Ethereum. We’ll be using the Ropsten test network to avoid cluttering up the live network, and to avoid exposing more valuable private keys with absolutely no key management. You’ll also need a free account at infura.io to use as a connection to the Ethereum Network, they will provide a URL you can paste in below – be sure to use the one for the Ropsten test network:
with open('full path to barcode.json') as f:
    abi = json.load(f)
    print("abi loaded")

w3 = Web3(HTTPProvider('URL provided by Infura'))
contract_address = 'contract address, including the 0x’
wallet_private_key = 'your test network private key here'
wallet_address = 'testnet wallet address, including the 0x'
contract = w3.eth.contract(address = contract_address, abi = abi)

def store_results(x):
    nonce = w3.eth.getTransactionCount(wallet_address)
#if something is failing, try print (nonce) to test connectivity to Infura here. Chain ID = 3 is Ropsten.
#Below, we craft a transaction to set variable x in the smart contract to the value provided to this function
    txn_dict = contract.functions.set(x).buildTransaction({
        'chainId': 3,
        'gas': 140000,
        'gasPrice': w3.toWei('40', 'gwei'),
        'nonce': nonce,
    })

#Then we sign the transaction with our private key
    signed_txn = w3.eth.account.signTransaction(txn_dict, private_key=wallet_private_key)
#The signed transaction is sent to the blockchain using Infura as an endpoint
    result = w3.eth.sendRawTransaction(signed_txn.rawTransaction)
# Then we wait for a receipt. It can take a short while.
    tx_receipt = w3.eth.getTransactionReceipt(result)
    count = 0
    while tx_receipt is None and (count < 30):
        time.sleep(10)
        tx_receipt = w3.eth.getTransactionReceipt(result)
    return(tx_receipt)
    if tx_receipt is None:
        tx_receipt = "Failed"
        return(tx_receipt)
That’s it for the server – all this saved to a file and run will monitor an MQTT topic, and post any received integers to Ethereum’s Ropsten test network. Plenty of shortcuts were taken here – no key management, insecure MQTT implementation, no data type checking, and so on. That’s quite OK for now as adding those would make our test needlessly complex.
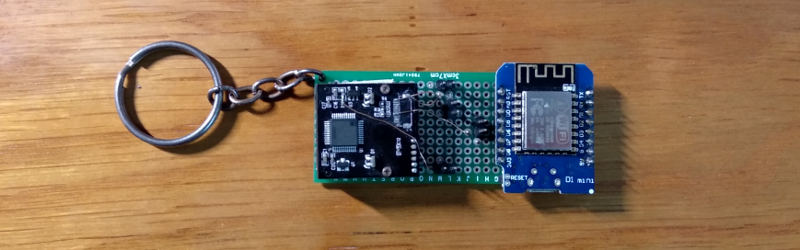
Connecting the Barcode Scanner
Finally, we’re going to need some IoT hardware as a source of data. I’ve dug up the IoT barcode scanner I wrote about previously. I wired it up to a Wemos Mini D1 running NodeMCU, and added a little code that cleans up and pushes the scanned barcode out MQTT:
-- Setup UART and print something so we know it's working

uart.setup(0, 9600, 8, uart.PARITY_NONE, uart.STOPBITS_1, 0)
print("Scanning")

-- Set up a couple of variables so they're not nil

data = ""
datac = ""

-- This function prints out the barcode data and clears all variables so the scanner can read a new barcode. If you wanted to send the data over MQTT, your code would replace the print statement here.

function finish()
    ClientID = 5446078
    m = mqtt.Client(ClientID, 120)
    datac = datac:gsub("%D+", "")
    print (datac)
    if datac ~= nil then
        m:connect("hardfork.asia", 1883, 0, function(client) print("connected") m:publish('5446078',datac,0,0) p = "Sent" print(p) m:close() scansoon() end)
    end
end

function scansoon()
    tmr.alarm(1, 1000, tmr.ALARM_SINGLE, function() scan() end)
    data = ""
    datac = ""
end
-- This function concatenates all data received over 150 milliseconds into the variable datac. The scanner sends the data in multiple parts to the ESP8266, which needs to be assembled into a single variable.

function scan()
    uart.on("data", 0, function(data)
        tmr.alarm(0,150,0,finish)
        datac = datac .. data
    end, 0)
end

tmr.alarm(1, 1000, tmr.ALARM_SINGLE, function() scan() end)
When we are connected to the network and scan a barcode, we see the following output from our application listening to the MQTT topic:

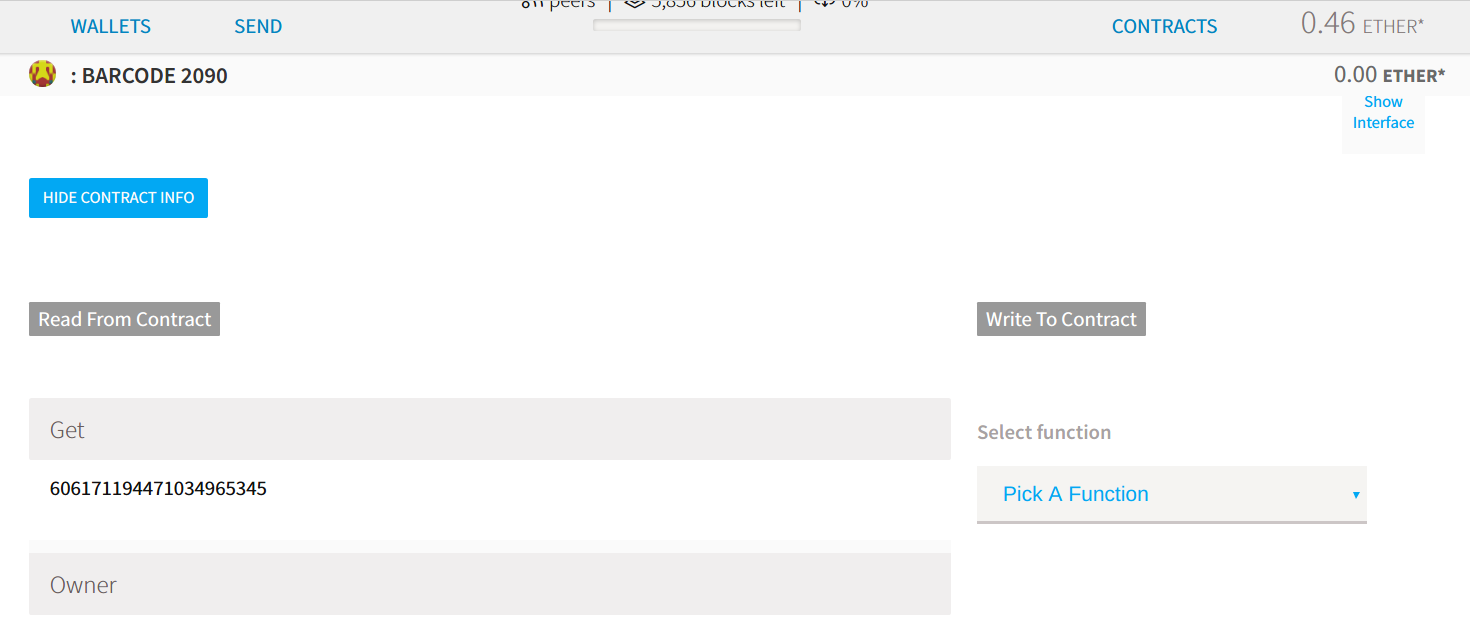
Finally, if we open an Ethereum wallet and check the value of the ‘Get’ function in the smart contract, we’ll see a barcode – in this case from a long-expired membership card. For better or for worse, our silly little internet of blockchain of things device works!
After building this, I still don’t understand why we would ever push data from IoT devices directly to a blockchain… but at least I now know how. Since the data coming from the IoT devices is just being trusted anyway, it seems a lot less Byzantine for any blockchain magic to happen after the data enters whatever backend you’re using – perhaps just using a hash function to anchor your database to a public chain every hour or so. That’s a pretty simple extension to most corporate systems I’ve seen, and certainly not a sufficient reason to raise tons of money.
Then again, the minds of investors are forever alien to me.


Security is only as good as its weakest link. There’s no such thing as “reasonably secure”, especially with block chain transactions.
I personally find a useful description of ‘reasonably secure’ to be the stricter of:
1. Where the cost of circumventing the security to be significantly more than my loss if that happens (or my customer’s loss if that applies).
2. Where the cost of circumventing the security is significantly more than the profit from doing so.
One of my favorite ways to think about topics like this in engineering is the question of whether a glass is half empty or half full — certainly it’s twice as large as it needs to be to hold that much water. Similarly while it’s true that some blockchain transactions represent quite a bit of value being transferred and need to be protected accordingly — If my toaster’s Ethereum account gets hijacked I’m more likely to have a good laugh, and push a transaction to the account inviting the perpetrator to have a coffee sometime (hex encoded in the data field).
If I was actually building a commercial device authorized to push data on-chain I’d most likely investigate using a hardened and dedicated chip to handle all keys and ECDSA locally. They’re cheap(ish) nowadays so no excuse not to use one. I’m thinking of ordering one and testing it out, so keep an eye out for the writeup if you like this sort of thing.
Take a look at Chainlink. It’s goal is resolve the “oracle problem” and IoT data is key to uses case like insurance and legal contracts.
One more way to solve this problem is through “secure hardware”: that is what IoTeX (iotex.io) is doing: e.g. they released as PoC cellular board (named “Pebble Tracker”) that features lots of sensors plus LTE connectivity and a TEE chip. This allows the sensor to send out his data along with a signature. Now, since the cryptographic keys are stored into the secure chip of the sensor, and never leave it, if you process these data within a smart contract you can achieve end-to-end trusted data that you cannot achieve with any other technology.
Notice that this doesn’t mean that you want to “store the data on-chain”: you can send the data to any MQTT broker like AWS for storage, and also send it if/when required to a smart contract. The smart contract can verify the signature, the identity of the device vs registered devices, and perform some logic. Imagine a delivery company that does not deliver on time or delivers damaged goods: the sensor data can be a 100% trusted source to run the “contract” logic that charges the delivery company for the damage (billions of dollars a wasted yearly due to supply chain controversy that also go on for years). Just one example.
Anyway the observation of @Sean Boyce are totally correct: Blockchain alone does not “make the IoT secure” it’s just one technology that adds trust, transparency, security **assumed that the data you pump into it are themselves trusted!!**
SEO algorithms unite!
That occurred to me too, and to be honest I experience a certain reluctance to write about any topic that’s been hyped up. On the other hand, I realize that’s not a productive attitude — if anything it’s more important to have frank discussions about whatever it is that marketing teams are pushing out as a panacea.
Missed the headline of blockchain on a keychain.
It would be nice to have uncorruptable temperature sensors recording, so the NOAA data cannot be manipulated to drive a narrative.
“After building this, I still don’t understand why we would ever push data from IoT devices directly to a blockchain… but at least I now know how.”
1. In places where the Government decides where most or all of your hard earned money goes, anything that bypasses that theft through redistribution is welcome – at any level. In an oppressive situation like that, blockchain micro-transactions scale.
2. You don’t “know” how to do this yet, you demonstrated this yourself. What you are doing is insecure with too many attack points. But that’s not to say anyone else is doing any better. What you did is fail – while pushing the envelope. That’s good; thank you for sharing it with us.
I like #2 — a good way to think about things! It’s fair to say this is quite similar to what most startups that have raised money for IoT + Blockchain seem to have been doing. Everyone seems so secretive about it, but the underlying architecture always turns out to be something like this when I look under the hood.
I’ve since thought of a few ways this could be done better and more securely, but nothing that quite does so at an acceptable cost, speed, or reliability. Maybe I’ll have a different story to tell a few months down the line — wish me better luck on my next (hopefully useful) failure!
wow, so many buzz words in the title
Have you seen this? As you mention, just use a hash function to timestamp the data since it’s trusted anyways using OpenTimeStamps: https://medium.com/@valerio.vaccaro/secmq-bc6963e48807
Is this code located on your github somewhere?