The objective of this tutorial is to build a simple job search API with Strapi and Puppeteer. Strapi is an open-source Headless CMS written in NodeJS and Puppeteer is an open-source Headless Browser (Chrome) NodeJS API.
It seems that the time is for headless tools...😆 (Anyway, there is no direct link between Strapi & Puppeteer except the "Headless" word.)
Strapi
Strapi is used to build powerful APIs without efforts. Several features are available in Strapi including CRON tasks configuration (And this is a good thing because we will use them to schedule the Puppeteer script execution).
1. Strapi installation
Well, let's start this tutorial. The first thing we need to do is to install Strapi.
yarn create strapi-app job-api --quickstart
If you don't want to use
yarn, there are other possibilities to install Strapi in the documentation.
2. Strapi admin user
This command should install Strapi and open your browser. Then, you will be able to create your admin user.

3. Job Collection type
In the Strapi admin home page, click on the blue button CREATE YOUR FIRST CONTENT-TYPE.

You will be redirected to the collection type creation form.

After that, you will be able to add fields to the Job collection type.

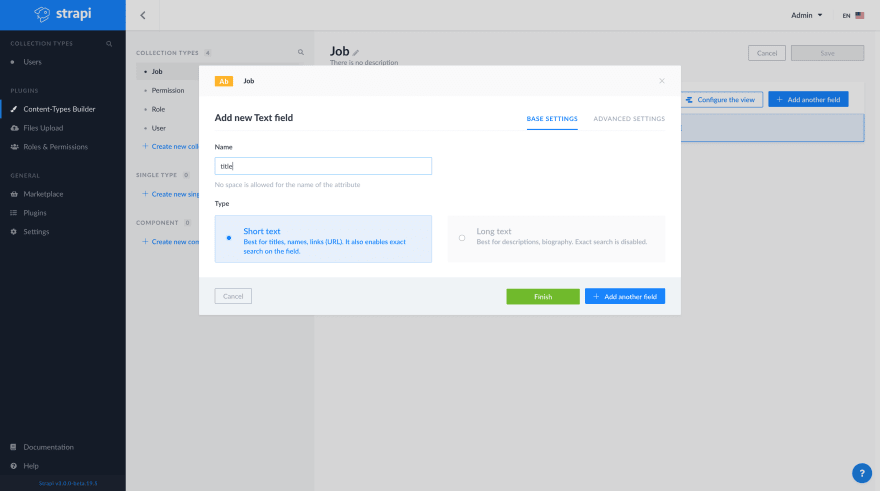
For our basic example, we will need to create five text fields (title, linkedinUrl, companyName, descriptionSnippet, and timeFromNow).

Don't forget to click on the Save button to restart the Strapi server

After that, we can put the Strapi admin aside for the moment and open the Strapi repository in an editor.
Strapi CRON task
Firstly, we'll need to enable CRON in the Strapi server configuration.
Open the config/environments/development/server.json file
{
  "host": "localhost",
  "port": 1337,
  "proxy": {
    "enabled": false
  },
  "cron": {
    "enabled": true
  },
  "admin": {
    "autoOpen": false
  }
}
Then let's create the CRON task. Open the ~/job-api/config/functions/cron.js file and replace the content by this
"use strict";
module.exports = {
  // The cron should display "{date} : My super cron task!" at every minute.
  "*/1 * * * *": (date) => {
    console.log(`${date} : My super cron task!\n`);
  },
};
Now, restart the Strapi server and let's see if our cron task is running properly.
yarn develop
yarn run v1.21.1
$ strapi develop

 Project information

┌────────────────────┬──────────────────────────────────────────────────┐
│ Time               │ Thu Apr 16 2020 01:40:49 GMT+0200 (GMT+02:00)    │
│ Launched in        │ 1647 ms                                          │
│ Environment        │ development                                      │
│ Process PID        │ 20988                                            │
│ Version            │ 3.0.0-beta.18.7 (node v10.16.0)                  │
└────────────────────┴──────────────────────────────────────────────────┘

 Actions available

Welcome back!
To manage your project 🚀, go to the administration panel at:
http://localhost:1337/admin

To access the server ⚡️, go to:
http://localhost:1337

Thu Apr 16 2020 01:41:00 GMT+0200 (GMT+02:00) : My super cron task !

Thu Apr 16 2020 01:42:00 GMT+0200 (GMT+02:00) : My super cron task !

Thu Apr 16 2020 01:43:00 GMT+0200 (GMT+02:00) : My super cron task !

...
We can see that {date} : My super cron task ! is displayed every minute in the terminal.
Puppeteer
Puppeteer is used to automating any action you can perform in the browser. You can use it to automate flows, take screenshots and generate PDFs. In this tutorial, we will use Puppeteer to get the list of ReactJS jobs from Linkedin. We will also use Cheerio to select the data in the received markup.
Now that the CRON task is working well, we will install Puppeteer and Cheerio in the Strapi project.
cd job-api
yarn add puppeteer cheerio
Let's adapt the CRON task to get a list of ReactJS job published on linkedin the last 24 hours in San Francisco.
In the ~/job-api/config/functions/cron.js
"use strict";
// Require the puppeteer module.
const puppeteer = require("puppeteer");

module.exports = {
  // Execute this script every 24 hours. (If you need to change the cron
  // expression, you can find an online cron expression editor like
  // https://crontab.guru
  "0 */24 * * *": async (date) => {
    // 1 - Create a new browser.
    const browser = await puppeteer.launch({
      args: ["--no-sandbox", "--disable-setuid-sandbox", "--lang=fr-FR"],
    });

    // 2 - Open a new page on that browser.
    const page = await browser.newPage();

    // 3 - Navigate to the linkedin url with the right filters.
    await page.goto(
      "https://fr.linkedin.com/jobs/search?keywords=React.js&location=R%C3%A9gion%20de%20la%20baie%20de%20San%20Francisco&trk=guest_job_search_jobs-search-bar_search-submit&redirect=false&position=1&pageNum=0&f_TP=1"
    );

    // 4 - Get the content of the page.
    let content = await page.content();
  },
};
Parse the html content with Cheerio and store the job with the Strapi global.
"use strict";
const puppeteer = require("puppeteer");
const cheerio = require("cheerio");

module.exports = {
  "0 */24 * * *": async (date) => {
    const browser = await puppeteer.launch({
      args: ["--no-sandbox", "--disable-setuid-sandbox", "--lang=fr-FR"],
    });
    const page = await browser.newPage();
    await page.goto(
      "https://fr.linkedin.com/jobs/search?keywords=React.js&location=R%C3%A9gion%20de%20la%20baie%20de%20San%20Francisco&trk=guest_job_search_jobs-search-bar_search-submit&redirect=false&position=1&pageNum=0&f_TP=1"
    );
    let content = await page.content();

    // 1 - Load the HTML
    const $ = cheerio.load(content);

    // 2 - Select the HTML element you need
    // For the tutorial case, we need to select the list of jobs and for each element, we will
    // create a new job object to store it in the database with Strapi.
    $("li.result-card.job-result-card").each((i, el) => {
      if (Array.isArray(el.children)) {
        const job = {
          title: el.children[0].children[0].children[0].data,
          linkedinUrl: el.children[0].attribs.href,
          companyName:
            el.children[2].children[1].children[0].data ||
            el.children[2].children[1].children[0].children[0].data,
          descriptionSnippet:
            el.children[2].children[2].children[1].children[0].data,
          timeFromNow: el.children[2].children[2].children[2].children[0].data,
        };

        // 4 - Store the job with the Strapi global.
        strapi.services.job.create(job);
      }
    });

    // 5 - Close the browser
    browser.close();
  },
};
Restart the Strapi server and let's go back to the admin
http://localhost:1337/admin.
In the Job content manager, you should see the data from LinkedIn
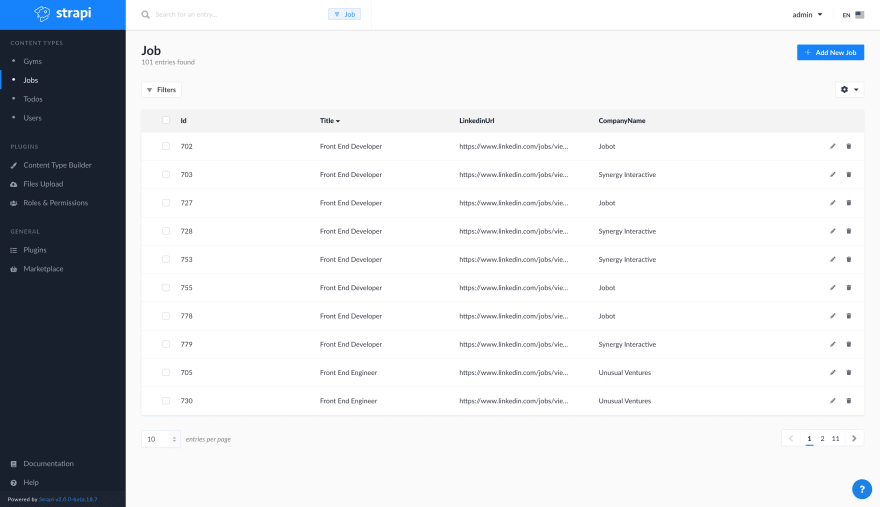

Good job ! You've just build an API from another website in few minutes 😄


Top comments (18)
Great article, testing it out and new to JS.
I notice that "li.result-card.job-result-card" is no longer working.
Can you please update or point to me to what I should look for?
If the selector doesn't work, you can go to the Linkedin job search with your browser a copy the
liselector in the DEV tools.Dude this is great man, I got it to work and thanks for teaching me.
Here is the update li to update:
li.result-card.job-result-card.result-card--with-hover-state.job-card__contents--active
Thank you, Sif!
Well, it seems that the selector in the tutorial is still working
li.result-card.job-result-card. Be careful, the selector in your reply will select only theactivelist item (as you can see, the.job-card__contents--activeis the active CSS class for a selected list item). We need all the list items (not just the selected one) so you need to get a more generic selector.Thanks for that, I will give that a try
Don't mean to be a killjoy, but the LinkedIn part seems to be a violation of the LinkedIn ToS
linkedin.com/help/linkedin/answer/...
LinkedIn has banned users for seemingly harmless apps in the past. Can you update the article to use another site as an example?
I followed the steps to the letter, but don't see jobs turning up in my admin page. I see GETs ongoing in my terminal, so I suppose that means that the data is being fetched? If I am not mistaken?
Hello Dushyant,
Can you see your content type in the Strapi admin page? Can you share your CRON task script please?
Thanks for the reply, sir.
Yes, I can see the content-type, Jobs, in the admin page.
Here is my CRON script(functions/cron.js)
gist.github.com/dkp1903/d598e143ea...
Your welcome.
Well, it should work. Can you confirm that your Strapi server CRON configuration is set to true in
config/environments/development/server.json.Also, keep in mind that the CRON task in this example will be executed every 24 hours. Did you wait 24 hours to test the case? Maybe you should modify the CRON expression to execute your script every minutes just to test if the script works well.
Don't forget to stop the server after the test :D
It works, sir. Forgot about the 24 hour thing. Switched it to a minute and it works right as rain.
Thanks a million!
Nice!
Tip:
/Users/helabbassi/perso/should be replaceable with~.Oh thank you Dan !
What is the vest way to manage authentication with puppeteer ? To have access to our own data in linkedin
Hi Lucas,
I didn't have time to test that solution (and I think it isn't the best way to do this) but I think you will need to sign in to Linkedin with your browser (to start a session) and find the
li_atcookie in the DEV tools. Then, you will be able to set this cookie before navigating to Linkedin (just before theawait page.goTo(...))I really recommend you to create a simple function to check if you are logged in or not. Something like
I think this function needs to be called after the
setCookiebecause your Linkedin session can be finished.Feel free to add some additional information about this solution or suggest a better way to do that.
Thanks for this! I was already building out a job board using Strapi and was manually inputting some of the things. This was a huge help to get some other data.
Great tutorial! Keep it up!
Thank you, Victor.