iOS Tutorial: Creating a chat room using Parse.com
About Parse
Parse.com has been out of beta for a few weeks now, and I have been using this service for a few months, while they were still polishing the tool - and the API. I do regard this kind of service as the next step in app evolution: for the example that is interesting us today, if you’ve ever created your own php-Ajax-whatever enabled server and tried to bind a client to it, you certainly remember the pain. Enters Parse, which is the best invention since sliced bread. It basically takes care of all the server-side creation and management for you, and lets you deal with just interacting with your database. And, cherry on the cake, the database interaction and definition is very lazily done for you, ie. while programming it you’ll be able to add new fields on-the-go. It’s really been a pleasure to use this service, and I thought I’d share some of the steps to follow in order to create a simple chat room. Which remains a first stab at client/server development anyway.
Gimme the code
For those completely lacking patience, the code I’m describing below is available on Github at this address: https://github.com/dmendels/chatDemo.
The goals
We’re not building the next Twitter client here, quite far from that actually - though I’m convinced that you could, given a bit of effort. In a recent project, I was building a breastfeeding tracker app for iPhone, so that we can easily alleviate some of the concerns of my Wife while she was feeding our (now 2.5 months old) daughter. As with any project, I decided early on to make it available on the App Store, and started coding. The result: Baby Yummy, I’m sharing two screen shots here, you can visit the app’s website for more information.


Don’t leave simply because you’re not a new Mom, that’s the only digression I’ll be making here. Along the way, I thought it could be cool for Moms who are breastfeeding to chat together, without leaving the app. Chat+Parse = a good demonstrator and test of the service, so there we go.
Today, we’re going to build an app similar to Baby Yummy, with a tab bar and three views, two of them being empty and the third containing our chat room. Needless to say, we’re going to use ARC and StoryBoards, because they’re really great features of iOS5.x. I’m not going to skin the app, I’ll just use some non-default backgrounds to make it look less bland. I’m using a pixel pattern I picked on the awesome subtlepatterns.com site. In the end, we should get to something that looks like this:
Having you own chat room inside your app can be quite interesting. First, you do control the content and administer this service. Quite simply, your timeline will not be tainted by other contents. Second, this is essentially private, and does not connect to the internet: this means that it does not get your app into the 17+ category automatically when submitting to the AppStore. And third, this can be used to deploy a simple bulletin board for internal use in enterprise apps.
Getting ready
First thing first, let’s get started with Parse. You’re going to need to sign in (or login) to Parse. It’s free (up to a large number of queries per month), so do yourself a favor and just do it. Go to Parse.com and sign in. You should get a “Your Apps” thumb in the main navigation bar. Get to it, and hit the “Create new app” button, down left. Give it a name, eg. “chatDemo”, hit the “Create App” button, and here we go. You should get to something that looks like this:
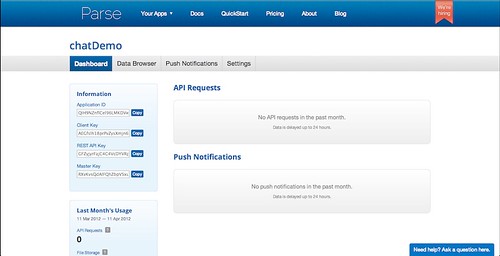
Parse has created your App database for you, and you ended in the Dashboard of your app. The first box on the left is what we’re after for now: the Application ID and Client Key. These are the only keys we’re going to use for now. You’ll notice that there are two other keys under, but we don’t want to discuss RESTful APIs and webservices now. You’ll notice that we don’t have any API request at the moment, and have not used Push Notifications (that’s another cool feature that we may explore in a later blog post). While we’re here, look at the DataBrowser thumb, which indicates that we’ve got no data in the app yet. There are 3 choices there, 1) go through a QuickStart guide, which I’d recommend anyway as it’s really quick and well written, 2) create a new class manually, which we’re not going to use as we’ll be doing that directly from Xcode, and 3) import existing data, which is an easy way to populate your database if need be.
Right, back to our keys. The Application ID and Client Key are going to get us on Parse with one line of code. Yup, that’s cool.
Now, fire up Xcode, and create a new project. Choose the “Tabbed Application” in iOS Application drop. Let’s call that “chatDemo”, use ARC and StoryBoards, and we’re only going to build the iPhone version (only).
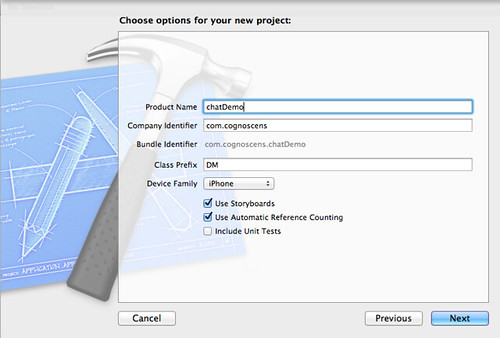
Hit “Next” and create. I’m using the DM prefix on all ViewControllers, that’s not an obligation. Now that we’ve got our project up and ready, we’ll first check that it’s OK. Compile and run, you’ll get a simple app with two view controllers.
Now, we’re going to run the QuickStart guide from Parse. Go to this address or simply hit the third thumb from the main navigation bar on the site “Quick Start”, and you should see something similar to this:
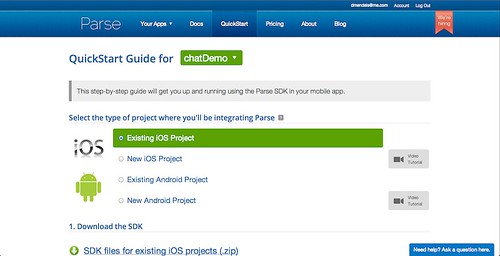
Just leave the first radio button as it is (“Existing iOS Project”), and proceed through the steps, ie. download the SDK first, install it, and add the libraries needed as requested. Follow through until step 10, this should take you about 3 minutes. The critical point is to copy/paste the line:
[Parse setApplicationId:@“QIH9NZnfICel96LMKDVwkkoHxYyHjv3ZJBxCe9kS” clientKey:@“AEGfslh18prPvZysXmjn61hagygBSfcYTJdSISw7”];
just as it is given to you, in your AppDelegate, inside the application:didFinishLaunchingWithOptions: function:.
Great, compile and run, if you’re not getting any errors/warnings from Xcode you’re done. You can go and test the SDK, (section 3), by creating a PFObject. Given our app structure, I’d recommend to paste that code in the viewDidLoad method of the first viewController. Got past point 3? Great! You have successfully uploaded data to the Cloud, and it was effortless. Now let’s build something cool with that service.
Building a chat view
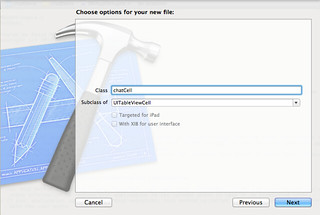
We’re going to add our chat to a UITableView. Since iOS5.0, setting up these beasts has become much easier, and there are plenty of blog posts out there that explain how to set them up and skin them if need be. We’ll be using three fields for each cell: a userLabel, a timeLabel, and a textString. Let’s create a UITableViewCell class first, and get this out of the way. Go on and create a New file, use the Objective-C class from the Cocoa Touch templates, name it “chatCell” as a subclass of UITableViewCell. Bang. Like so:
Let’s do our property declarations in chatCell.h while we’re at it:
@interface ChatCell : UITableViewCell
{
    IBOutlet UILabel *userLabel;
    IBOutlet UITextView *textString;
    IBOutlet UILabel *timeLabel;
}
@property (nonatomic,retain) IBOutlet UILabel *userLabel;
@property (nonatomic,retain) IBOutlet UITextView *textString;
@property (nonatomic,retain) IBOutlet UILabel *timeLabel;

@end
and let’s synthesize our properties in chatCell.m:
@synthesize userLabel, timeLabel, textString;
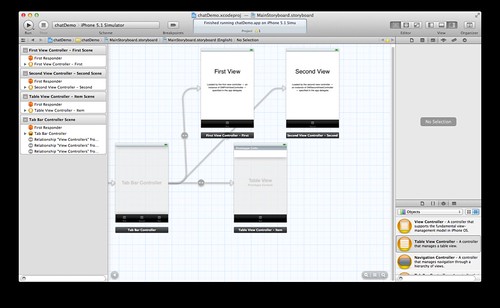
Now let’s get into the Storyboard. There’s only one, open it and you’ll see our two view controllers linked to a TabBar controller. Now we’re going to create our Table, but unfortunately we cannot use a UITAbleViewController directly, as there will be more than a simple table in our view. We’re building something that will look like this:
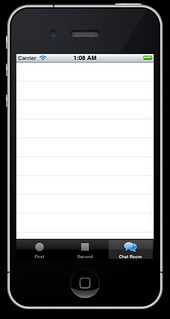
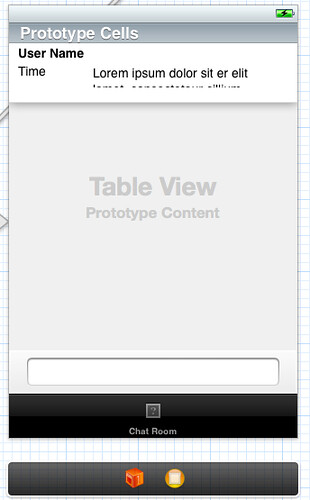
Let’s get started: we drag in a new view controller, and put a table view in it. Next, because we’re generating the table view from scratch, drag into your table a TableViewCell. Then connect the new view to the TabBarController: Control-Drag from the TabBarController to your view controller, select the “Relationship - ViewController” segue, and we’re done. Change the Bar Item to “Chat Room” and the icon (I’m using the “chat” icon from the awesome Icon Sweet here), compile and run, and you should have something like this, after getting to the Chat Room thumb:
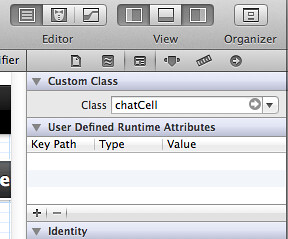
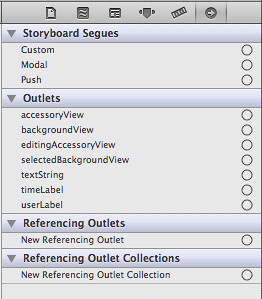
We’ve got one warning though: “Prototype table cells must have reuse identifiers”. Right, let’s silence this one, and give our cells an identifier. Select the cell in your Storyboard, and give it chatCellIdentifier as the identifier. Compile and run, issue gone. We’re going to do a little more while we’re on the cell: change its class to a custom class, which is, you guessed, chatCell. Go on and change the class name in the Identity Inspector. This should be like shown below, and then check in your Connection Inspector that you have access to all the goodness of the chatCell class, ie. our outlets.
Now, let’s add our two UILabels and a UITextView. Just drag and drop them inside the cell, and make the UITextView not editable, and while we’re at it, un-tick the Detection methods (Links, addresses, etc…). We’re building a table cell that looks like this:
Now, in your Connections Inspector, drag your textString outlet to the TextView, and your timeLabel and userLabel outlets to their respective labels. Everything is connected, we’re good. There’s one more thing left, though: what good would a chat room be if we couldn’t enter text? Let’s get out of the Storyboard for a minute, create our ViewController for the chat room, we’ll be back soon.
Chat room View Controller
Text entry
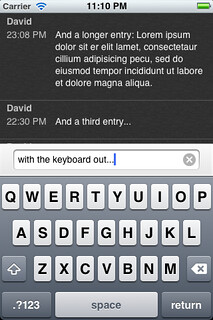
Create a new file, DMChatRoomViewController using the Objective-C class from the Cocoa Touch templates, as a subclass of UIViewController. We’re going to need a UITextField tfEntry that we create in the interface and give it an outlet as well. Next thing, we go back to our StoryBoard and add that field to our chat room view. Let’s change the class of our View Controller first, with the vc selected, go into the Identity Inspector and change the class to DMChatRoomViewController. All good, now let’s add a background to our textField (I’ve got a textField_background.png image with height of 49 pix here), and we’re dragging a text field on top. Give it a width of 280 pix. From the inspector, connect the tfEntry to the textField. You should get something that looks like the previous picture, now.
We’re going to deal with the keyboard in code, so we’re done here and are left with populating our table. If you build and run now, you’ll see your keyboard going up when typing into the textField, but there’s no way to get it down. The methods to show/hide the keyboard are pretty much classic, I’m not going to discuss them here, you can check them inside the #pragma mark - Chat textfield in the DMChatRoomViewController.m file on github. The four methods are:
-(void) registerForKeyboardNotifications;
-(void) freeKeyboardNotifications;
-(void) keyboardWasShown:(NSNotification*)aNotification;
-(void) keyboardWillHide:(NSNotification*)aNotification;
There isn’t much to it, in short we just create the keyboard notifications (willShow and willHide), and use our keyboardWasShown and keyboardWillHide in order to sync the movement of the rest of the view with the keyboard going up and down. Don’t forget to hook up your textfield in the Storyboard with the textFieldDoneEditing IBAction. The code at the moment is:
*** DMChatRoomViewController.h ***
#import <UIKit/UIKit.h>
@interface DMChatRoomViewController : UIViewController <UITextFieldDelegate>
{
    UITextField             *tfEntry;
}
@property(nonatomic, strong) IBOutlet UITextField *tfEntry;
-(void) registerForKeyboardNotifications;
-(void) freeKeyboardNotifications;
-(void) keyboardWasShown:(NSNotification*)aNotification;
-(void) keyboardWillHide:(NSNotification*)aNotification;
@end
*** DMChatRoomViewController.m ***
#import "DMChatRoomViewController.h"#define TABBAR_HEIGHT 49.0f#define TEXTFIELD_HEIGHT 70.0f

@interface DMChatRoomViewController ()

@end

@implementation DMChatRoomViewController
@synthesize tfEntry;

- (void)viewDidLoad
{
    [super viewDidLoad];
    tfEntry.delegate = self;
    tfEntry.clearButtonMode = UITextFieldViewModeWhileEditing;
    [self registerForKeyboardNotifications];
}

- (void)viewDidUnload
{
    [super viewDidUnload];
    [self freeKeyboardNotifications];
}

- (BOOL)shouldAutorotateToInterfaceOrientation:(UIInterfaceOrientation)interfaceOrientation
{
    return (interfaceOrientation == UIInterfaceOrientationPortrait);
}

#pragma mark - Chat textfield-(IBAction) textFieldDoneEditing : (id) sender
{
    NSLog(@"the text content%@",tfEntry.text);
    [sender resignFirstResponder];
    [tfEntry resignFirstResponder];
}

-(IBAction) backgroundTap:(id) sender
{
    [self.tfEntry resignFirstResponder];
}

- (BOOL)textFieldShouldReturn:(UITextField *)textField
{
    NSLog(@"the text content%@",tfEntry.text);
    [textField resignFirstResponder];

    if (tfEntry.text.length>0) {
    }
    return NO;
}


-(void) registerForKeyboardNotifications
{
    [[NSNotificationCenter defaultCenter] addObserver:self selector:@selector(keyboardWasShown:) name:UIKeyboardWillShowNotification object:nil];
    [[NSNotificationCenter defaultCenter] addObserver:self selector:@selector(keyboardWillHide:) name:UIKeyboardWillHideNotification object:nil];
}


-(void) freeKeyboardNotifications
{
    [[NSNotificationCenter defaultCenter] removeObserver:self name:UIKeyboardWillShowNotification object:nil];
    [[NSNotificationCenter defaultCenter] removeObserver:self name:UIKeyboardWillHideNotification object:nil];
}


-(void) keyboardWasShown:(NSNotification*)aNotification
{
    NSLog(@"Keyboard was shown");
    NSDictionary* info = [aNotification userInfo];

    NSTimeInterval animationDuration;
    UIViewAnimationCurve animationCurve;
    CGRect keyboardFrame;
    [[info objectForKey:UIKeyboardAnimationCurveUserInfoKey] getValue:&animationCurve];
    [[info objectForKey:UIKeyboardAnimationDurationUserInfoKey] getValue:&animationDuration];
    [[info objectForKey:UIKeyboardFrameBeginUserInfoKey] getValue:&keyboardFrame];

    [UIView beginAnimations:nil context:nil];
    [UIView setAnimationDuration:animationDuration];
    [UIView setAnimationCurve:animationCurve];
    [self.view setFrame:CGRectMake(self.view.frame.origin.x, self.view.frame.origin.y- keyboardFrame.size.height+TABBAR_HEIGHT, self.view.frame.size.width, self.view.frame.size.height)];

    [UIView commitAnimations];

}

-(void) keyboardWillHide:(NSNotification*)aNotification
{
    NSLog(@"Keyboard will hide");
    NSDictionary* info = [aNotification userInfo];

    NSTimeInterval animationDuration;
    UIViewAnimationCurve animationCurve;
    CGRect keyboardFrame;
    [[info objectForKey:UIKeyboardAnimationCurveUserInfoKey] getValue:&animationCurve];
    [[info objectForKey:UIKeyboardAnimationDurationUserInfoKey] getValue:&animationDuration];
    [[info objectForKey:UIKeyboardFrameBeginUserInfoKey] getValue:&keyboardFrame];

    [UIView beginAnimations:nil context:nil];
    [UIView setAnimationDuration:animationDuration];
    [UIView setAnimationCurve:animationCurve];
    [self.view setFrame:CGRectMake(self.view.frame.origin.x, self.view.frame.origin.y + keyboardFrame.size.height-TABBAR_HEIGHT, self.view.frame.size.width, self.view.frame.size.height)];

    [UIView commitAnimations];
}

@end
Table source
Now that we’ve done all that leg work to setup our view, (phew!), we can finally get to the main matter: populating our Table cells, and hooking its source to the Parse database we have opened. Fortunately, this is rather simple. As a - very neat - bonus, Parse includes in its framework a version of the EGORefreshTableHeader class, which enables the pull-to-refresh functionality on the table. We’re going to use it, of course. Notice that if you simply wanted a table without the entry field, you could have created a simple UITableViewController and populated it with your data in a few lines of code: there is a very simple, 5 minutes tutorial, on Parse website.
We’re going to add three delegates to our class: UITableViewDelegate, UITableViewDataSource,PF_EGORefreshTableHeaderDelegate. In order to use the last one, we need to import the Parse framework in our class: #import <Parse/Parse.h> goes at the top of our DMChatRoomViewController.h.
Since we created our table manually, we are going to create an outlet for our table, and a mutable array for its data:
IBOutlet UITableView    *chatTable;
NSMutableArray          *chatData;
PF_EGORefreshTableHeaderView *_refreshHeaderView;
Also create the properties:
@property (nonatomic, retain) UITableView *chatTable;
@property (nonatomic, retain) NSArray *chatData;
and synthesize them in DMChatRoomViewController.m.
Now, in the StoryBoard, Control-drag from the Chat Room View Controller to the Table View, and select the chatData outlet. Then Control-drag from the Table View, and select the Chat Room View Controller for both the dataSource and the delegate. If you build and run now, you’ll get a nice crash that tells you that the numberOfRowsInSection: method is not being implemented. In other words, the table we are trying to display does not have any methods defining how to display and populate it. Let’s just do it, then.
We’re going to need an indicator that signals whether the table is reloading, so add:
BOOL _reloading;
to your interface in DMChatRoomViewController.h. We’re also going to need a loading method for our data, call it loadLocalChat and add it after our keyboard methods in _DMChatRoomViewController.h:
- (void)loadLocalChat;
Let’s get done with the EGORefreshTableHeaderDelegate methods now. In DMChatRoomViewController.m, we add the following:
#pragma mark -#pragma mark Data Source Loading / Reloading Methods- (void)reloadTableViewDataSource{

    //  should be calling your tableviews data source model to reload
    //  put here just for demo
    _reloading = YES;
    [self loadLocalChat];
    [chatTable reloadData];
}

- (void)doneLoadingTableViewData{

    //  model should call this when its done loading
    _reloading = NO;
    [_refreshHeaderView egoRefreshScrollViewDataSourceDidFinishedLoading:chatTable];

}


#pragma mark -#pragma mark UIScrollViewDelegate Methods- (void)scrollViewDidScroll:(UIScrollView *)scrollView{

    [_refreshHeaderView egoRefreshScrollViewDidScroll:scrollView];

}

- (void)scrollViewDidEndDragging:(UIScrollView *)scrollView willDecelerate:(BOOL)decelerate{

    [_refreshHeaderView egoRefreshScrollViewDidEndDragging:scrollView];

}


#pragma mark -#pragma mark EGORefreshTableHeaderDelegate Methods- (void)egoRefreshTableHeaderDidTriggerRefresh:(PF_EGORefreshTableHeaderView*)view{

    [self reloadTableViewDataSource];
    [self performSelector:@selector(doneLoadingTableViewData) withObject:nil afterDelay:3.0];

}

- (BOOL)egoRefreshTableHeaderDataSourceIsLoading:(PF_EGORefreshTableHeaderView*)view{

    return _reloading; // should return if data source model is reloading

}

- (NSDate*)egoRefreshTableHeaderDataSourceLastUpdated:(PF_EGORefreshTableHeaderView*)view{

    return [NSDate date]; // should return date data source was last changed

}
We’re going to deal with the table delegate now. Add this code to DMChatRoomViewController.m (you’ll need to #import “chatCell.h” as well):
#pragma mark - Table view delegate- (NSInteger)tableView:(UITableView *)tableView numberOfRowsInSection:(NSInteger)section {
    return [chatData count];
}

- (UITableViewCell *)tableView:(UITableView *)tableView cellForRowAtIndexPath:(NSIndexPath *)indexPath
{
    chatCell *cell = (chatCell *)[tableView dequeueReusableCellWithIdentifier: @"chatCellIdentifier"];
    NSUInteger row = [chatData count]-[indexPath row]-1;

    if (row < chatData.count){
        NSString *chatText = [[chatData objectAtIndex:row] objectForKey:@"text"];
        cell.textLabel.lineBreakMode = UILineBreakModeWordWrap;
        UIFont *font = [UIFont systemFontOfSize:14];
        CGSize size = [chatText sizeWithFont:font constrainedToSize:CGSizeMake(225.0f, 1000.0f) lineBreakMode:UILineBreakModeCharacterWrap];
        cell.textString.frame = CGRectMake(75, 14, size.width +20, size.height + 20);
        cell.textString.font = [UIFont fontWithName:@"Helvetica" size:14.0];
        cell.textString.text = chatText;
        [cell.textString sizeToFit];

        NSDate *theDate = [[chatData objectAtIndex:row] objectForKey:@"date"];
        NSDateFormatter *formatter = [[NSDateFormatter alloc] init];
        [formatter setDateFormat:@"HH:mm a"];
        NSString *timeString = [formatter stringFromDate:theDate];
        cell.timeLabel.text = timeString;

        cell.userLabel.text = [[chatData objectAtIndex:row] objectForKey:@"userName"];
    }
    return cell;
}

- (CGFloat)tableView:(UITableView *)tableView heightForRowAtIndexPath:(NSIndexPath *)indexPath
{
    NSString *cellText = [[chatData objectAtIndex:chatData.count-indexPath.row-1] objectForKey:@"text"];
    UIFont *cellFont = [UIFont fontWithName:@"Helvetica" size:14.0];
    CGSize constraintSize = CGSizeMake(225.0f, MAXFLOAT);
    CGSize labelSize = [cellText sizeWithFont:cellFont constrainedToSize:constraintSize lineBreakMode:UILineBreakModeWordWrap];

    return labelSize.height + 40;
}
Now if you compile and run, you should be without error. It’s just a matter of connecting to Parse now, and loading our data… We check first that our reload method is working when pull-to-refresh is activated. Just add the following lines to the end of the viewDidLoad method:
    if (_refreshHeaderView == nil) {

        PF_EGORefreshTableHeaderView *view = [[PF_EGORefreshTableHeaderView alloc] initWithFrame:CGRectMake(0.0f, 0.0f - chatTable.bounds.size.height, self.view.frame.size.width, chatTable.bounds.size.height)];
        view.delegate = self;
        [chatTable addSubview:view];
        _refreshHeaderView = view;
    }
    //  update the last update date
    [_refreshHeaderView refreshLastUpdatedDate];
If we build and run, we’ll see that the well-known pull-to-refresh messages comes up, before a crash: we have not entered the loadChatCata method yet. Let’s do that, add these lines to your DMChatRoomViewController.m.
#pragma mark - Parse- (void)loadLocalChat
{
    PFQuery *query = [PFQuery queryWithClassName:className];


    // If no objects are loaded in memory, we look to the cache first to fill the table
    // and then subsequently do a query against the network.
    if ([chatData count] == 0) {
        query.cachePolicy = kPFCachePolicyCacheThenNetwork;
        [query orderByAscending:@"createdAt"];
        NSLog(@"Trying to retrieve from cache");
        [query findObjectsInBackgroundWithBlock:^(NSArray *objects, NSError *error) {
            if (!error) {
                // The find succeeded.
                NSLog(@"Successfully retrieved %d chats from cache.", objects.count);
                [chatData removeAllObjects];
                [chatData addObjectsFromArray:objects];
                [chatTable reloadData];
            } else {
                // Log details of the failure
                NSLog(@"Error: %@ %@", error, [error userInfo]);
            }
        }];
    }
    __block int totalNumberOfEntries = 0;
    [query orderByAscending:@"createdAt"];
    [query countObjectsInBackgroundWithBlock:^(int number, NSError *error) {
        if (!error) {
            // The count request succeeded. Log the count
            NSLog(@"There are currently %d entries", number);
            totalNumberOfEntries = number;
            if (totalNumberOfEntries > [chatData count]) {
                NSLog(@"Retrieving data");
                int theLimit;
                if (totalNumberOfEntries-[chatData count]>MAX_ENTRIES_LOADED) {
                    theLimit = MAX_ENTRIES_LOADED;
                }
                else {
                    theLimit = totalNumberOfEntries-[chatData count];
                }
                query.limit = [NSNumber numberWithInt:theLimit];
                [query findObjectsInBackgroundWithBlock:^(NSArray *objects, NSError *error) {
                    if (!error) {
                        // The find succeeded.
                        NSLog(@"Successfully retrieved %d chats.", objects.count);
                        [chatData addObjectsFromArray:objects];
                        NSMutableArray *insertIndexPaths = [[NSMutableArray alloc] init];
                        for (int ind = 0; ind < objects.count; ind++) {
                            NSIndexPath *newPath = [NSIndexPath indexPathForRow:ind inSection:0];
                            [insertIndexPaths addObject:newPath];
                        }
                        [chatTable beginUpdates];
                        [chatTable insertRowsAtIndexPaths:insertIndexPaths withRowAnimation:UITableViewRowAnimationTop];
                        [chatTable endUpdates];
                        [chatTable reloadData];
                        [chatTable scrollsToTop];
                    } else {
                        // Log details of the failure
                        NSLog(@"Error: %@ %@", error, [error userInfo]);
                    }
                }];
            }

        } else {
            // The request failed, we'll keep the chatData count?
            number = [chatData count];
        }
    }];
}
We’ve got two errors that pop up: a missing parameter, for which you can add #define MAX_ENTRIES_LOADED 25 to the top, and the className. This is the name of the class you are using on Parse, that references your database. It’s just a NSString we’re going to declare in our .h file interface, as:
NSString *className;
and initialize in our viewWillAppear as:
className = @"chatroom";
While we’re at it, add a userName variable to your .h:
NSString *userName;
and initialize it in viewWillAppear:
userName = @"John Appleseed";
Now we should be able to compile without errors. Let’s look at our LoadLocalChat method now. It all begins with a PFQuery, which is our query to the Parse server. Here we’ll query only one class, that is _@“chatRoom”, but we could have more than one in our app, of course. And structured differently as well. There are two ways to query Parse: synchronously or asynchronously. The former should be used ***only for testing purposes***. Querying your database synchronously means it is performed on your main thread, and therefore hangs your interface. Not good at all. In addition, we want our user to be presented with some content when the database loads, and therefore the first thing we do is loading the cache. The Parse framework handles the caching for us, which is simply great.
We then proceed to loading our data if necessary, ie. if there are new entries. Parse lets us use blocks, and we take full advantage of that feature while using the method [query countObjectsInBackgroundWithBlock:^(int number, NSError *error) {…}. If we run the app now, we should be getting a console resembling that:
 chatDemo[94443:f803] Trying to retrieve from cache
    chatDemo[94443:f803] Error: result not cached (Code: 120, Version: 0.4.40)
    chatDemo[94443:f803] Error: Error Domain=Parse Code=120 "The operation couldn’t be completed. (Parse error 120.)" UserInfo=0x68d4e10 {code=120, error=result not cached} {
    code = 120;
    error = "result not cached";
}
    chatDemo[94443:f803] There are currently 0 entries
    chatDemo[94443:f803] Successfully retrieved 0 chats from cache.
In other words, we successfully connected to Parse, and there is nothing to show, not any cached data. Let’s assign the chatDat first in our viewWillAppear:
chatData  = [[NSMutableArray alloc] init];
[self loadLocalChat];
And now we’re just going to modify our textFieldShouldReturn method, and we’re done. Change it to the following:
- (BOOL)textFieldShouldReturn:(UITextField *)textField
{
    NSLog(@"the text content%@",tfEntry.text);
    [textField resignFirstResponder];

    if (tfEntry.text.length>0) {
        // updating the table immediately
        NSArray *keys = [NSArray arrayWithObjects:@"text", @"userName", @"date", nil];
        NSArray *objects = [NSArray arrayWithObjects:tfEntry.text, userName, [NSDate date], nil];
        NSDictionary *dictionary = [NSDictionary dictionaryWithObjects:objects forKeys:keys];
        [chatData addObject:dictionary];

        NSMutableArray *insertIndexPaths = [[NSMutableArray alloc] init];
        NSIndexPath *newPath = [NSIndexPath indexPathForRow:0 inSection:0];
        [insertIndexPaths addObject:newPath];
        [chatTable beginUpdates];
        [chatTable insertRowsAtIndexPaths:insertIndexPaths withRowAnimation:UITableViewRowAnimationTop];
        [chatTable endUpdates];
        [chatTable reloadData];

        // going for the parsing
        PFObject *newMessage = [PFObject objectWithClassName:@"chatroom"];
        [newMessage setObject:tfEntry.text forKey:@"text"];
        [newMessage setObject:userName forKey:@"userName"];
        [newMessage setObject:[NSDate date] forKey:@"date"];
        [newMessage saveInBackground];
        tfEntry.text = @"";
    }

    // reload the data
    [self loadLocalChat];
    return NO;
}
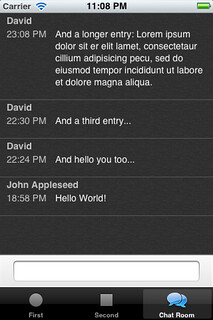
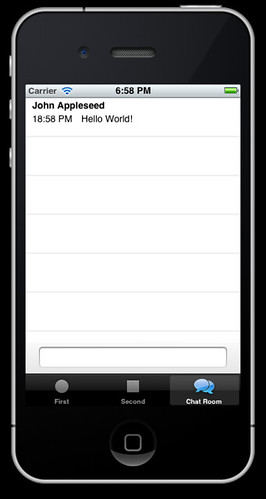
Compile and run, and you should be able to send a message to your chatroom, say “Hello World!”, like so:

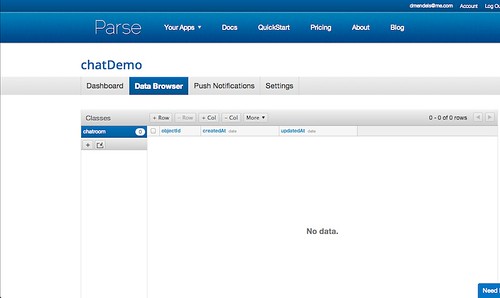
Something really interesting happened. Remember I told you earlier about Parse’s ability to Lazy parse your data? We did not declare anything on the server side, yet, if we now compare our “chatRoom” class in the web browser before and after we messaged, we get the following picture:
*** BEFORE ***
*** AFTER ***
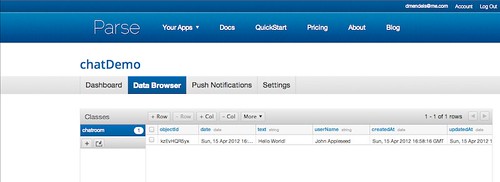
This means quite simply that Parse has created the database fields upon our parsing of the message object. This is done through the creation of the PFObject for which we set three keys: userName, text and date. When we send the command saveInBackground, the framework sends the object to the server, where the fields are created as they did not exist. One pretty cool feature is that you can add fields on-the-go as well, ie. if you decide to add say a gender key, you’ll just need to issue a new key to your object, and it will add it to all the previous and future entries. Neat, eh?
Conclusion
So, there you have it, your own private chat room. That was a long one, and I hope that you could follow. It’s honestly not that complicated once you know what you’re doing, just takes a bit of time to get into it. The full project is available on github, and there’s a bit of a bonus in there:
to be good Apple/iPhone citizens, I’ve added the check that the connection is alive (check on the network status, quite standard if you want to submit to the AppStore);
as it’s become really easy to do in iOS5, I’ve also added a pop-up alert to set the userName. John Appleseed has enough work on his plate, let’s not bother him with infinite chat testing as well.
Hope it was useful, and don’t hesitate to fork the project on Github and submit your corrections/comments etc. I’m looking forward to hearing from you, and can be reached on twitter @davmendels.
48 Notes/ Hide
jessecolinscott liked this
 pranayprajapati92-blog reblogged this from attila
  ourstudyworld liked this
 dadutchess liked this
shebella1014 reblogged this from attila
pocketfoo-blog-blog reblogged this from attila
voiidpriince liked this
 mega-darkart liked this
 rodkar liked this
mobileordering-blog reblogged this from attila
localbusinessapps-blog liked this
vfreeappsnh-blog liked this
kandroidsi-blog liked this
aceisbored reblogged this from attila
wesleybao reblogged this from attila
 frabrunelle liked this
  y-ios reblogged this from attila
 codepress-blog reblogged this from attila
fallenhitokiri liked this
 velho-novo-coracao liked this
 blogi0 liked this
dekiminato-blog liked this
- bluefivecn-blog liked this
lifelovecode liked this
kentfenwick-blog reblogged this from attila
attila posted this