The Project File Part 2: Schemes and Targets
Welcome to part 2 of my Project file series! Before reading this post, I suggest familiarizing yourself with part 1.
Schemes and targets are the building blocks of apps in Xcode. Every app has at least one scheme and one target. Just like everything else in Xcode’s build system, these have representations on disk that are used to keep track of the settings needed to build.
Terminology
Before digging into some of the details on how schemes and targets work, there are a number of terms that need to be defined.
- Product: Apple’s term for the output of a compilation. There are set pre-defined target types: application, test, static library, and framework to name a few.
- NativeTarget: a set of instructions for building a product. These usually go un-qualified because they are much more frequent than the other kinds of target.
- Aggregate Target: a set of instructions for building multiple targets. This is flexible and can be used to do pieces of work that don’t output a product. Example: mogenerator is run with an aggregate target but outputs no built product.
- Legacy Target: a set of instructions that calls a command-line system for building. If a project needs a dependency that needs to run
maketo build, this is the kind of target to use. - Scheme: a set of instructions for building one or more targets. This is the top-most instruction set that Xcode uses and only one can be active at a time. Schemes also have the ability to be private or public. By default, every Xcode project is created with 1 target and 1 public scheme, which is the minimum requirement for building in Xcode.
Targets
All target information is saved in the .pbxproj with the type PBXNativeTarget or PBXAggregateTarget. Here’s what a simple target looks like:
D9B6428F176A2E17003D8169 /* Catstagrame */ = {
			isa = PBXNativeTarget;
			buildConfigurationList = D9B642C5176A2E17003D8169 /* Build configuration list for PBXNativeTarget "Catstagrame" */;
			buildPhases = (
				5886B8DBD5B540EDADB3C9A3 /* Check Pods Manifest.lock */,
				D9B6428C176A2E17003D8169 /* Sources */,
				D9B6428D176A2E17003D8169 /* Frameworks */,
				D9B6428E176A2E17003D8169 /* Resources */,
				291A5E171FA24E5AA4E0C13F /* Copy Pods Resources */,
				D9847C20177F8CA400C3F95B /* Copy Key */,
			);
			buildRules = (
			);
			dependencies = (
			);
			name = Catstagrame;
			productName = Catstagrame;
			productReference = D9B64290176A2E17003D8169 /* Catstagrame.app */;
			productType = "com.apple.product-type.application";
		};
The keys within this object should look fairly familiar–they correspond with information we see within the project view in Xcode. $(TARGET_NAME) is retrieved from the name field. The buildConfigurationList populates the Build Settings tab, buildRules populates the Build Rules tab, and buildPhases and dependencies are shown in the Build Phases tab. The productReference is the UID used to refer to the built product, not the target itself even though they can appear to be very similar.
Product Types
Even though we only have 3 kinds of targets, only PBXNativeTarget has multiple product types. When adding a Legacy or Aggregate product, productReference and productType are missing from the entity. The most common types of products are fairly self-explanatory:
com.apple.product-type.framework
com.apple.product-type.library.static
com.apple.product-type.application.watchapp2
com.apple.product-type.watchkit2-extension
com.apple.product-type.bundle.unit-test
tvOS
One really interesting tidbit about tvOS targets is that they are listed exactly the same as iOS targets. The main tvOS application is a com.apple.product-type.application. All of the entries are the same as an iOS app, with a few different build settings set in the XCBuildConfiguration section:
SDKROOT = appletvos;
TARGETED_DEVICE_FAMILY = 3;
TVOS_DEPLOYMENT_TARGET = 9.0;
Schemes
Schemes are saved in a separate xml file, within xcuserdata or xcshareddata. Most repositories ignore xcuserdata since Xcode also put things in there like breakpoint settings that shouldn’t be shared between developers. These .xcscheme files are standard xml, not plists like many other files used by Xcode internals. Like the .pbxproj this is not a full representation of scheme data–there is an internal-to-Xcode set of flags that it overrides.
At a quick glance, this file appears to be fairly generic. In reality it is tightly coupled to the project file and targets therein. Every target that is explicitly included in the scheme is referenced within the .xcscheme by UID. Because of this, these cannot simply be copy-pasted between different Xcode projects and “just work.”
This file is auto-generated by Xcode, and just like the project file will be overwritten on a regular basis. Edits to this file should only be made while the corresponding Xcode project is not open.
The root of this file includes information for performing all of the different actions within the project: build, test, launch, profile, analyze, and archive. Unlike the project file, there are no key/value pairs that reference a particular entity so as you read through it, you will notice many references that look the same. The name of the scheme is the name of the file.
<?xml version="1.0" encoding="UTF-8"?>
<Scheme
   LastUpgradeVersion = "0500"
   version = "1.7">
   <BuildAction>
   	...
   </BuildAction>
   <TestAction>
   ...
   </TestAction>
   <LaunchAction>
   ...
   </LaunchAction>
   <ProfileAction>
   ...
   </ProfileAction>
   <AnalyzeAction>
   ...
   </AnalyzeAction>
   <ArchiveAction>
   ...
   </ArchiveAction>
</Scheme>
All of these Actions are named the same as they are used in Xcode except for LaunchAction which is actually Run.
References
Dependencies are referenced within each of the sections within a BuildableReference entry. The presence of one of these means that action is dependent upon Build happening first, which is the case for all other Actions. Unlike in the project file, the same BuildableReference is included several times to refer to the same target. There is also a reference to the project file that contains the target. The UID is referenced by the BlueprintIdentifier key. The project file the target comes from is also included.
<BuildableReference
   BuildableIdentifier = "primary"
   BlueprintIdentifier = "3AA4FE2703EA4DC3A89C1CCC"
   BuildableName = "libPods.a"
   BlueprintName = "Pods"
   ReferencedContainer = "container:Pods/Pods.xcodeproj">
</BuildableReference>
Actions
The Build Action is the only action that refers to multiple targets. As such, it includes a list of BuildableReferences within BuildActionEntries that refer to the explicit dependencies specified by the contained targets. These come from Target Dependencies or Link Binary With Library where the library is also a target within the workspace. All other Actions nest the BuildableReference inside whatever needs to reference the product.
<BuildableProductRunnable
   runnableDebuggingMode = "0">
   <BuildableReference
      BuildableIdentifier = "primary"
      BlueprintIdentifier = "D9B6428F176A2E17003D8169"
      BuildableName = "Catstagrame.app"
      BlueprintName = "Catstagrame"
      ReferencedContainer = "container:Catstagrame.xcodeproj">
   </BuildableReference>
</BuildableProductRunnable>
Another difference between schemes and the project file is that each action has a different set of configuration options. All actions have pre- and post- actions that can be performed before the main action, but that is the only consistency between action types. Analyze and Archive have the fewest options whereas Launch has the most. This mirrors the Edit Scheme dialogue in Xcode.
<AnalyzeAction
   buildConfiguration = "Debug">
</AnalyzeAction>
<ArchiveAction
   buildConfiguration = "Release"
   revealArchiveInOrganizer = "YES">
</ArchiveAction>
Options
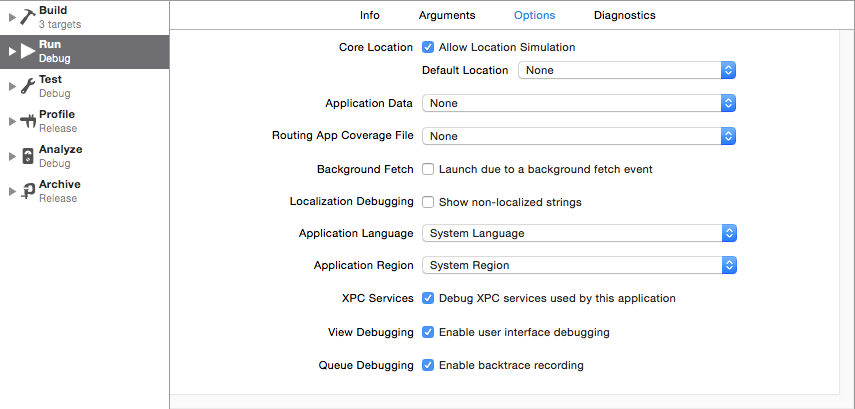
All of the actions have options associated with them. These are included in the opening tag of the Action as attributes. Not all of the options that show in the Xcode Edit Scheme menu are listed, and some only appear when they are turned on.
<LaunchAction
   buildConfiguration = "Debug"
   selectedDebuggerIdentifier = "Xcode.DebuggerFoundation.Debugger.LLDB"
   selectedLauncherIdentifier = "Xcode.DebuggerFoundation.Launcher.LLDB"
   launchStyle = "0"
   useCustomWorkingDirectory = "NO"
   ignoresPersistentStateOnLaunch = "NO"
   debugDocumentVersioning = "YES"
   debugServiceExtension = "internal"
   allowLocationSimulation = "YES">
For example, turning on Localization Debugging adds showNonLocalizedStrings = "YES" but when turned off the attribute is simply missing. On the other hand, allowLocationSimulation is present regardless of whether it is enabled or not.
Pre- and Post- Actions
There are only 2 kinds of pre- and post- actions available: send email and run script.
The Send Email action will open up Mail.app on your computer and send an email from your default email account. There’s no way to add any variables or conditionals. Oh and attachLogToEmail doesn’t appear to do anything.
<ExecutionAction
   ActionType = "Xcode.IDEStandardExecutionActionsCore.ExecutionActionType.SendEmailAction">
   <ActionContent
      title = "Send Email"
      emailRecipient = "thedoctor@tardis.space"
      emailSubject = "Sup"
      emailBody = "Bowties are cool"
      attachLogToEmail = "NO">
   </ActionContent>
</ExecutionAction>
The Script action is much more useful. It can run in any shell in any language you have installed. However, just like with the PBXShellScriptBuildPhase the script will be contained within the scheme file. Thankfully it will automatically escape quotes to ". By default, this is run from within the build directory. So if your goal is to modify contents of the workspace, you can cd ${SRCROOT}.
So for this script:
cd ${SRCROOT}

pod install #>> /tmp/output.txt
It gets saved as:
<ExecutionAction
ActionType = "Xcode.IDEStandardExecutionActionsCore.ExecutionActionType.ShellScriptAction">
<ActionContent
title = "Run Script"
scriptText = "cd ${SRCROOT} pod install #>> /tmp/output.txt"
shellToInvoke = "/usr/bin/env bash">
<EnvironmentBuildable>
<BuildableReference
BuildableIdentifier = "primary"
BlueprintIdentifier = "D9B6428F176A2E17003D8169"
BuildableName = "Catstagrame.app"
BlueprintName = "Catstagrame"
ReferencedContainer = "container:Catstagrame.xcodeproj">
</BuildableReference>
</EnvironmentBuildable>
</ActionContent>
</ExecutionAction>
All of the flags passed into the build are available for use within these actions, including things like ${PRODUCT_NAME}. Note: Any sort of echo or print will not show up in the build logs, console etc. Send output to a file in order to see what’s going on.
One other nifty fact: changing the titles does also update them in Xcode. So you can send a REALLY COOL email for instance.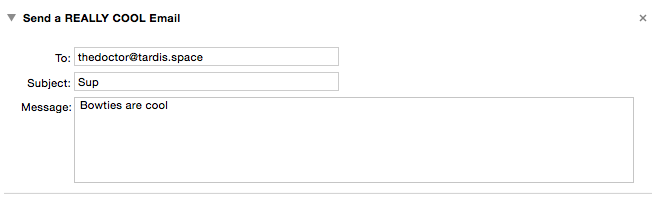
In Conclusion
Schemes and targets are the building blocks of our applications, and it turns out they are fairly complicated. Thankfully the naming conventions used in the project and scheme files is fairly explicit and easily tied into Xcode’s views of the same information. Configuring these at a deer level than the defaults that Xcode provide can simplify many processes and automate common tasks. Xcode is a powerful tool. But we all know: with great power, comes great responsibility, so edit wisely.