 Navigation
Two-Node Setup of a Private Ethereum on AWS with Contract Deployment (Part 2)
Recap
In Part 1, we have completed a setup of two-node private Ethereum blockchain. Now we deploy a contract on this blockchain, and the accounts of both nodes can access the contract and execute the functions.
My plan is to deploy the contract on Node 1 and see how Node 2 accesses this contract.
The contract I am using is the “Voting.sol” by Mahesh Murthy in his blog (link). He wrote a very comprehensive guide about Ethereum application. While he deployed the application on testrpc, I plan to deploy the same contract on my private blockchain with the same deployment example. You can easily cross-check the deployment procedure.
Since he has explained in very detail how the code compilation works, I will skip the detail and only refer to some points relevant to my contract deployment. Please refer to his Part 1 (link) on the detail about the code and the compilation.
The Code “Voting.sol”
Voting.sol (source: link)
pragma solidity ^0.4.11;
// We have to specify what version of compiler this code will compile with

contract Voting {
  /* mapping field below is equivalent to an associative array or hash.
  The key of the mapping is candidate name stored as type bytes32 and value is
  an unsigned integer to store the vote count
  */

  mapping (bytes32 => uint8) public votesReceived;

  /* Solidity doesn't let you pass in an array of strings in the constructor (yet).
  We will use an array of bytes32 instead to store the list of candidates
  */

  bytes32[] public candidateList;

  /* This is the constructor which will be called once when you
  deploy the contract to the blockchain. When we deploy the contract,
  we will pass an array of candidates who will be contesting in the election
  */
  function Voting(bytes32[] candidateNames) {
    candidateList = candidateNames;
  }

  // This function returns the total votes a candidate has received so far
  function totalVotesFor(bytes32 candidate) returns (uint8) {
    if (validCandidate(candidate) == false) throw;
    return votesReceived[candidate];
  }

  // This function increments the vote count for the specified candidate. This
  // is equivalent to casting a vote
  function voteForCandidate(bytes32 candidate) {
    if (validCandidate(candidate) == false) throw;
    votesReceived[candidate] += 1;
  }

  function validCandidate(bytes32 candidate) returns (bool) {
    for(uint i = 0; i < candidateList.length; i++) {
      if (candidateList[i] == candidate) {
        return true;
      }
    }
    return false;
  }
}
d!'
This is a simple contract to illustrate how Solidity code works. Here are some points we will refer to in this part.
- The contract requires a list of candidates (see the constructor). We will input this when deploying a new contract.
- Two functions are defined in this contract: total Voting For and vote For Candidate. We will use these two functions to interact with the contract from both nodes.
You can find the detail process of compilation (using solc) here. After compilation, we need two pieces of information for contract deployment. They are the Application Binary Interface (ABI) and Bytecode.
Application Binary Interface (ABI)
It contains the methods available in this contract that users can interact with. Here is the ABI for this Voting contract.
'[{"constant":false,"inputs":[{"name":"candidate","type":"bytes32"}],"name":"totalVotesFor","outputs":[{"name":"","type":"uint8"}],"payable":false,"type":"function"},{"constant":false,"inputs":[{"name":"candidate","type":"bytes32"}],"name":"validCandidate","outputs":[{"name":"","type":"bool"}],"payable":false,"type":"function"},{"constant":true,"inputs":[{"name":"","type":"bytes32"}],"name":"votesReceived","outputs":[{"name":"","type":"uint8"}],"payable":false,"type":"function"},{"constant":true,"inputs":[{"name":"","type":"uint256"}],"name":"candidateList","outputs":[{"name":"","type":"bytes32"}],"payable":false,"type":"function"},{"constant":false,"inputs":[{"name":"candidate","type":"bytes32"}],"name":"voteForCandidate","outputs":[],"payable":false,"type":"function"},{"inputs":[{"name":"candidateNames","type":"bytes32[]"}],"payable":false,"type":"constructor"}]'
Bytecode
It is the actual contract code to be deployed on the blockchain. Here is the bytecode.
'0x6060604052341561000c57fe5b6040516103d83803806103d8833981016040528080518201919050505b806001908051906020019061003f929190610047565b505b506100bf565b828054828255906000526020600020908101928215610089579160200282015b82811115610088578251829060001916905591602001919060010190610067565b5b509050610096919061009a565b5090565b6100bc91905b808211156100b85760008160009055506001016100a0565b5090565b90565b61030a806100ce6000396000f30060606040526000357c0100000000000000000000000000000000000000000000000000000000900463ffffffff1680632f265cf714610067578063392e6678146100a55780637021939f146100e1578063b13c744b1461011f578063cc9ab2671461015b575bfe5b341561006f57fe5b61008960048080356000191690602001909190505061017f565b604051808260ff1660ff16815260200191505060405180910390f35b34156100ad57fe5b6100c76004808035600019169060200190919050506101cd565b604051808215151515815260200191505060405180910390f35b34156100e957fe5b610103600480803560001916906020019091905050610233565b604051808260ff1660ff16815260200191505060405180910390f35b341561012757fe5b61013d6004808035906020019091905050610253565b60405180826000191660001916815260200191505060405180910390f35b341561016357fe5b61017d600480803560001916906020019091905050610278565b005b60006000151561018e836101cd565b1515141561019c5760006000fd5b60006000836000191660001916815260200190815260200160002060009054906101000a900460ff1690505b919050565b60006000600090505b6001805490508110156102285782600019166001828154811015156101f757fe5b906000526020600020900160005b505460001916141561021a576001915061022d565b5b80806001019150506101d6565b600091505b50919050565b60006020528060005260406000206000915054906101000a900460ff1681565b60018181548110151561026257fe5b906000526020600020900160005b915090505481565b60001515610285826101cd565b151514156102935760006000fd5b600160006000836000191660001916815260200190815260200160002060008282829054906101000a900460ff160192506101000a81548160ff021916908360ff1602179055505b505600a165627a7a72305820994b2ebbfeec46890216bc547cf9a1292547cc43f08440506866c34b2ff0ac9e0029'
Steps
Step 1: Install node.js and web3 on both nodes
The interaction to contract is through nodejs and web3js. We need to install nodejs and the web3 modules. I follow the procedure suggested here (link).
Node 1
$ sudo apt-get install python-software-properties
$ curl -sL https://deb.nodesource.com/setup_6.x | sudo -E bash -
$ sudo apt-get install nodejs
To verify successful installation, use $ node -v and $ npm -v, and their version is shown.
Then install web3 module.
Node 1
$ npm install web3
Repeat this step in Node 2 as well.
Step 2: Access Blockchain through web3 in Node Console
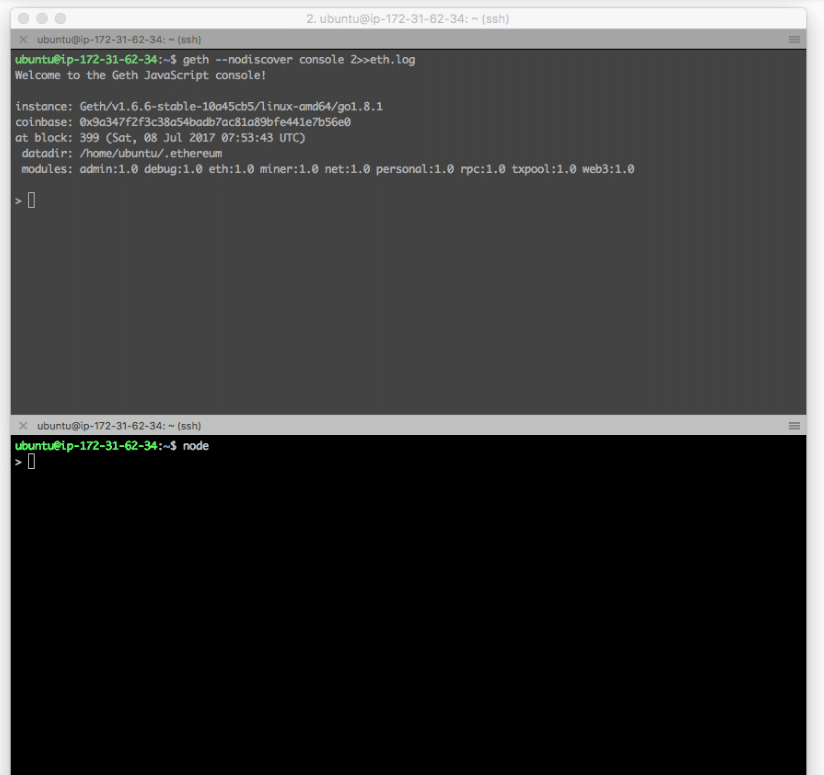
We are ready to access the node. Since we need both geth client and node console, we will use split screen again. The top terminal is geth, and the bottom is node console.
To start the geth, depending on whether you still have geth running, either command should bring you back to console.
Node 1 (geth)
$ geth --nodiscover console 2>>eth.log OR
$ geth attach
To start the node console, simply use this
Node 1 (node)
$ node
We are now ready to use node console to access geth by rpc. The default rpc is on http://localhost:8545/.
First, turn on rpc on geth:
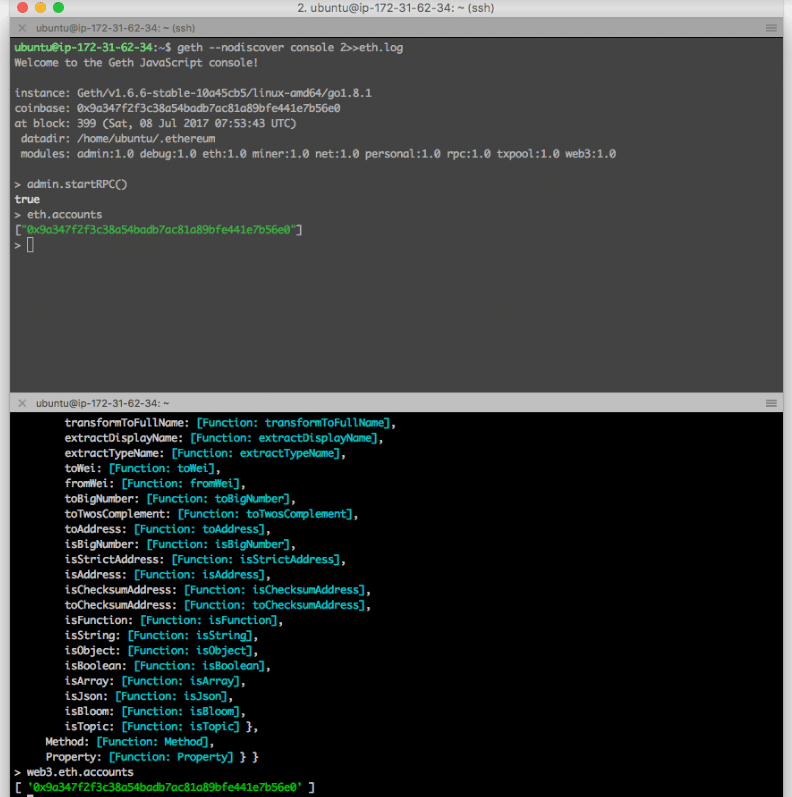
Node 1 (geth)
> admin.startRPC()
On node console,
Node 1 (geth)
> admin.startRPC()
To verify if the node can reach geth successfully we can use > web3.eth.accounts on node console. We should see the account that we created on geth console.
Repeat this step on Node 2.
Step 3: Deploy Contract on Node 1
We now deploy the contract on this private blockchain from Node 1.
Node 1 (node)
> abi = <abi shown above>
> VotingContract = web3.eth.contract(JSON.parse(abi))
> byteCode = <bytecode shown above>
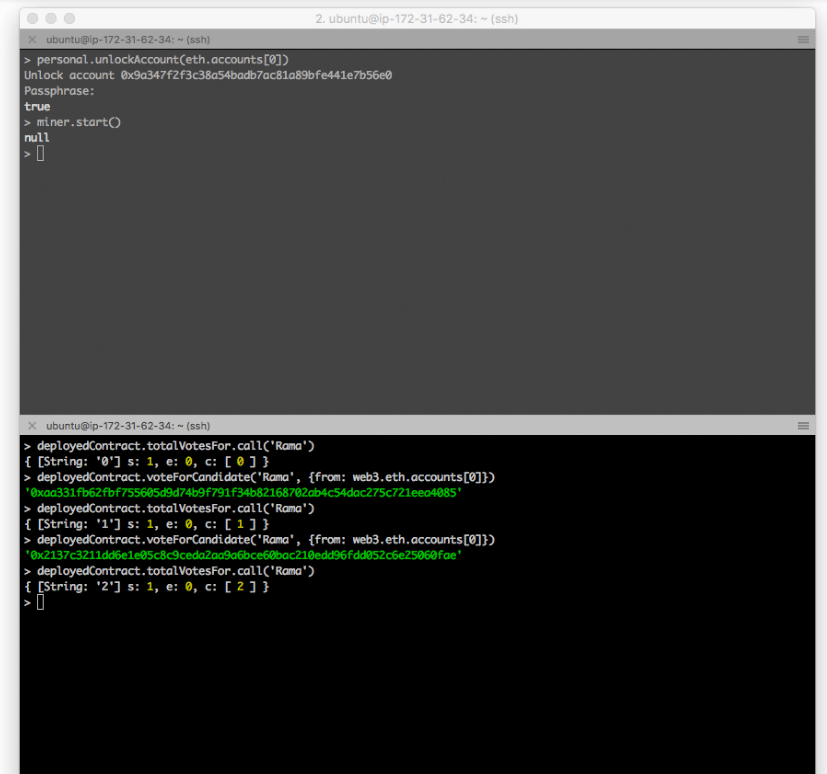
As the deployment requires gas, we need to unlock the account and turn on mining
Node 1 (geth)
> personal.unlockAccount(eth.accounts[0])
> miner.start()
Now we deploy the contract. This contract requires a list of candidates. We will include this when deploying the contract.
Node 1 (node)
> deployedContract = VotingContract.new(['Rama', 'Nick', 'Jose'], { data: byteCode, from: web3.eth.accounts[0], gas: 4700000 })
Now the contract is deployed. And we can execute the functions for verification. We will see the vote increasing when we keep executing the functions.
Node 1 (node)
> deployedContract.totalVoteFor.call('Rama')
> deployedContract.voteForCandidate('Rama', {from: web3.eth.accounts[0]})
The contract is successfully deployed. Now we move to Node 2 and see how account in Node 2 can also access this contract.
Step 4: Access Contract from Node 2
Make sure Node 1 and Node 2 have already peered. Verify by > admin.peers on geth console on both nodes. Refer to Part 1 how to do if needed.
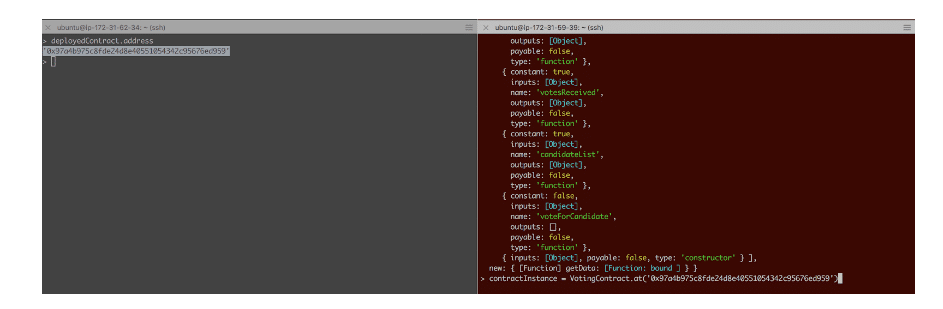
The information required for an account in Node 2 accessing this deployed contract is (1) the ABI and (2) its deployed address. We have ABI information already. Now from Node 1 we can obtain this deployed address.
Node 1 (node)
> deployedContract.address
'0x97a4b975c8fde24d8e40551054342c95676ed959'
0]})
For ABI, we define VotingContract with the same abi on Node 2.
Node 2 (node)
> abi = <abi shown above>
> VotingContract = web3.eth.contract(JSON.parse(abi))
We do not need to deploy a new contract as we did on Node 1. Instead, we define the contract instance based on the VotingContract and the address we obtained from Node 1.
Node 2 (node)
> contractInstance = VotingContract.at('0x97a4b975c8fde24d8e40551054342c95676ed959')
Left-hand-side is Node 1, and right-hand-side is Node 2.
Now, contract Instance is the point we can access this deployed contract in Node 2. We can issue the commands just as we do on Node 1:
Node 2 (node)
> contractInstance.totalVoteFor.call('Rama')
> contractInstance.voteForCandidate('Rama', {from: web3.eth.accounts[0]})
)
Don’t forget to unlock the account on Node 2 when voting, as this consumes gas to execute a function on the contract.
Step 5: Verification
By interacting on both nodes, we see accounts on both nodes are acting on the same contract. Here I capture the interaction between the two nodes.
- Both nodes see the same result (vote count for Rama is 4).
- An account on Node 1 votes for Rama once.
- From Node 2 we see the vote count for Rama is now 5.
- An account on Node 2 votes for Rama again.
- From Node 1 now we see the vote count is now 6.
Closing
This setup emulates the real ethereum operation. New nodes can easily join the public chain and can access deployed contract. Of course, in real life, the application is most likely accessed through web interface. Nevertheless, using console helps understanding more the interaction behind.
Once again, thanks for many works by others which inspire and guide my overall setup. Here they are,
- JJ’s World: Setting up a private Ethereum blockchain (link)
- Mahesh Murthy: Ethereum for Web Developers (link)
- MLG Blockchain Consulting: Use Go-Ethereum to Setup an Ethereum Blockchain on AWS (link)


marketing dissertation help https://helpon-doctoral-dissertations.net/
dissertation writing company https://dissertations-writing.org/
dissertation dedication examples https://mydissertationwritinghelp.com/
phd dissertation editing help https://dissertationwriting-service.com/
dissertation help service binding https://buydissertationhelp.com/
battle slots download https://slotmachinegameinfo.com/
winning slots https://www-slotmachines.com/
ruby slots https://411slotmachine.com/
river slots app https://download-slot-machines.com/
slots plus bonus codes https://beat-slot-machines.com/
free giants gold slots https://slot-machine-sale.com/
cashman casino slots free https://slotmachinesforum.net/
igt slots online for free https://slotmachinesworld.com/
hollywood slots https://pennyslotmachines.org/
free slots vegas https://candylandslotmachine.com/
slots games https://freeonlneslotmachine.com/
clearwater slots https://2-free-slots.com/
dating black gay ass https://speedgaydate.com/
indiana gay chat https://gay-buddies.com/
gay chat chartestone https://gaytgpost.com/
gay dating us marine https://gaypridee.com/
free asain chat lines gay https://bjsgaychatroom.info/
2earthen
Hi KC,
It is very helpful.
Thanks,
Kannan TN
Hi KC,
It is very helpful.
Thanks,
Kannan TN
Hi KC,
It is very helpful.
Thanks,
Kannan TN
Extremely helpful tutorial, KC. Just a small correction in Step 2:
On node console,
———————-
Node 1 (geth)
> admin.startRPC()
———————-
should be:
———————-
Node 1 (node)
> var web3 = new Web3(new Web3.providers.HttpProvider(“http://localhost:8545”))
———————-
Good catch. And thanks for correcting.
I have checked my origin and it’s written as yours. So I guess it’s just wrongly pasted when the article was posted here. And it looks like this,
Node 1 (node)
> Web3 = require(‘web3’)
> web3 = new Web3(new Web3.providers.HttpProvider(“http://localhost:8545”))
Thanks again and have a great weekend!
Hello KC,
Super Interesting, I’ll have to go and read part 1.
I am going to put some time into learning / installing Ethereum and practice with private chains.
Thanks for posting
Abe
Thanks Abe. The links embedded in the document can help understanding more on this topic. Beside setting up Ethereum private chains, you can also learn some programming skill on Solidity (if you have not yet). You will find more fun.
cheers, kc
thanks for posting these. Fairly lost – but I appreciate being able to have the step by step experiments drawn out
thanks for posting these. Fairly lost – but I appreciate being able to have the step by step experiments drawn out
thanks for posting these. Fairly lost – but I appreciate being able to have the step by step experiments drawn out
[…] Read Part Two Here […]
[…] Read Part Two Here […]
[…] Read Part Two Here […]
[…] post Two-Node Setup of a Private Ethereum on AWS with Contract Deployment (Part 2) appeared first on […]
[…] post Two-Node Setup of a Private Ethereum on AWS with Contract Deployment (Part 2) appeared first on […]
[…] post Two-Node Setup of a Private Ethereum on AWS with Contract Deployment (Part 2) appeared first on […]