by Gareth Fuller
Deploy a NUXT app to S3 in 5 minutes
Step by step guide to deploy a NUXT app with Vue.js to an AWS S3 bucket with a custom domain and everything! ?
To start with, I’m assuming that you are somewhat familiar with Vue.js, NUXT and Amazon AWS S3 buckets.
We’ve only got 5 minutes so lets get started.
1. Install the Vue CLI
On the command line:
npm install -g @vue/clithen
npm install -g @vue/cli-init2. Create your NUXT app
On the command line:
vue init nuxt-community/starter-template exampleapp-frontendthen
cd exampleapp-frontend3. Test the development environment
On the command line:
npm installthen
npm run devIf you navigate to localhost:3000 in your browser you should see the default NUXT home page.
4. Generate your NUXT app
On the command line:
npm run generateThis generates a /dist folder with your production NUXT app build. This is the folder we’ll be deploying to S3.
5. Install the AWS CLI
We need the AWS CLI so that we can create and manipulate our S3 bucket quickly from the command line.
pip install awscli --upgrade --user6. Configure your AWS CLI
This step is so you have the authorization to create an S3 bucket in your AWS account from the command line.
aws configureIt will then ask for some credentials:
AWS Access Key ID: [ENTER YOUR ACCESS KEY]
AWS Secret Access Key: [ENTER YOUR SECRET ACCESS KEY]
Default region name: [ENTER YOUR PREFERRED REGION NAME]
Default output format: json
For your ‘Default region name’ choose which ever is most appropriate for you. Here is a list of available regions for the S3 service.
7. Create your S3 bucket
On the command line:
aws s3api create-bucket --bucket yourdomain.com --region eu-west-1 --create-bucket-configuration LocationConstraint=eu-west-1Note that we’ve named the bucket after the domain name we want to use. Replace ‘yourdomain.com’ with whatever domain you want to have your app at. Also, replace ‘eu-west-1’ with your own preferred region.
8. Enable S3 bucket static website hosting
On the command line:
aws s3 website s3://yourdomain.com/ --index-document index.html --error-document index.htmlNote that here we are also setting the index and error documents of our S3 static hosting bucket. For this example we have set them both to the NUXT index page (index.html) but in the future you may want to change the --error-document to an actual error page.
9. Enable S3 bucket versioning
On the command line:
aws s3api put-bucket-versioning --bucket yourdomain.com --versioning-configuration Status=Enabled10. Create an S3 Policy to upload to S3 bucket
This allows your S3 bucket to be accessed via a public URL.
In your local directory create a JSON file called policy.json and add the following:
{
  "Statement": [
    {
      "Effect": "Allow",
      "Principal": "*",
      "Action": "s3:GetObject",
      "Resource": "arn:aws:s3:::yourdomain.com/*"
    }
  ]
}
Then add the policy to your bucket from the command line:
aws s3api put-bucket-policy --bucket yourdomain.com --policy file://policy.json11. Deploy your NUXT app to S3
On the command line:
aws s3 cp dist s3://yourdomain.com --recursiveHere we are essentially uploading the contents of our /dist folder to the S3 bucket we have just created.
12. Point your custom URL at your new app
Get your S3 bucket URL from the ‘Properties’ section of your S3 bucket:
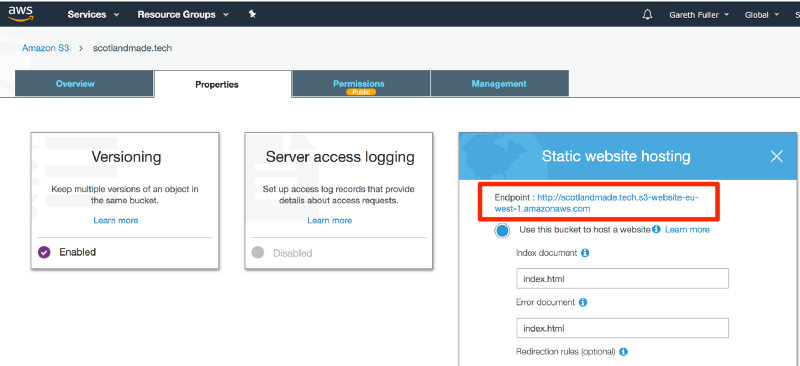
Set the root CNAME record of your custom domain to point to that endpoint. If you are using Cloudflare for DNS you would set it up like this:
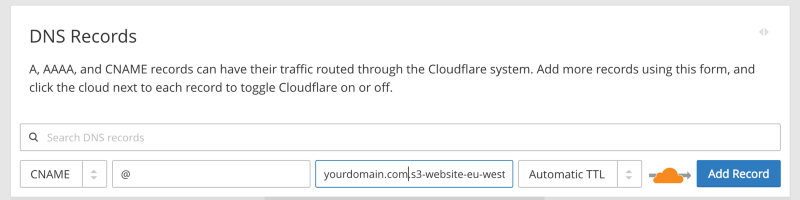
Note: you may also need to delete any DNS A records you currently have associated with your domain.
And that’s it!
If you browse to the domain you’ve specified (in our case yourdomain.com), you should be able to see the NUXT app default page.
Don’t believe it can be done in 5 minutes? I followed my own article, recorded it in a screen-cast and did it in exactly 5 minutes!
Total fluke actually.
Here’s the video: