

The creator of Vapor, a web framework for Swift, explains why you should consider using Swift for your next server-side project. You will learn about what makes Swift a great server-side language, what you can create, and how to deploy your first Swift web app.
Introduction
Two years ago I was working at a startup here in New York as both an iOS developer and a backend developer. As I was working there, I was constantly jumping between using Swift for iOS and a scripted language for the backend, and I kept wishing that I could use Swift on the backend. Perhaps due to some divine intervention, this was right when Swift was open-sourced and more importantly, a Linux compatible compiler was released.
I was excited about that and later I created Vapor. Due to some generous sponsorship we’re able to work full time on it with four developers.
I want to talk first about using Swift as a backend since many of you out there are iOS developers. Then I want to talk about getting started with Vapor, and what it looks like to use it and to deploy it.
Backend Options
Why use a Swift web framework for your backend? There are a lot of great options to use for your backend, but from the perspective of a Swift developer, they all come with tradeoffs.
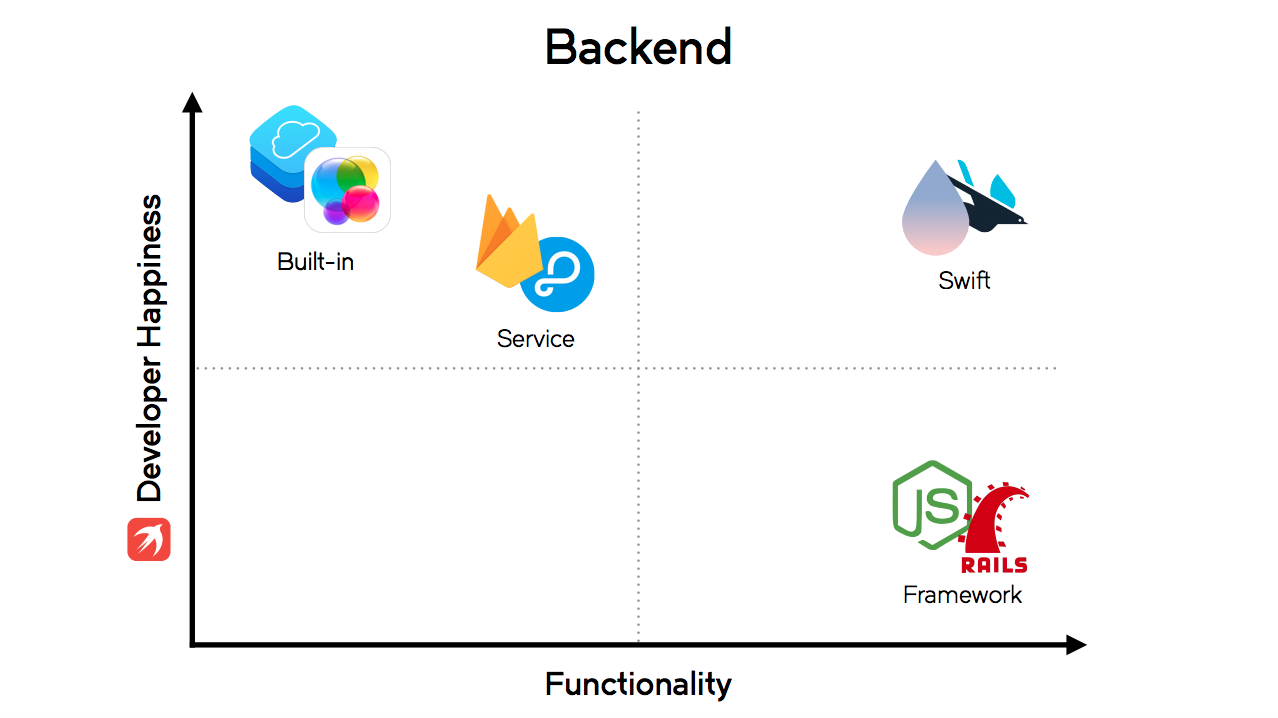
“Developer happiness” here is an amalgamation of how easy it is to get started, how easy it is to use, and how easy it is to maintain. By “functionality,” I mean how much you can get done with this backend.
Built-in Frameworks
These are things that are built into the platform itself, e.g. CloudKit or Game Center. They’re easy to set up and they’re going to feel native to use them because they’re part of the platform. They’ll do the basics but they’re not going to do everything you need. If you need a complex backend, you’re probably going to want something more.
They’re also not cross-platform. If you want your idea to end up supporting Android or the web, you’ll have to find something else for those platforms.
BaaS
Backends as a service, like Firebase or Parse (which is no longer available as a service but it exemplifies this category well), are great because they’re cross-platform. If you want to roll out to Android or the Web, you can do that with these services. The problem is that it’s not exactly easy to be DRY (Don’t Repeat Yourself) with these.
If you have an iOS app and you’re using a backend service, you have some backend logic in this app; e.g. interacting with a database or doing user auth. If you roll out a web version of the front end, you also create the backend logic there.
Now we have backend logic in two places, which can be a problem. What happens if you need to change the structure of your database? You have to change that in two places. If you build an Android app that exacerbates the problem further. You want for your backend logic to be in one place, on the backend, and the communication between your frontend and your backend should be an abstraction layer, an API. That’s not easy to do with these.
Traditional Web Frameworks
Let’s break out the big guns: the traditional web frameworks like Express.js for Node and Ruby on Rails. These can do anything. You can execute arbitrary code on the server with these, and they can work with any platform that supports http. You can use JSON, Protobuf, etc.
These frameworks carry two problems for Swift developers:
- We have to worry about deploying and maintaining our deployments, that can be a huge pain
- We’re not using Swift anymore. We might have to learn JavaScript or Ruby. We might need to get a new IDE for those. We might even need to install some sort of a VM on our computer to run them.
Server-Side Swift
With the current solutions we have this unfortunate relation between how much you can do with the backend and how easy they are to use.
With server-side Swift, we have all of the functionality of a framework – they are web frameworks themselves. But now we get to use the same development environment. We’re still using Swift and Xcode, and we can continue to use all of the skills that we’ve built over time on Xcode and Swift. That’s a huge win.
The other big advantage is that it’s easy to be DRY with server-side Swift. If your models are written in Swift you can break those out into separate packages and share those between your frontend and your backend. This allows you to have the compiler type-check the communication between your frontend and your backend. Anyone who has ever done any JSON parsing in an iOS app will know that’s the code that you don’t like to write.
Getting Started
The Vapor toolbox
This is available on Mac OS and Ubuntu. It’s easy to install on both platforms, and Ubuntu will even install Swift for you.
This will help you do anything that you would commonly want to do with a Vapor project, e.g. create a new project, build, run, and test your projects, generate Xcode files, and even deploy.
Starting a New Vapor Project
$ vapor new Hello --api creates a new project. You put the name of the project and then pass the API flag to create a backend. You can also create a frontend application that would be an alternative to something like Angular, but we’ll stick with the backend example for now.
$ vapor xcode pulls in the dependencies using SPM and then it’ll even open Xcode for you.
Now we’re back in familiar Xcode, with our project files on the left and some of the example code included with the API template in the middle. But instead of opening an iOS simulator or a Mac OS app when you hit the play button, it’ll open up the console and display “the server is starting on local host at some port.” If we go to Safari and visit that address we can see our website. We didn’t need to install any VM’s, Linux, or anything on our computer – it just works right in Xcode.
In Xcode we have all of the tools available to us that we know and love, e.g. Breakpoints. If we set a breakpoint and then go back to that page and visit it, the debugger will break out and we can look at the request that we got and debug it. You can see the user agent is set to Safari which is what we visited this page with.
That is the development environment: Swift, Xcode, and the Vapor Toolbox.
Using Vapor
What is it like to actually use Vapor? I want to show you some new APIs, some of which are still in alpha, so even if you’ve used Vapor before, this might be some new stuff.
Routing
Routing is taking some identifying information from an http request and routing it your business logic. Some examples are:
-
GET /usersreturns a list of users -
POST /articles/42/commentscreates a comment for article 42 -
DELETE /todos/5deletes todo 5
import Vapor

let app = Application()

let router = try app.make(Router.self)

router.get("users") { req in
    return try User.all()
}

try app.run()
First, we want to import Vapor. Next we’re going to create an application, which is a service container and it holds your configuration. This is useful for creating things that you need in your application while you’re using Vapor.
Next we ask the app to make a router. The router is not a concrete type, it’s a protocol, and it declares all of the things that you need to be a router. This is important for two reasons:
- It makes it easy to swap out your components: If you want to use a different router, perhaps your backend would be more efficient with a different algorithm, you might want to use that router.
- For testing: If our application uses a router protocol to register all of it’s routes, then we could devise a unit test that goes through and puts in a test router that adds all the routes registered to an array. Then we can give it that test router and assert that that array contained what we expected.
We then use the router that we got and since there’s no custom configuration we’re going to get the default try router. We’re going to register using .get("users"). We give it a closure that accepts a request and returns a response. We’re using Fluent to get all users.
Then we run the app – that’s a full application.
Fluent ORM
Fluent is an ORM created by the core team. It lets you fetch and persist data, and create and migrate schema, similar to what Core Data would do for you. It also supports querying and advanced querying, such as computed fields, joins, aggregates, etc, all with a nice Swift syntax. You can do transactions: saving a bunch of things but if one of them fails you want to undo everything. It also supports raw querying.
Fluent supports both SQL and NoSQL, like MySQL, MongoDB, and Postgres. Sometimes you might want to get access to those layers underneath, for example if you wanted to select the version of MySQL you’re using. In those cases, Fluent makes it easy to get out of your way and let you access that layer.
Fetch and Persist Data
This is what it looks like to fetch data using Fluent:
import Fluent

let res = try CartoonCharacter.makeQuery()
    .filter("age" > 60)
    .filter("catchPhrase" == "Wubba lubba dub-dub!")
    .all()

print(res) // [CartoonCharacter]
We have a cartoon character model. Since it conforms to model we can call makeQuery on that and get a query for cartoon characters. We can then add filters to that using the convenience operator syntax. And then call .all and we get an array of cartoon characters, it’s very simple.
model
This is what the model looks like:
import Fluent

final class CartoonCharacter: Model {
    var name: String
    var age: Int
    var catchPhrase: String
    let storage = Storage()

    init(row: Row) throws {
        name = try row.get("name")
        age = try row.get("age")
        catchPhrase = try row.get("catchPhrase")
    }

    func makeRow() throws -> Row {
        var row = Row()
        try row.set("name")
        try row.set("age")
        try row.set("catchPhrase", catchPhrase)
        return row
    }
}
We have a basic Swift class. I’m declaring it final so I don’t have to worry about required units, but that’s not required. We have three basic properties, string, name, age, and a catch phrase. And then we put on there a storage object and this allows Fluent to maintain some internal state on your object. Then we have our parsing and serialization code for taking our object from the database and putting it to the database.
This is fairly easy to implement but luckily with Swift 4 and Codable, we don’t need that anymore.
Leaf
Leaf is a templating language that the Vapor core team wrote. It allows you to render data to HTML, which is useful if you’re creating a website with a lot of HTML pages. Even if you’re creating a backend, this can be useful for generating emails.
This supports expressions and for and if-else sugar that is very similar to what you get in Swift. If you’re used to Swift you’ll feel right at home in Leaf. It supports nested templates which I’ll show you and lazy and async. Lazy and async is cool, and it’s not out yet but it’s in the next release. I don’t think any other templating language has this.
Let’s imagine we have, in our template, a block of code and an if block: If this resolves to true we’re going to display what is in that block. Imagine we’re looping over some users from the database. What happens if that if block resolves to false and that never gets displayed? Since Leaf is lazy, it’ll never even make that database call in the first place. Which can make big applications more performant.
Rendering Data to HTML
This is what it looks like to render data to HTML:
import Vapor

let app = Application()

let router = try app.make(Router.self)
let view = try app.make(ViewRenderer.self)

router.get("hello") { req in
    return try view.make("welcome", [
        "name": "Vapor"
    ])
}

try app.run()
This is the example from earlier but now I’ve added in a request to the app to create a ViewRenderer. We use that ViewRenderer to make a view named welcome and we give it a string: string context with name equal to Vapor.
In welcome.leaf we have simple echo syntax and we echo out the name, which will resolve to Hello Vapor:
<h1>Hello, #(name)!</h1>
Nested Templates
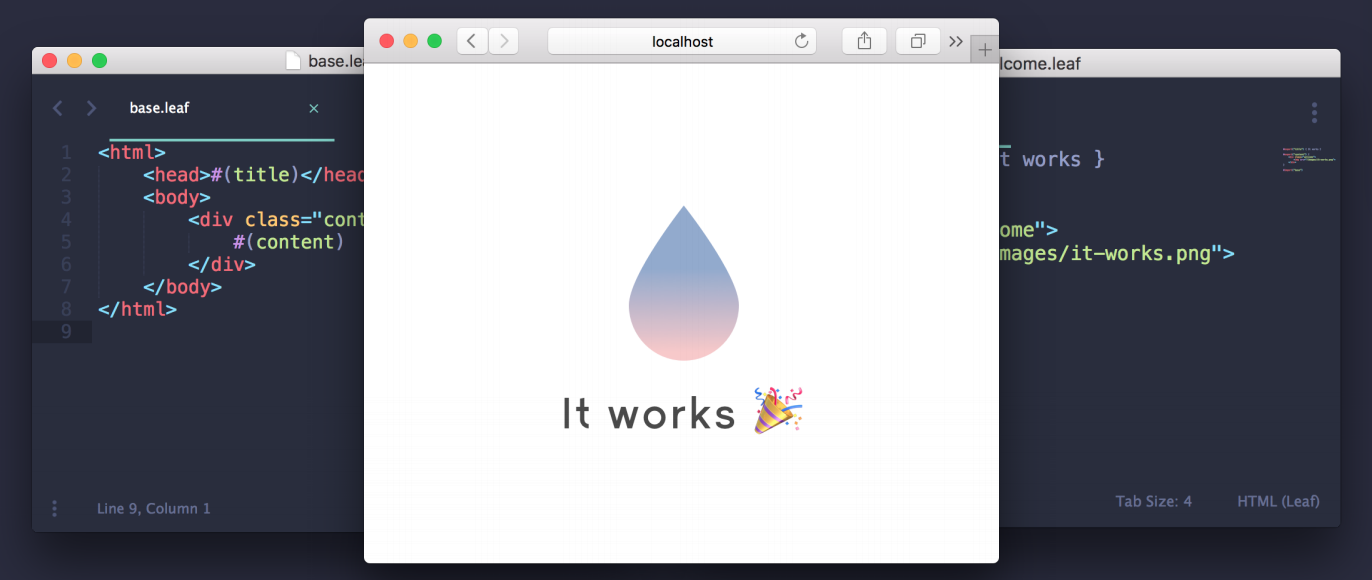
This is what nested templates look like. The base template is expecting a title and some content:
<html>
    <head>#(title)</head>
    <body>
        <div class="container">
            #(content)
        </div>
    </body>
</html>
Then we export the title, export the content, and then import that base template:
#export("title") { It works }

#export("content") {
    <div class="welcome">
        <img src="/images/it-works.png">
    </div>
}

#import("base")
The base template a normal template. We could use that with a string string dictionary and plug in values. Many templating languages will use an import, base, extend-type of metaphor. You can’t use them as regular templates.
If you create a new Vapor app with the web flag this will be the page that you get:
Deploying
Heroku is a popular way to deploy your app. You can use the Heroku command in the CLI tool to do this with just two commands. The first time you need to init your project for Heroku; the second time you can push it.
$ vapor heroku init
$ vapor heroku push
Bluemix is a another great option. IBM created Kitura, which is another server-side Swift web framework. We’ve worked with them to make sure that Vapor runs well on Bluemix as well.
Vapor CLOUD
Another deployment option, built by the Vapor core team, is Vapor CLOUD. This loops back to maintenance being one of the hard parts about using a web framework for your backend. Our goal was to make deploying your code and maintaining those deployments as easy as possible. Deploying your code can at best be a chore and at worse be utterly arcane. We wanted to change that and make deploying a web frame as easy as using a built-in backend.
We built Vapor Cloud on top of AWS. Since we know we’re running Vapor projects on there, we can do smart things, like have Swift pre-installed, which a lot of hosting solutions don’t have.
Another feature we’re working on now intelligently analyzes the configuration of your Vapor setup and can see things like if you’re using a MySQL database, we help you get a MySQL database set up and automatically inject the things you need for MySQL. No more worrying about the host name or MySQL’s port again.
We have a command line tool for this similar to Heroku. This is in open beta right now; if you want to try this out, it’s free to use during the beta phase.
It’s one command to deploy: $ vapor cloud deploy. If it’s your first time deploying, it’ll walk you through the process of getting set up. And we have a dashboard as well. This was all written in Vapor, both the API and the front end.
To sum up, with Vapor and Vapor Cloud together, we hope to combine the functionality of a web framework with the simplicity of a built in backend.
Links:
About the content
This talk was delivered live in September 2017 at try! Swift NYC. The video was recorded, produced, and transcribed by Realm, and is published here with the permission of the conference organizers.


