In this tutorial we’ll be using Ionic 4 to build a news application that makes use of a third-party news API.
Ionic 4 is the latest version of Ionic, a mobile framework originally built on top of Cordova and Angular. Ionic allows users to create hybrid mobile apps with HTML, CSS and JavaScript and their related web technologies.
What makes Ionic 4 the best version yet is that it’s now framework agnostic. This means it’s not dependent on Angular anymore, and you you’ll be able to use it with any framework or library you are familiar with, or with plain JavaScript.
But at the time of this writing, Ionic CLI only supports generating Ionic projects based on Angular, so we’ll be using an Angular/Ionic project to build our news application.
See a hosted version of the application we’ll be building and grab the source code from this GitHub repository.
Prerequisites
Let’s get started with the prerequisites you need to be able to follow this tutorial comfortably.
- You will need to have Node.js and npm installed on your development machine. If that’s not the case, the simplest approach is to go to the official website and grab the binaries for your system. Node.js is not a requirement for Ionic itself, but for Ionic CLI (and Angular CLI behind the scenes) which is the tool that we’ll be using to generate Ionic projects.
- We’ll be using Ionic with Angular, which is based on TypeScript, so you need to be familiar with the basic concepts of TypeScript.
Installing Ionic CLI 4
Ionic CLI 4 is the latest version of the CLI. Open a terminal and run the following command to install it on your system:
$ npm install -g @ionic/cli
Please note that you may need to add sudo before your command in order to install the package globally if you’re using a Debian-based system or macOS. For Windows, if you get any permission errors you can use a command prompt with administrator access. In all systems, you can avoid the npm permission errors by either reinstalling npm with a node version manager (recommended) or manually changing npm’s default directory. See the docs.
Next, you can generate a project based on Angular by running the following command:
$ ionic start
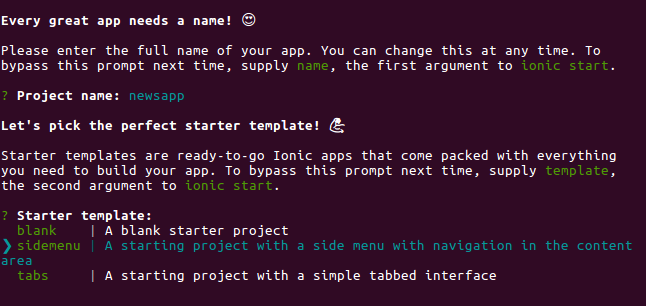
The CLI will interactively ask you for the necessary information about your project, such as the name (Enter newsapp or whatever name you prefer) and the starter template (choose sidemenu which will give you a starting project with a side menu and navigation of the box).
Next press Enter to instruct the CLI to start generating the files and installing the dependencies from npm.
Finally the CLI will ask you if you want to Install the free Ionic Appflow SDK and connect your app? (Y/n). You can type n if you don’t want to integrate the cloud services offered by Ionic.
Appflow is a continuous integration and deployment platform for Ionic developers. Appflow helps developers continuously build and ship their iOS, Android, and web apps faster than ever. You can find more information about Appflow from the official docs.
Next, you can navigate to your project’s root folder and run the following command to start a live-reload development server:
$ cd ./newsapp
$ ionic serve
Your application will be available from the http://localhost:8100 address.
This is a screenshot of the application at this point:
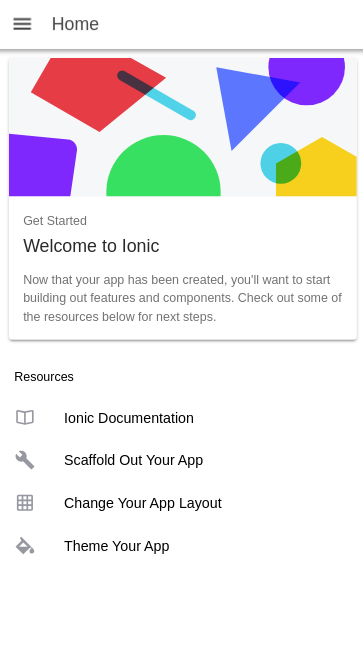
You can see that we already have a pretty decent starting application without doing any development yet. Let’s make some changes to our project.
The project already has two pages — home and list. Leave the first page and delete the list page.
First, remove the src/app/list folder. Next, open the src/app/app-routing.module.ts file and remove the route entry for the list page:
const routes: Routes = [
  {
    path: '',
    redirectTo: 'home',
    pathMatch: 'full'
  },
  {
    path: 'home',
    loadChildren: './home/home.module#HomePageModule'
  },
  {
    path: 'list',
    loadChildren: './list/list.module#ListPageModule'
  }
];
We have three routes, one for the empty path that redirects to the /home route, the /home route that displays the home page, and the /list route that displays the list page. You simply need to remove the last object.
You also need to remove the link for the list page from the side menu. Open the src/app/app.component.ts file. Locate the appPages array defined in the component:
  public appPages = [
    {
      title: 'Home',
      url: '/home',
      icon: 'home'
    },
    {
      title: 'List',
      url: '/list',
      icon: 'list'
    }
  ];
And simply remove the second object: { title: 'List', url: '/list', icon: 'list'}.
Now, let’s create an about page for our application. In your terminal, run the following command:
$ ionic generate page about
This command will generate a src/app/about folder with a bunch of files, and will update the src/app/app-routing.module.ts file to include a route for the generated page:
import { NgModule } from '@angular/core';
import { Routes, RouterModule } from '@angular/router';

const routes: Routes = [
  {
    path: '',
    redirectTo: 'home',
    pathMatch: 'full'
  },
  {
    path: 'home',
    loadChildren: './home/home.module#HomePageModule'
  },
  { path: 'about', loadChildren: './about/about.module#AboutPageModule' }
];

@NgModule({
  imports: [RouterModule.forRoot(routes)],
  exports: [RouterModule]
})
export class AppRoutingModule {}
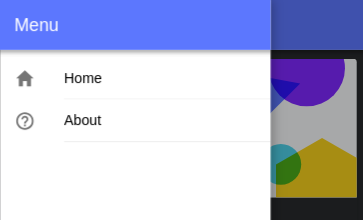
Let’s add a link to the about page in the side menu. Open the src/app/app.component.ts file and update the appPages array:
  public appPages = [
    {
      title: 'Home',
      url: '/home',
      icon: 'home'
    },
    {
      title: 'About',
      url: '/about',
      icon: 'help-circle-outline'
    }
  ];
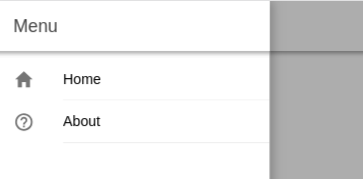
This is a screenshot of the menu at this point:
Next, open the src/app/about/about.page.html and add a menu icon to the toolbar of the page, which allows users to open the side menu:
<ion-header>
  <ion-toolbar>
    <ion-buttons slot="start">
      <ion-menu-button></ion-menu-button>
    </ion-buttons>
    <ion-title>
      About
    </ion-title>
  </ion-toolbar>
</ion-header>

<ion-content padding>

</ion-content>
Now let’s add some theming to our application UI.
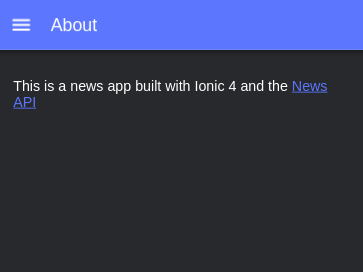
Open the src/app/about/about.page.html and add a primary color to the menu toolbar and a dark color to the content section:
<ion-header>
<ion-toolbar color="primary">
<ion-buttons slot="start">
<ion-menu-button></ion-menu-button>
</ion-buttons>
<ion-title>
About
</ion-title>
</ion-toolbar>
</ion-header>
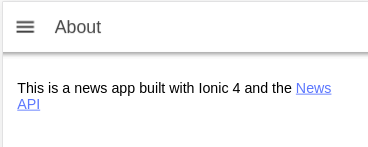
<ion-content color="dark" padding>
<p>
This is a news app built with Ionic 4 and the <a href="https://newsapi.org/">News API</a>
</p>
</ion-content>
This is a screenshot of the page:
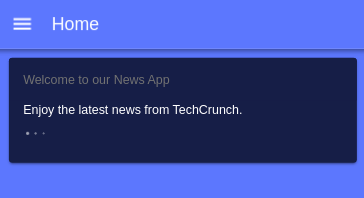
Next, let’s theme the homepage. Open the src/app/home/home.page.html file and replace its contents with the following:
<ion-header>
  <ion-toolbar color="primary">
    <ion-buttons slot="start">
      <ion-menu-button></ion-menu-button>
    </ion-buttons>
    <ion-title>
      Home
    </ion-title>
  </ion-toolbar>
</ion-header>

<ion-content color="primary">
    <ion-card>
      <ion-card-header>
        <ion-card-subtitle>Welcome to our News App</ion-card-subtitle>
      </ion-card-header>
      <ion-card-content>
        <p>
          Enjoy the latest news from TechCrunch.
        </p>
        <ion-spinner *ngIf="!articles"  name="dots"></ion-spinner>
      </ion-card-content>
    </ion-card>
</ion-content>
Next, open the src/app/home/home.page.scss file and add:
ion-card{
  --background: #021b46;
  --color: #fff;
}
Also, open the src/app/app.component.html file and add a primary color to the menu toolbar:
        <ion-toolbar color="primary">
          <ion-title>Menu</ion-title>
        </ion-toolbar>
Getting News Data
Let’s now see how you can retrieve news data from the third-party news API available from NewsAPI.org/, which offers a free plan for open source and development projects.
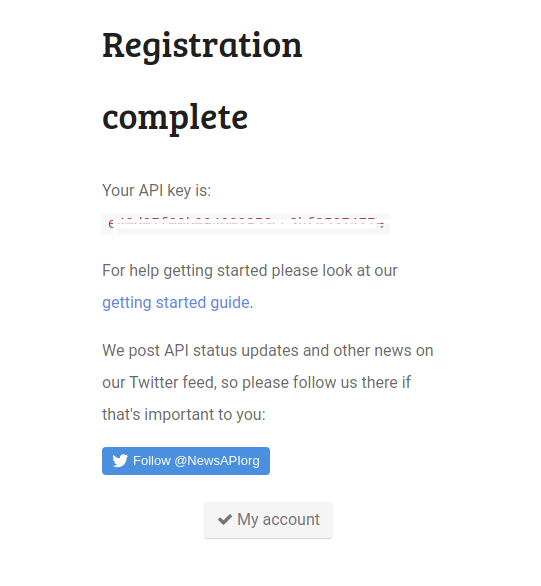
You first need to head here to register for an API key:

Fill the form and submit it. You should get redirected to the page where you can copy your API key:
Adding a Service
Next, let’s create a service that will take care of getting data from the news API. In your terminal, run the following command:
$ ionic generate service api
Next, open the src/app/app.module.ts file then import HttpClientModule and add it to the imports array:
// [...]
import { HttpClientModule } from '@angular/common/http';

@NgModule({
  declarations: [AppComponent],
  entryComponents: [],
  imports: [
    // [...]
    HttpClientModule,
  ],
  // [...]
})
export class AppModule {}
Next, open the src/app/api.service.ts file and inject HttpClient via the service constructor:
import { Injectable } from '@angular/core';
import { HttpClient } from '@angular/common/http';

@Injectable({
  providedIn: 'root'
})
export class ApiService {

  constructor(private httpClient: HttpClient) { }
}
Next, define an API_KEY variable which will hold your API key from the News API:
export class ApiService {
  API_KEY = 'YOUR_API_KEY';
Finally, add a method that sends a GET request to an endpoint for TechCrunch news:
  getNews(){
    return this.httpClient.get(`https://newsapi.org/v2/top-headlines?sources=techcrunch&apiKey=${this.API_KEY}`);
  }
That’s all we need to add for the service.
Open the src/app/home/home.page.ts file and import, then inject, ApiService via the component constructor:
import { Component } from '@angular/core';
import { ApiService } from '../api.service';

@Component({
  selector: 'app-home',
  templateUrl: 'home.page.html',
  styleUrls: ['home.page.scss'],
})
export class HomePage {
  constructor(private apiService: ApiService){}
}
Next, add an articles variable that will hold the retrieved news:
export class HomePage {
  articles;
Add an ionViewDidEnter() method, where you call the getNews() method of ApiService to retrieve the news:
  ionViewDidEnter(){

    this.apiService.getNews().subscribe((data)=>{
      console.log(data);
      this.articles = data['articles'];
    });
  }
Finally, let’s iterate through the articles variable and display the news on our homepage.
Again, open the src/app/home/home.page.html file and add the following code:
  <ion-card *ngFor="let article of articles">
    <ion-img src="{{article.urlToImage}}"></ion-img>
    <ion-card-header>
      <ion-card-subtitle>{{article.title}}</ion-card-subtitle>
    </ion-card-header>
    <ion-card-content>
      <p>
        {{article.description}}
      </p>
      <ion-button ion-button fill="outline" href="{{article.url}}" large>Read full article</ion-button>

    </ion-card-content>
  </ion-card>
We simply use the ngFor directive to loop through the articles variable and display the image, title, description and URL of each article inside a card component.
This is a screenshot of the result:

You can either host this application on the web (as a PWA) or build it and publish it on the app stores. You can find a live version from this link and the source code in this GitHub repository.
Conclusion
We’ve built a news application from scratch with Ionic 4 and Angular. The application still has plenty of room for improvement, so feel free to play with it and extend it on your own. For example, you could add sources other than TechCrunch, and allow the user to select the source of the news.
Frequently Asked Questions about Building an App with Ionic 4 and Angular
How do I start building an app with Ionic 4 and Angular?
To start building an app with Ionic 4 and Angular, you first need to install Node.js and npm on your computer. After that, install Ionic and Cordova using npm. Once these installations are complete, you can create a new Ionic project using the Ionic CLI. Navigate to the directory where you want to create your project and run the command ‘ionic start’. Follow the prompts to set up your new project.
What are the key features of Ionic 4?
Ionic 4 comes with a number of key features that make it a powerful tool for app development. These include a component-based architecture, which makes it easier to build and manage complex user interfaces; a powerful CLI that provides a range of development tools; and integration with Angular, which allows you to use Angular’s powerful features in your Ionic apps.
How do I use Angular with Ionic 4?
Ionic 4 is built to work seamlessly with Angular. When you create a new Ionic project, you can choose to use Angular as the framework for your app. Once you’ve done this, you can use Angular’s features in your app, such as its powerful data binding and dependency injection capabilities.
How do I add pages to my Ionic 4 app?
To add a new page to your Ionic 4 app, you can use the ‘ionic generate’ command. This command creates a new directory in your project’s ‘src/app’ directory, with files for the new page’s module, component, and template. You can then add the new page to your app’s routing module to make it accessible.
How do I style my Ionic 4 app?
Ionic 4 uses CSS variables for styling, which makes it easy to customize the look and feel of your app. You can define your own CSS variables in your app’s global CSS file, and then use these variables in your component’s CSS files. Ionic also provides a range of pre-defined CSS variables that you can use to style your app.
How do I test my Ionic 4 app?
Ionic 4 provides a range of tools for testing your app. You can use the ‘ionic serve’ command to launch your app in a web browser for testing. For testing on a device, you can use the ‘ionic cordova run’ command, which builds your app and deploys it to a connected device.
How do I deploy my Ionic 4 app?
To deploy your Ionic 4 app, you first need to build it for production using the ‘ionic cordova build’ command. This command creates a production-ready version of your app that you can then deploy to a device or app store.
What are some common challenges when building an app with Ionic 4 and Angular, and how can I overcome them?
Some common challenges when building an app with Ionic 4 and Angular include managing complex user interfaces, handling asynchronous operations, and optimizing performance. To overcome these challenges, you can use Ionic’s component-based architecture to simplify your UI, use Angular’s async pipe to handle asynchronous operations, and use Ionic’s built-in performance optimizations to improve your app’s performance.
Can I use other frameworks with Ionic 4?
Yes, while Ionic 4 is built to work seamlessly with Angular, it also supports other frameworks such as React and Vue.js. You can choose to use these frameworks when creating a new Ionic project.
Where can I find more resources to help me build an app with Ionic 4 and Angular?
There are many resources available to help you build an app with Ionic 4 and Angular. These include the official Ionic and Angular documentation, online tutorials and courses, and community forums. You can also find a range of sample projects and code snippets on sites like GitHub.
 Ahmed Bouchefra
Ahmed is a technical author and web developer living in Morocco with a Master's degree in software development. He authors technical content about JavaScript, Angular and Ionic. He is also a fan of entrepreneurship, poetry, and teaching. You can contact me on my personal website and read my other articles on Techiediaries.