If you’ve ever tried to create your own iOS framework, you know that it’s not for the faint of heart – managing dependencies and writing tests doesn’t make it any easier. This tutorial will walk you through creating your first iOS framework from start to finish so that you can go out and create your own.
We’re going to build a framework that exposes a function called
RGBUIColor(red:green:blue) that returns a new UIColor created from those
values. We’ll build it using Swift, with Carthage as our dependency manager.
Our framework will be consumable using Carthage, CocoaPods, or git submodules.
Let’s begin!
Setting up the Xcode Project
- Select File → New → Project.
- Select iOS → Framework & Library from the left sidebar and select “Cocoa Touch Library” on the right.
- Click “Next” and fill in the option prompts. Make sure to select the “Include Unit Tests” check box.

- Select where you’d like to save your project.
- Uncheck “Create Git repository on My Mac”, we’ll manually set it up later.
- Click “Create” and the project will open in Xcode.
- Go to File → Save As Workspace and save it in the same directory as your Xcode project with the same name. We put the project in a workspace because we’ll be adding our Carthage dependencies as submodules; they must be in a workspace for Xcode to build them.
- Close the Xcode project with File → Close Project.
- Open the workspace with File → Open.
- Click on the scheme on the top left of Xcode and select “Manage Schemes”. We need to mark our scheme as “shared” so that the project can be built with Carthage.
- Locate the “RGB” scheme and check the “Shared” check box and click “Close”.

Let’s jump over to the terminal.
Initializing Git
First, navigate to the directory you saved your project in.
- Run
git initto initialize an empty repository. - Create a
.gitignorewhich will keep out some pesky Xcode and dependency files we don’t want to track in git.
Here’s a standard one for Swift projects with a few
modifications. We added .DS_Store and removed fastlane and extra comments.
## OS X Finder
.DS_Store

## Build generated
build/
DerivedData

## Various settings
*.pbxuser
!default.pbxuser
*.mode1v3
!default.mode1v3
*.mode2v3
!default.mode2v3
*.perspectivev3
!default.perspectivev3
xcuserdata

## Other
*.xccheckout
*.moved-aside
*.xcuserstate
*.xcscmblueprint

## Obj-C/Swift specific
*.hmap
*.ipa

# Swift Package Manager
.build/

# Carthage
Carthage/Build
Adding Carthage and Dependencies
- Create a file in your project directory named
Cartfileand the runtime dependencies to it. We’ll add Curry.
github "thoughtbot/Curry"
- Create a
Cartfile.private. It will house private dependencies like our test frameworks. We’ll use Quick and Nimble.
github "Quick/Quick"
github "Quick/Nimble"
- Create a
bin/setupscript. It’s used to give our contributors (and us) a simple way to set up the project and the dependencies.
mkdir bin
touch bin/setup
chmod +x bin/setup
- Open up
bin/setupand fill it with:
#!/usr/bin/env sh

if ! command -v carthage > /dev/null; then
  printf 'Carthage is not installed.\n'
  printf 'See https://github.com/Carthage/Carthage for install instructions.\n'
  exit 1
fi

carthage update --platform iOS --use-submodules --no-use-binaries
In this script, we make sure the user has Carthage installed and run its
update command to install the iOS dependencies.
We’re using --use-submodules so that our dependencies are added as submodules.
This allows users to consume our framework outside of Carthage if they want. We
use --no-use-binaries so that our dependencies are built on our system.
With bin/setup created, let’s run it so that Carthage will download our
dependencies.
- In the terminal, run
bin/setup.
Now we need to set up our project to build and link the new dependencies.
Adding Dependencies to the Workspace
Since our dependencies are submodules, we need to add them to our workspace.
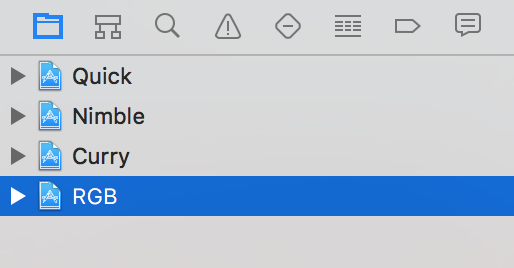
- Open up
Carthage/Checkoutsand add each dependency’s.xcodeprojto the root of the workspace. They can be dragged from Finder into the navigator of the Xcode project.
When you’re done it should look like:
Link Runtime Dependencies
- With “RGB” selected in the Navigator and the “RGB” target selected on the middle sidebar, select the “Build Phases” tab and expand the “Link binary with libraries” section.
- Click the “+” icon and select the
Curry.frameworkfrom theCurry-iOStarget. - Click “Add”.
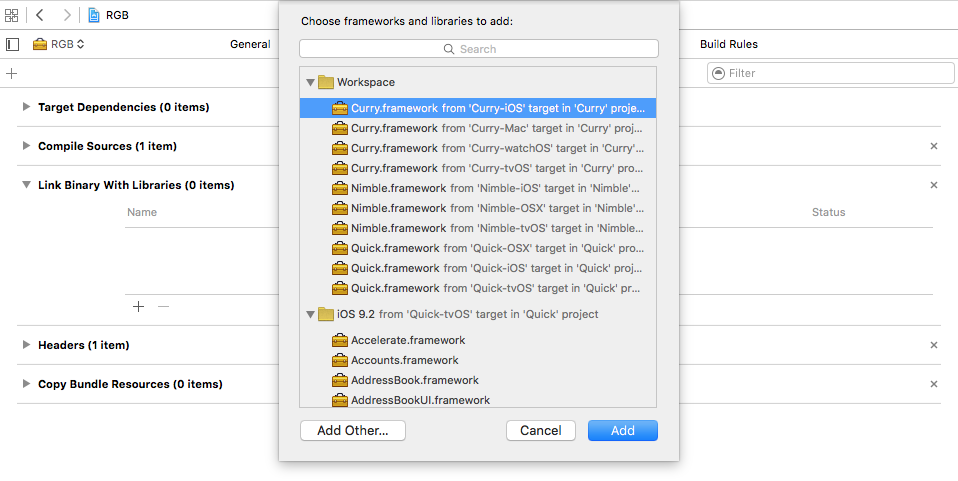
Link Development Dependencies
- Select the “RGBTests” target from the middle sidebar.
- Using the same process as before, add the Quick and Nimble frameworks to the “Link binary with libraries” section for this target.
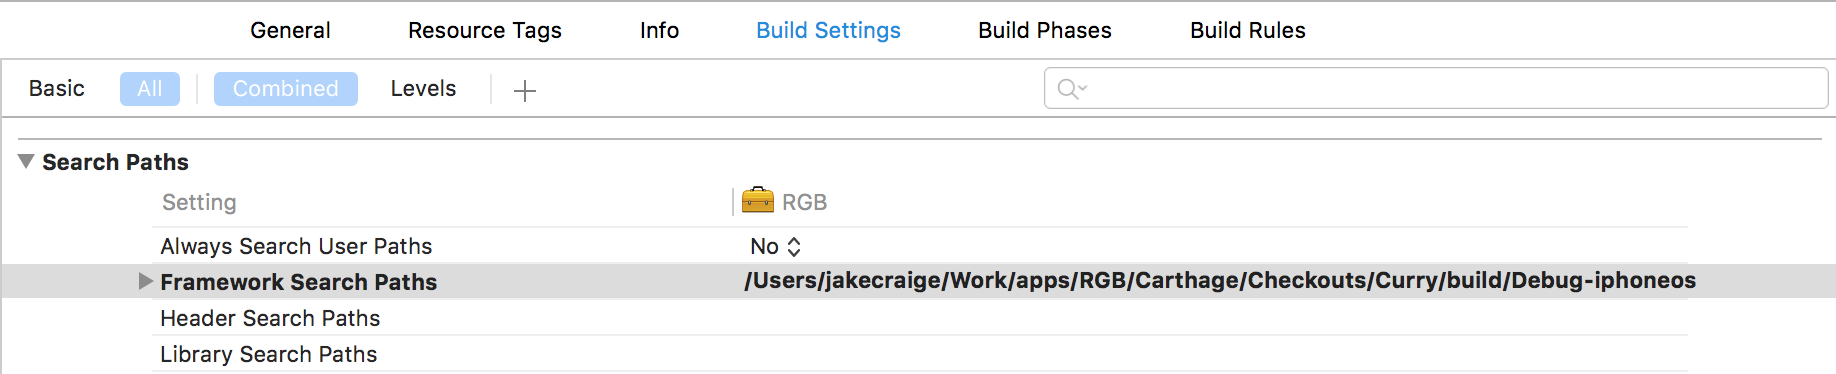
When adding dependencies to each target, Xcode will automatically add them to the “Framework Search Paths” under the “Build Settings” tab. We can remove these from the “RGB” and “RGBTests” target because Xcode treats them as implicit dependencies due to them being in the same workspace.
- Select the target, locate the “Framework Search Paths” setting, highlight it, and press “backspace” on your keyboard.
- Next, look in the “RGB” project in the Navigator; you’ll see there are three new frameworks at the root level. To keep this area organized, highlight all three, right click and select “New group from selection” to place them in a named group. I’ll call mine “Frameworks”.
Now that Carthage is set up, let’s add CocoaPods.
Adding CocoaPods support
To add CocoaPods support, we need to create a .podspec at the root of our
project and fill in our project info.
- Create a file named
RGB.podspec. - Copy and paste the sample below into the file.
- Fill in the options with your project’s details. There are a lot more options available to you, but these are what’s needed for this project.
Pod::Spec.new do |spec|
  spec.name = "RGB"
  spec.version = "1.0.0"
  spec.summary = "Sample framework from blog post, not for real world use."
  spec.homepage = "https://github.com/jakecraige/RGB"
  spec.license = { type: 'MIT', file: 'LICENSE' }
  spec.authors = { "Your Name" => 'your-email@example.com' }
  spec.social_media_url = "http://twitter.com/thoughtbot"

  spec.platform = :ios, "9.1"
  spec.requires_arc = true
  spec.source = { git: "https://github.com/jakecraige/RGB.git", tag: "v#{spec.version}", submodules: true }
  spec.source_files = "RGB/**/*.{h,swift}"

  spec.dependency "Curry", "~> 1.4.0"
end
One line to pay attention to is spec.dependency "Curry", '~> 1.4.0'. Because
we’re supporting CocoaPods, we expect the consumers of our framework to be using
it instead of Carthage, so we have to specify dependencies here and in the
Cartfile.
Once this is set up we can run the pod lib lint command to test that
everything is configured properly. If all goes well, we’ll see something like
this:

With the project and dependencies set up, we’re almost ready to write some code. Before we do that, let’s create our first commit.
git commit -am "Project and dependencies set up"
Writing the First Test
Open RGBTests/RGBTests.swift so that we can take a look at the default
template. It uses @testable and XCTest, but we’ll be changing
both of these.
We’ll remove @testable because we want to test the public API that consumers
of the framework will use. As our framework grows, we may need @testable to
test parts that are not exposed publicly; generally we want to avoid that so
we are testing what’s exposed to the consumer. This feature is most useful in
testing applications rather than frameworks.
From the Apple Docs on Testability:
With testability, you are now able to write tests of Swift 2.0 frameworks and apps without having to make all of your internal routines public. Use @testable import {ModuleName} in your test source code to make all public and internal routines usable by XCTest targets, but not by other framework and app targets.
We’ll use Quick and Nimble for testing. Quick provides a nicer testing interface with a behavior-driven style that is very similar to RSpec and Specta; Nimble gives us many powerful assertions and the ability to write asynchronous code with less boilerplate.
Once those changes are made, the test file should look like:
import Quick
import Nimble
import RGB

class RGBTests: QuickSpec {
    override func spec() {
        describe("RGB") {
            it("works") {
                expect(true).to(beTrue())
            }
        }
    }
}
Run the tests with ⌘U or Product → Test and they should be green.
And… we’re done!
Just kidding. Let’s write some real tests.
We expect that calling RGBUIColor(red: 195, green: 47, blue:
52) will return a beautiful “thoughtbot red” UIColor.
In code, this looks like:
describe("RGBUIColor") {
    it("is a correct representation of the values") {
        let thoughtbotRed = UIColor(
            red: CGFloat(195/255),
            green: CGFloat(47/255),
            blue: CGFloat(52/255),
            alpha: 1
        )
        let color = RGBUIColor(red: 195, green: 47, blue: 52)

        expect(color).to(equal(thoughtbotRed))
    }
}
If we run the tests, now they will fail as we expect. Swift’s type checking will
prevent us from running the tests because we never defined the RGBUIColor
function.
Let’s do that.
Writing the Implementation
Right click on the “RGB” group in the Navigator and select “New File”.
Create a Swift file called RGBUIColor.swift and save it. Fill it with this
implementation:
import Curry

func RGBUIColor(red red: Int, green: Int, blue: Int) -> UIColor {
    return curry(createColor)(red)(green)(blue)
}

private func createColor(red: Int, green: Int, blue: Int) -> UIColor {
    return UIColor(
        red: CGFloat(red/255),
        green: CGFloat(green/255),
        blue: CGFloat(blue/155),
        alpha: 1
    )
}
The use of curry here is used as an example of using a runtime dependency.
This is a non-standard use and doesn’t provide any value here.
Now let’s run the tests!

At first glance, this error may seem a bit odd. We clearly defined the
RGBUIColor function, right?
We did, but it’s not marked as public.
What this means is that if someone tries to use our framework, they won’t be
able to see this function. If you want to see the difference in action, add
@testable back and your tests will pass.
Experiencing this error is why we removed the @testable from the import at
the beginning. It helps us to catch these kinds of errors earlier, before we
release our framework to others.
To fix this, let’s mark the function as public like so:
public func RGBUIColor(red red: Int, green: Int, blue: Int) -> UIColor {
    return curry(createColor)(red)(green)(blue)
}
Let’s run the tests!

We’re Green!
Let’s commit this bad boy.
git commit -am "Completed my first iOS framework!"
That’s all folks!
That’s it. There were a lot of steps but we’ve successfully created a marginally useful framework that could be published to GitHub. As a matter of fact, we published the source for this framework on GitHub.
We can’t wait to see what kinds of awesome open-source projects you’ll create.