This article was updated on 11.05.2017 to reflect important changes to Auth0’s API.
Authentication for single page apps can be a tricky matter. In many cases, SPA architecture involves having an isolated front-end application with a framework like AngularJS, and a separate backend that serves as a data API to feed the front-end. In these cases, traditional session-based authentication that is done in most round-trip applications falls short. Session-based authentication has a lot of issues for this kind of architecture, but probably the biggest is that it introduces state to the API, and one of the tenets of REST is that things remains stateless. Another consideration is that if you ever want to use that same data API as a backend for a mobile application, session-based authentication won’t work.
JSON Web Tokens
To get around these limitations, we can use JSON Web Tokens (JWT) to add authentication to our single page apps. JWT is an open standard and provides us a way to authenticate requests from our front end AngularJS app to our backend API. JWTs are more than just a token though. One of the biggest advantages of JWTs is that they include a data payload that can have arbitrary JSON data in the form of claims that we define. Since JWTs are digitally signed with a secret that lives on the server, we can rest assured that they can’t be tampered with and the data in the payload can’t be changed before reaching the backend.
Authentication for Angular Apps
JWTs are a perfect solution for adding authentication to our AngularJS apps. All we need to do to access secured endpoints from our API is save the user’s JWT in local storage and then send it as an Authorization header when we make HTTP requests. If the user has an invalid JWT or no JWT at all, their request to access the protected resoures will be denied, and they will get an error.
Unfortunately, this would be just the bare minimum for handling authentication in AngularJS apps. If we care at all about user experience, there are a few other things we need to do to make sure our apps behave as one would expect. We need to:
- Conditionally show or hide certain elements depending on whether the user has a valid JWT (e.g.: Login and Logout buttons)
- Protect certain routes that an unauthenticated user shouldn’t be able to access
- Update the user interface when user state changes if their JWT expires or when they log out
In this article, we’ll implement authentication from start to finish in an AngularJS app, and we’ll even create a small NodeJS server to see how to make requets to a protected resource. There are a lot of details around setting up a user database and issuing JWTs, so instead of doing it on our own, we’ll use Auth0 (the company I work for) to do it for us. Auth0 provides a free plan for up to 7,000 active users, which gives us plenty of room in many real world applications. We’ll also see how we can easily add a login box and even use social authentication with Auth0.
Before we start, if you’d like a refresher on AngularJS, check out Building an App with AngularJS over on SitePoint Premium.
To see all the code for this tutorial, check out the repo.
Sign up for Auth0
The first thing you’ll need for this tutorial is an Auth0 account. When signing up for an account, you will need to give your app a domain name which cannot be changed later. Since you can have multiple apps under the same account, how you name your domain will depend on your situation. In most cases, it’s best to name it with something that is relevant to your organization, such as your company’s name. If it makes sense, you can also use your application’s name–it’s up to you. Your Auth0 domain takes the pattern your-domain.auth0.com and is used when configuring the Auth0 tools that we’ll see below.
Once you’ve signed up, you’ll be asked what kind of authentication you’d like for your application. It’s fine to leave the defaults in place, as you’ll be able to change them later.
After you have signed up, head over to your dashboard to check things out. If you click the Clients link in the left sidebar, you’ll see that your account gets created with a Default App. Click the Default App to see your credentials and other details.
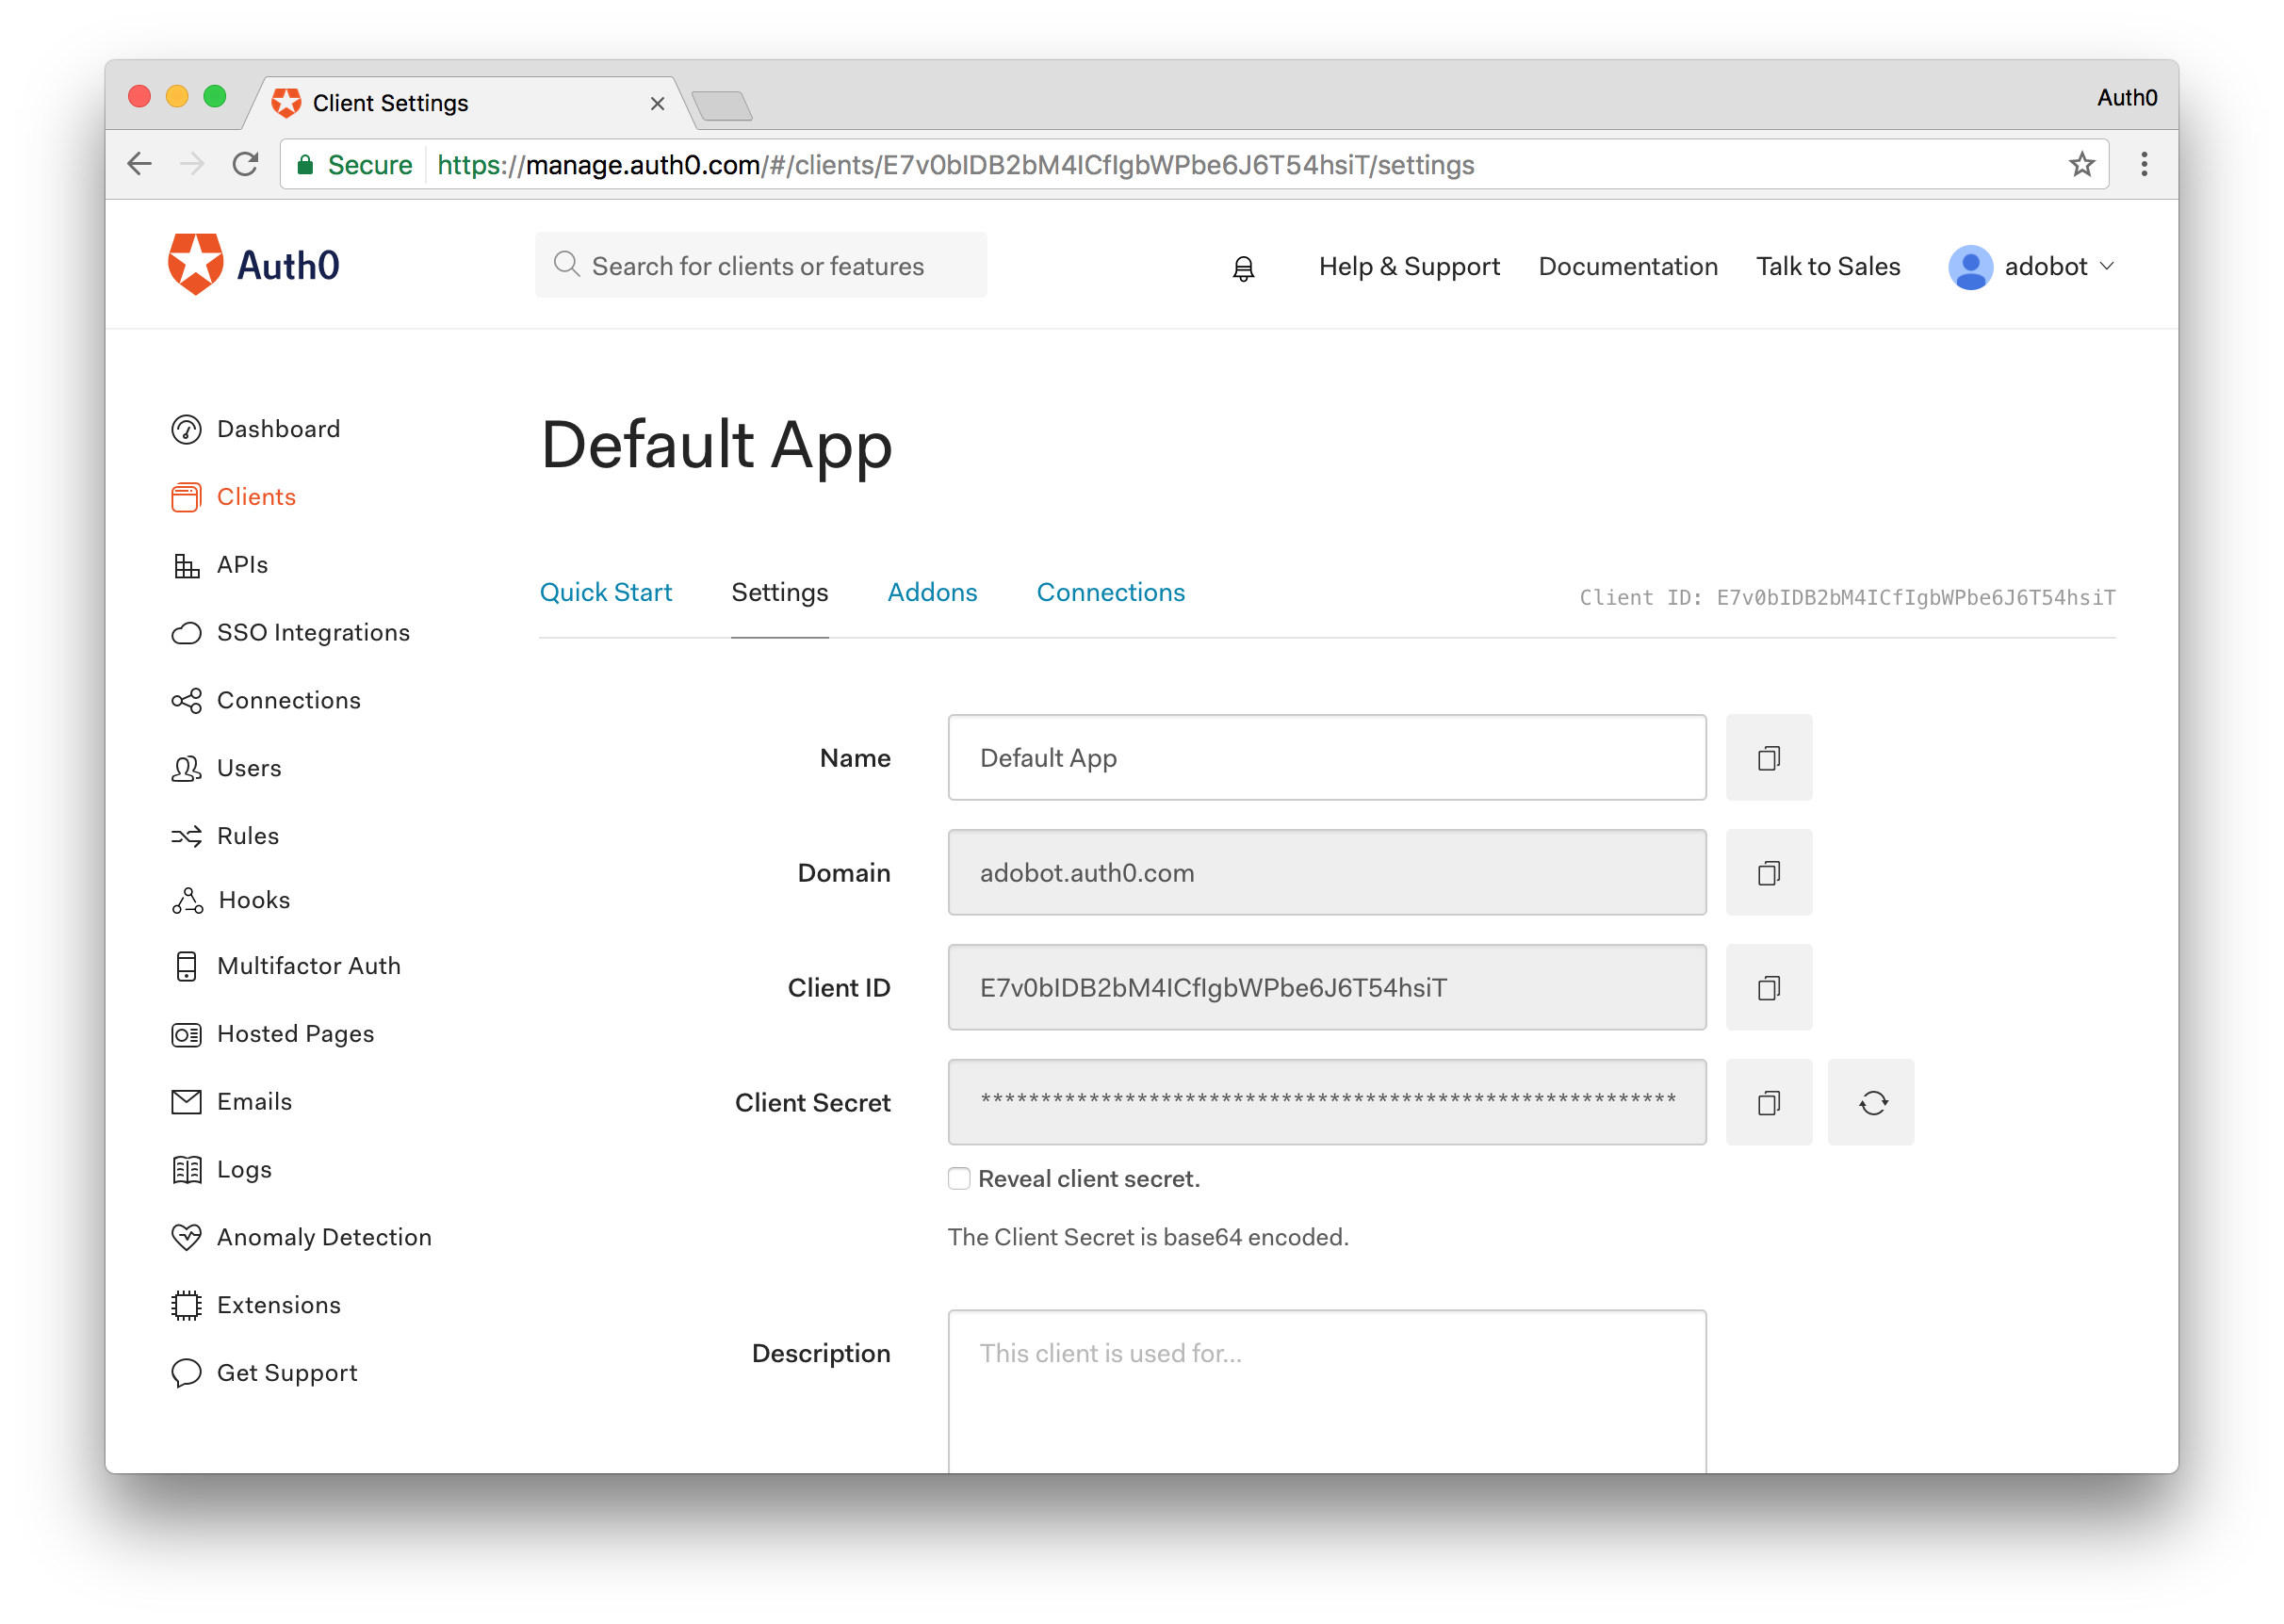
Right off the bat we should fill in our Allowed Origins and Allowed Callback URLs. This field is used to tell Auth0 which domains are allowed to make requests to authenticate users, as well as which domains we can redirect to after authentication has taken place. We’ll be using http-sever in this tutorial, which has a default origin of http://localhost:8080.
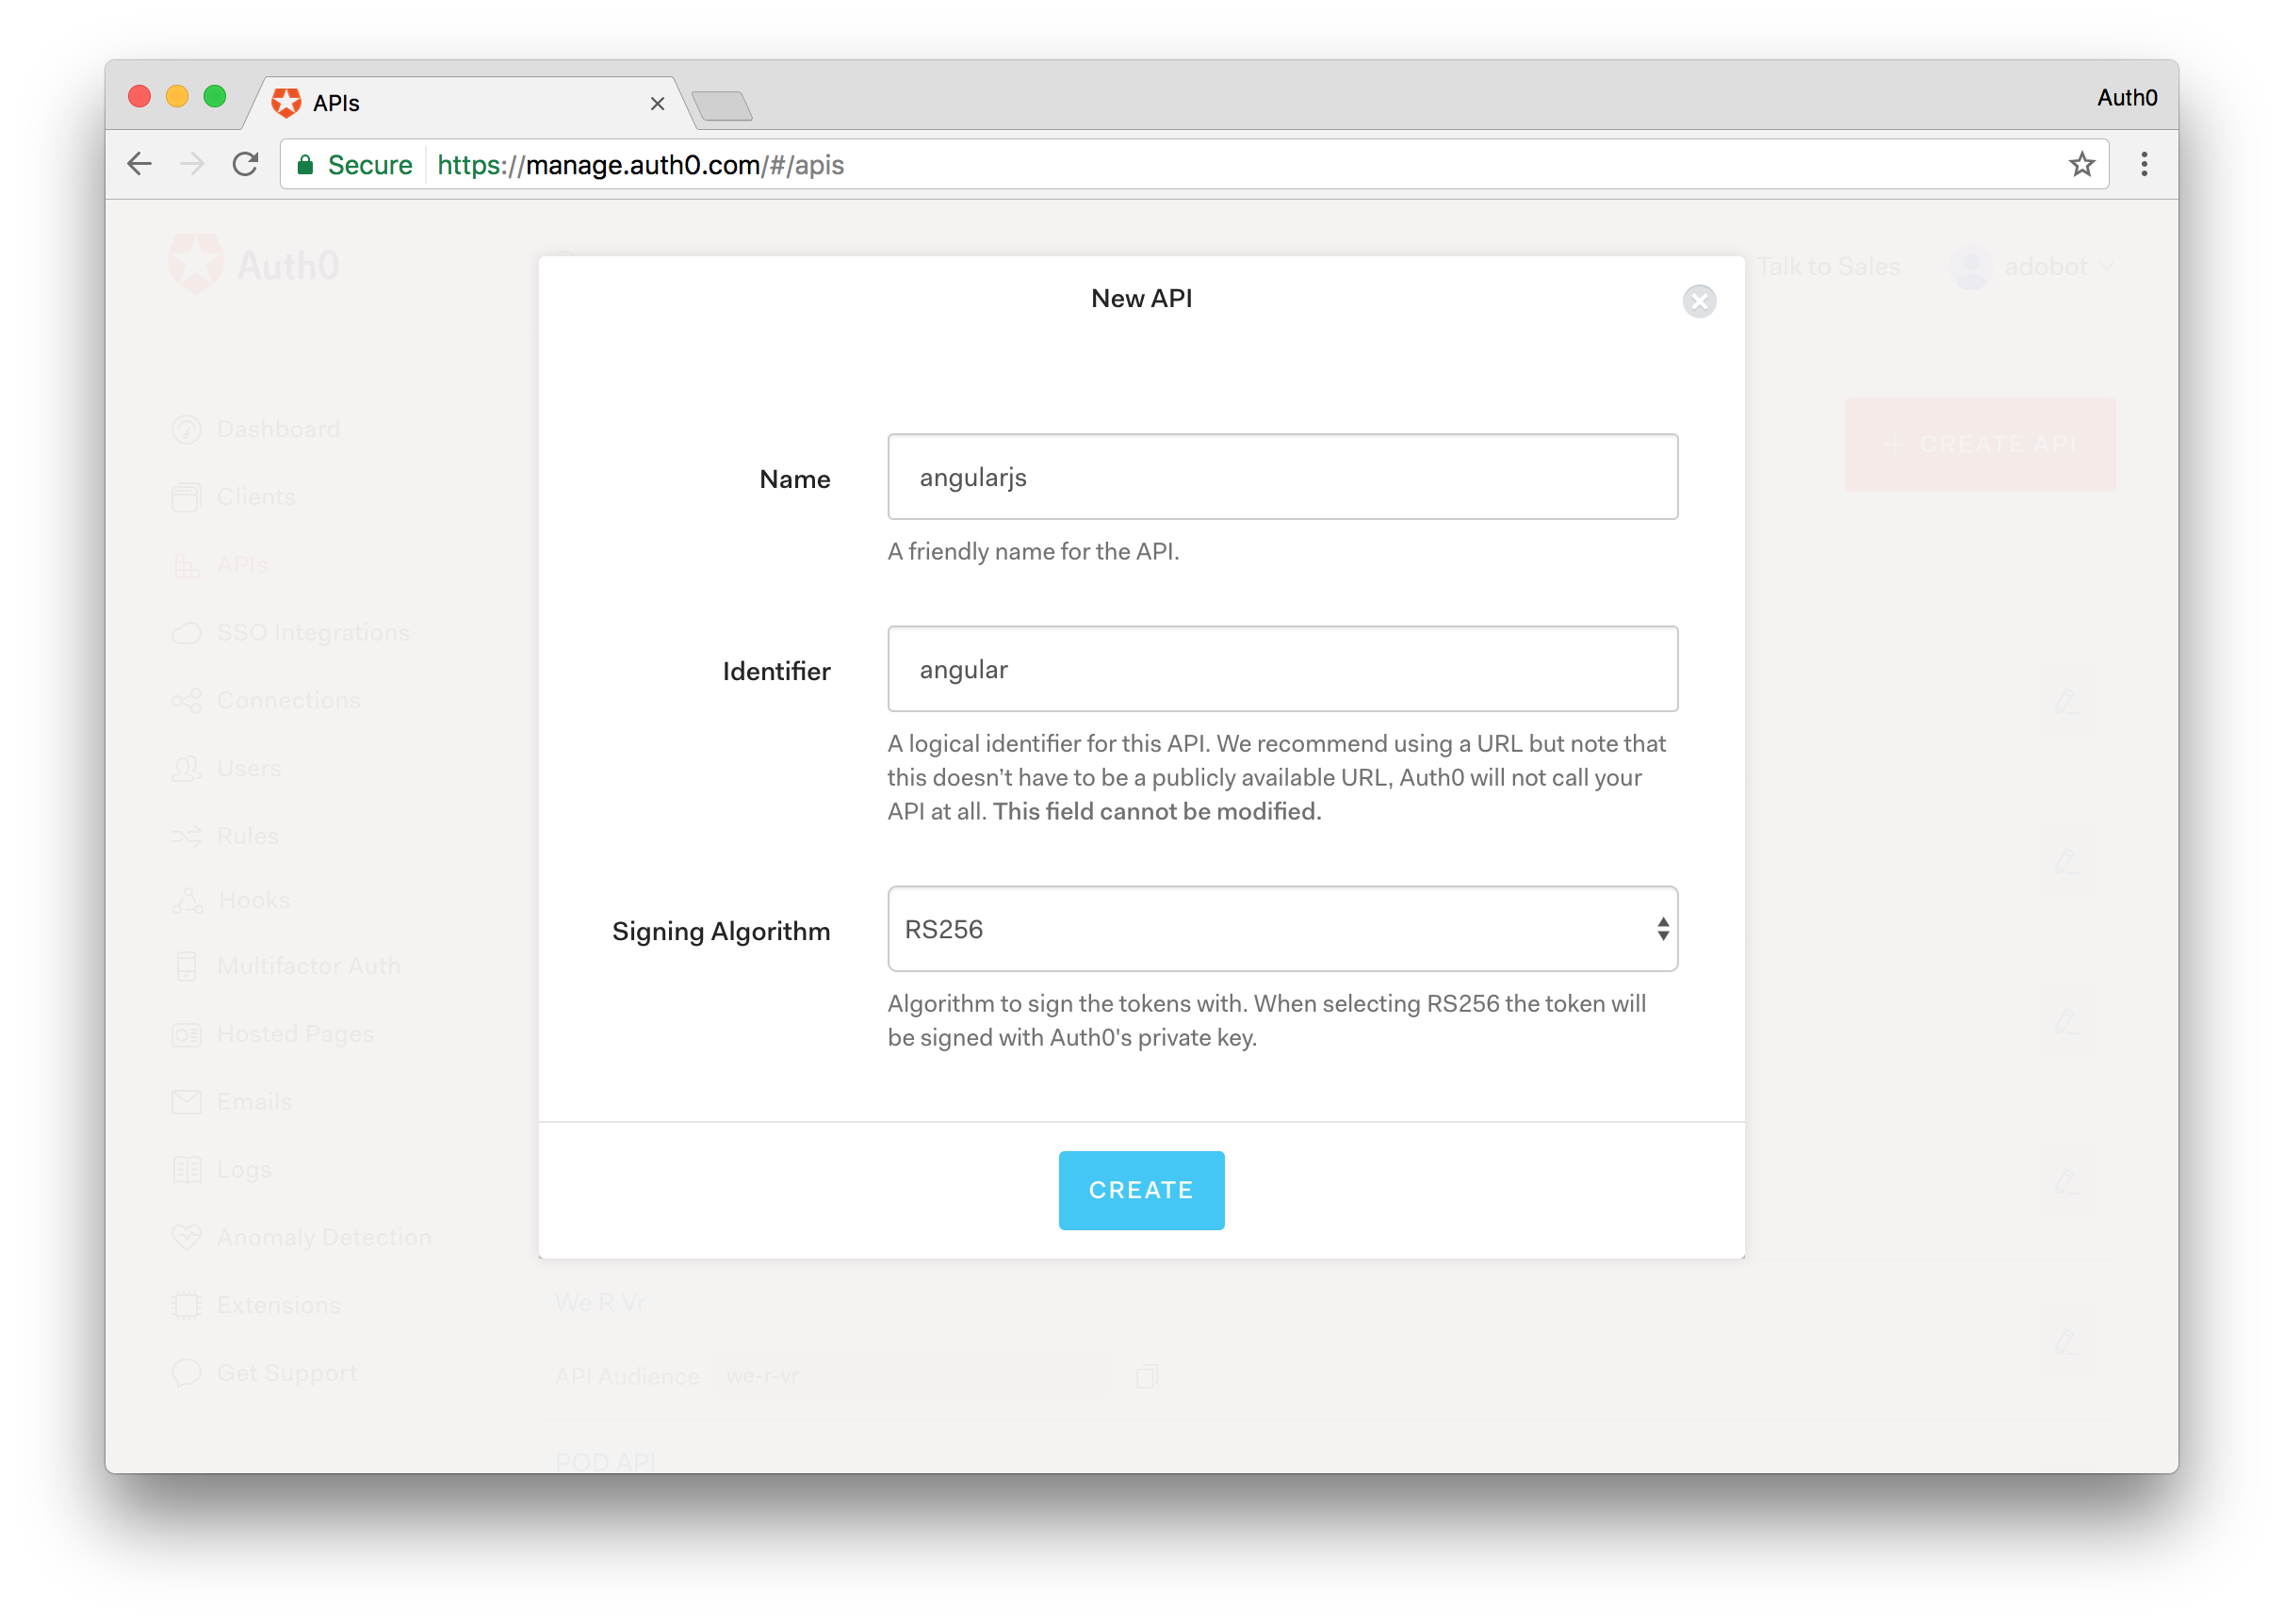
Next, since we are building a Single Page App that will talk to an API backend, let’s build an API client as well. Click on the APIs link in the main menu. From here, click the Create API button and you will be presented with a dialog that will ask you to fill in some information about your API. All you’ll need to provide is a Name and Identifier. Make note of the Identifier as this is the value that will be used as your audience identifier for the API. Leave the Signing Algorithm as RS256.
With Auth0’s free plan, we are able to use two social identity providers, such as Google, Twitter, Facebook and many others. All we need to do to make them work is flip a switch and this can be done in the Connections > Social link in the dashboard.
Install the Dependencies and Configure Auth0
We’ll need a number of packages for this app, some of which are provided by Auth0 as open source modules. If you have forked the GitHub repo, you can simply run bower install to install all the needed dependencies. Once the dependencies have been installed, you will want to install the http-server module globally. To do so enter the following command:
# To serve the app (if not already installed)
npm install -g http-server
Finally, to get the app up and running, simply execute the http-server command from your terminal or command line interface.
Next, let’s set up our app.js and index.html files to bootstrap the application. At this time we can let Angular know which modules we need access to from the dependencies we installed.
// app.js

(function () {

  'use strict';

  angular
    .module('app', ['auth0.auth0', 'angular-jwt', 'ui.router'])
    .config(config);

  config.$inject = ['$stateProvider', '$locationProvider', 'angularAuth0Provider', '$urlRouterProvider', 'jwtOptionsProvider'];

  function config($stateProvider, $locationProvider, angularAuth0Provider, $urlRouterProvider, jwtOptionsProvider) {

    $stateProvider
      .state('home', {
        url: '/home',
        controller: 'HomeController',
        templateUrl: 'components/home/home.html',
        controllerAs: 'vm'
      })

    // Initialization for the angular-auth0 library
    angularAuth0Provider.init({
      clientID: AUTH0_CLIENT_ID, // Your Default Client ID
      domain: AUTH0_DOMAIN, // Your Auth0 Domain
      responseType: 'token id_token',
      redirectUri: AUTH0_CALLBACK_URL, // Your Callback URL
      audience: AUTH0_API_AUDIENCE, // The API Identifier value you gave your API
    });

    // Configure a tokenGetter so that the isAuthenticated
    // method from angular-jwt can be used
    jwtOptionsProvider.config({
      tokenGetter: function() {
        return localStorage.getItem('id_token');
      }
    });

    $urlRouterProvider.otherwise('/home');

    // Remove the ! from the hash so that
    // auth0.js can properly parse it
    $locationProvider.hashPrefix('');

  }

})();
Here we’ve configured authProvider from auth0-angular with our credentials from the dashboard. Of course, you’ll want to replace the values in the sample with your own credentials. Let’s also create an app.run.js file and paste the following code:
// app.run.js
(function () {

  'use strict';

  angular
    .module('app')
    .run(function ($rootScope, authService) {

      // Put the authService on $rootScope so its methods
      // can be accessed from the nav bar
      $rootScope.auth = authService;

      // Process the auth token if it exists and fetch the profile
      authService.handleParseHash();
    });

})();
What this piece of functionality will do is parse the hash to extract the access_token and id_token returned with the callback once a user has successfully authenticated. In a real-world application you may have a specific route to handle this such as /callback but for our simple demo will just have this run anytime the app is refreshed.
The access_token will be sent to your backend API and this token will be validated to ensure proper access. The id_token on the other hand is for the frontend client and holds user data for the client.
<!-- index.html -->
<html>
  <head>
    <title>AngularJS Authentication</title>

    <!-- Viewport settings-->
    <meta name="viewport" content="width=device-width, initial-scale=1.0, maximum-scale=1.0, user-scalable=no" />

    <!-- Basic style -->
    <link href="bower_components/bootstrap/dist/css/bootstrap.css" rel="stylesheet" />
      <style>
      .navbar{
        margin-bottom: 0;
        border-radius: 0;
      }
    </style>
  </head>
  <body>
    <div ng-app="app">
      <nav class="navbar navbar-default">
        <div class="container-fluid">
          <div class="navbar-header">
            <a class="navbar-brand" ui-sref="home">Auth0</a>
          </div>
          <div id="navbar" class="navbar-collapse collapse">
            <ul class="nav navbar-nav">
              <li ng-if="!auth.isAuthenticated()"><a ng-click="auth.login()">Log In</a></li>
              <li ng-if="auth.isAuthenticated()"><a ng-click="auth.logout()">Log Out</a></li>
            </ul>
          </div>
        </div>
      </nav>

      <div ui-view></div>
    </div>

    <script type="text/javascript" src="auth0-variables.js"></script>
    <script type="text/javascript" src="bower_components/angular/angular.js"></script>
    <script type="text/javascript" src="bower_components/angular-ui-router/release/angular-ui-router.js"></script>
    <script type="text/javascript" src="bower_components/auth0.js/build/auth0.js"></script>
    <script type="text/javascript" src="bower_components/angular-auth0/dist/angular-auth0.js"></script>
    <script type="text/javascript" src="bower_components/angular-jwt/dist/angular-jwt.js"></script>
    <script type="text/javascript" src="app.js"></script>
    <script type="text/javascript" src="app.run.js"></script>
    <script type="text/javascript" src="components/home/home.controller.js"></script>
    <script type="text/javascript" src="components/auth/auth.service.js"></script>
  </body>
</html>
Now we have the groundwork for our application setup. We have a simple toolbar at the top of the page that will allow the user to login. You’ll notice a bunch of imports at the bottom that we haven’t created yet. We’ll start building those out in the next section.
Create the Homepage
There are several places in an app we could put controls for authentication. We could use a sidenav, a navbar, a modal, or even a mix of these three. To keep things simple, we already put a login button in the toolbar, but for a better user experience let’s also add it to our main view. If we look at our app.js file we’ll see that our home component will live in the components/home directory, so create this directory next with a home.controller.js file and a home.html file for the UI. Our UI will look like this:
 <!-- home.html -->
<div class="jumbotron">
  <h2 class="text-center"><img src="https://cdn.auth0.com/styleguide/1.0.0/img/badge.svg"></h2>
  <h2 class="text-center">Home</h2>
  <div class="text-center" ng-if="!vm.auth.isAuthenticated()">
    <p>You are not yet authenticated. <a href="javascript:;" ng-click="vm.auth.login()">Log in.</a></p>
  </div>
  <div class="text-center" ng-if="vm.auth.isAuthenticated()">
    <p>Thank you for logging in! <a href="javascript:;" ng-click="vm.auth.logout()">Log out.</a></p>
  </div>
  <div class="text-center">
    <a ng-click="vm.getMessage()">Get Message</a> <span style="padding: 0 50px;">|</span>
    <a ng-click="vm.getSecretMessage()">Get Secret Message</a>
    <br />
    <p>{{vm.message}}</p>
  </div>
</div>
For our home.controller.js file we’ll have the following code:
 // home.controller.js
(function () {

  'use strict';

  angular
    .module('app')
    .controller('HomeController', homeController);

  homeController.$inject = ['authService', '$http'];

  function homeController(authService, $http) {

    var vm = this;
    vm.auth = authService;

    vm.getMessage = function() {
      $http.get('http://localhost:3001/api/public').then(function(response) {
        vm.message = response.data.message;
      });
    }

    // Makes a call to a private endpoint.
    // We will append our access_token to the call and the backend will
    // verify that it is valid before sending a response.
    vm.getSecretMessage = function() {
      $http.get('http://localhost:3001/api/private', {headers : {
        Authorization: 'Bearer ' + localStorage.getItem('access_token')
      }}).then(function(response) {
        vm.message = response.data.message;
      }).catch(function(error){
        vm.message = "You must be logged in to access this resource."
      });
    }

  }

})();
From our home controller we will make calls to our API service. We will have two API calls, one for a public API route that anyone can access, and one for a protected route that can only be accessed successfuly by a logged in user. It’s ok if some of this code doesn’t make sense yet. We’ll dive deeper in the next section when we create our authentication service.
Creating the Authentication Service
We’ve referenced the authentication service multiple times so far but haven’t actually built it. Let’s take care of that next. The authentication service will be responsible for logging in users, managing the authentication state, and so on. Create a new directory called auth and in there a file auth.service.js. Our authentication service will look like this:
// auth.service.js
(function () {

  'use strict';

  angular
    .module('app')
    .service('authService', authService);

  authService.$inject = ['$state', 'angularAuth0', 'authManager'];

  function authService($state, angularAuth0, authManager) {

    // When a user calls the login function they will be redirected
    // to Auth0's hosted Lock and will provide their authentication
    // details.
    function login() {
      angularAuth0.authorize();
    }

    // Once a user is successfuly authenticated and redirected back
    // to the AngularJS application we will parse the hash to extract
    // the idToken and accessToken for the user.
    function handleParseHash() {
      angularAuth0.parseHash(
        { _idTokenVerification: false },
        function(err, authResult) {
        if (err) {
          console.log(err);
        }
        if (authResult && authResult.idToken) {
          setUser(authResult);
        }
      });
    }

    // This function will destroy the access_token and id_token
    // thus logging the user out.
    function logout() {
      localStorage.removeItem('access_token');
      localStorage.removeItem('id_token');
    }

    // If we can successfuly parse the id_token and access_token
    // we wil store them in localStorage thus logging the user in
    function setUser(authResult) {
      localStorage.setItem('access_token', authResult.accessToken);
      localStorage.setItem('id_token', authResult.idToken);
    }

    // This method will check to see if the user is logged in by
    // checking to see whether they have an id_token stored in localStorage
    function isAuthenticated() {
      return authManager.isAuthenticated();
    }

    return {
      login: login,
      handleParseHash: handleParseHash,
      logout: logout,
      isAuthenticated: isAuthenticated
    }
  }
})();
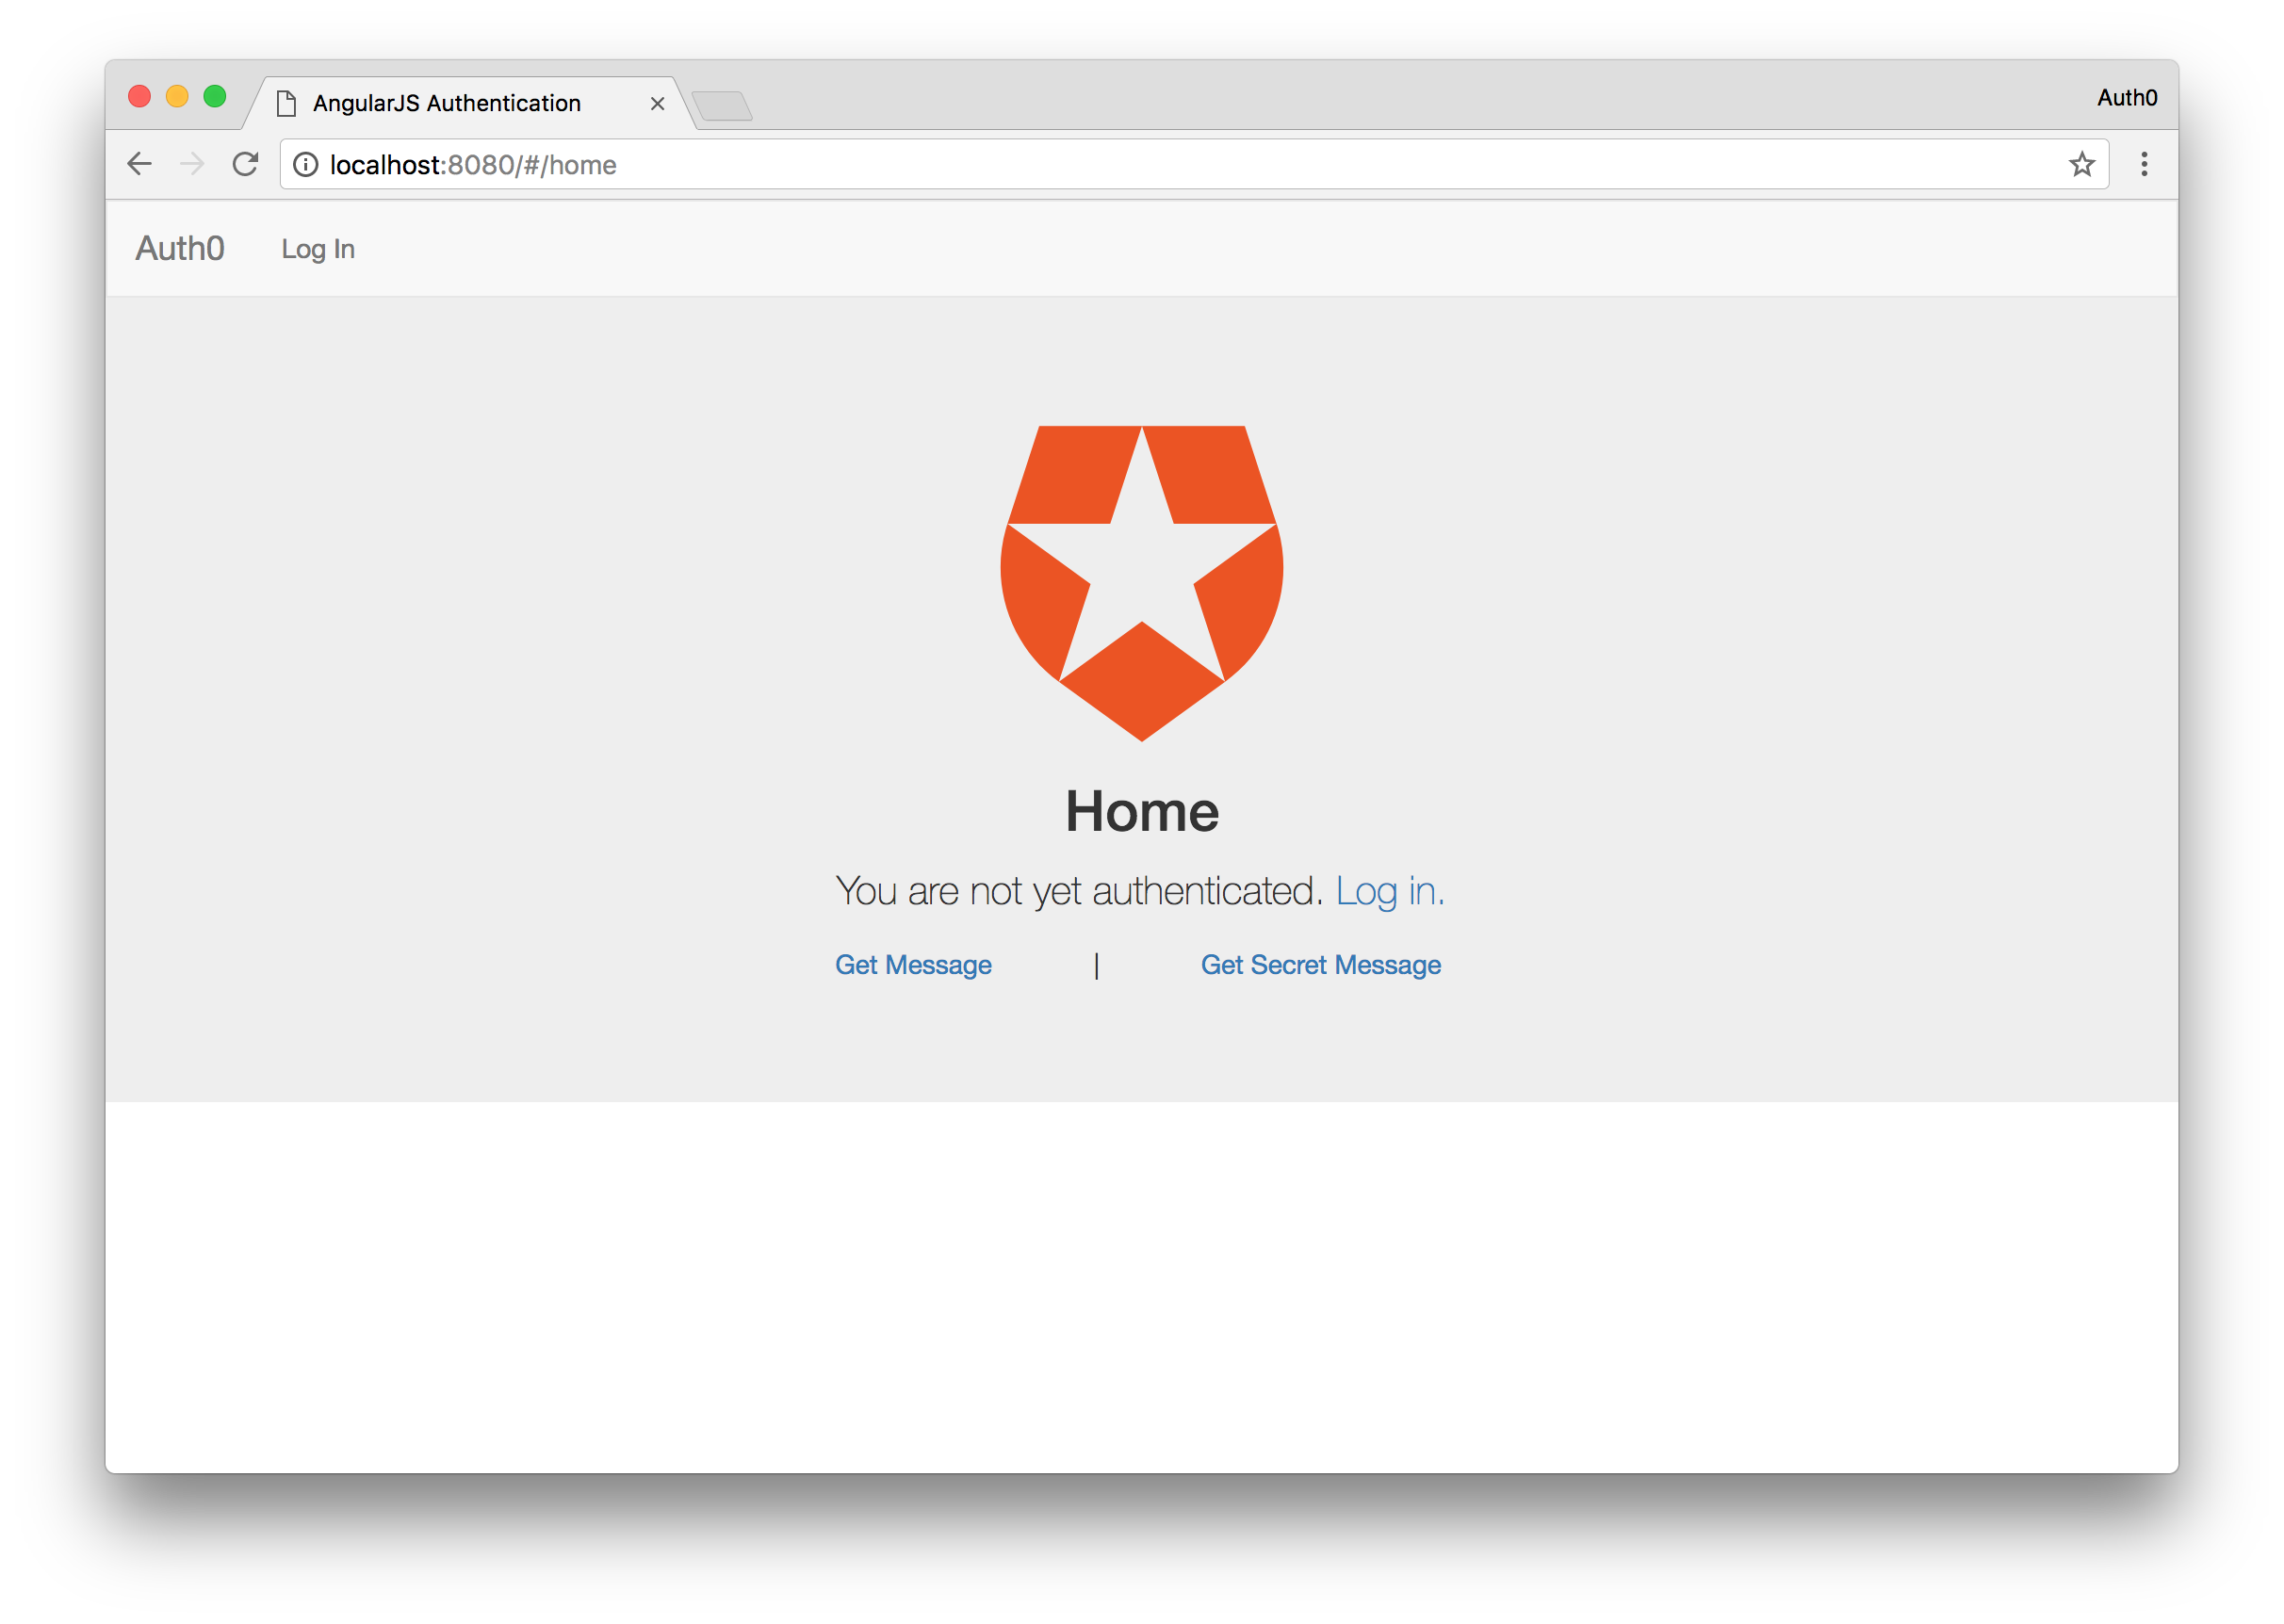
The authentication service is pretty straightforward. We have functions to handle the logging in and out of the application, as well as checking to see if the user is logged in. Our application should now work. Let’s go ahead and visit localhost:8080 to see our application in action.
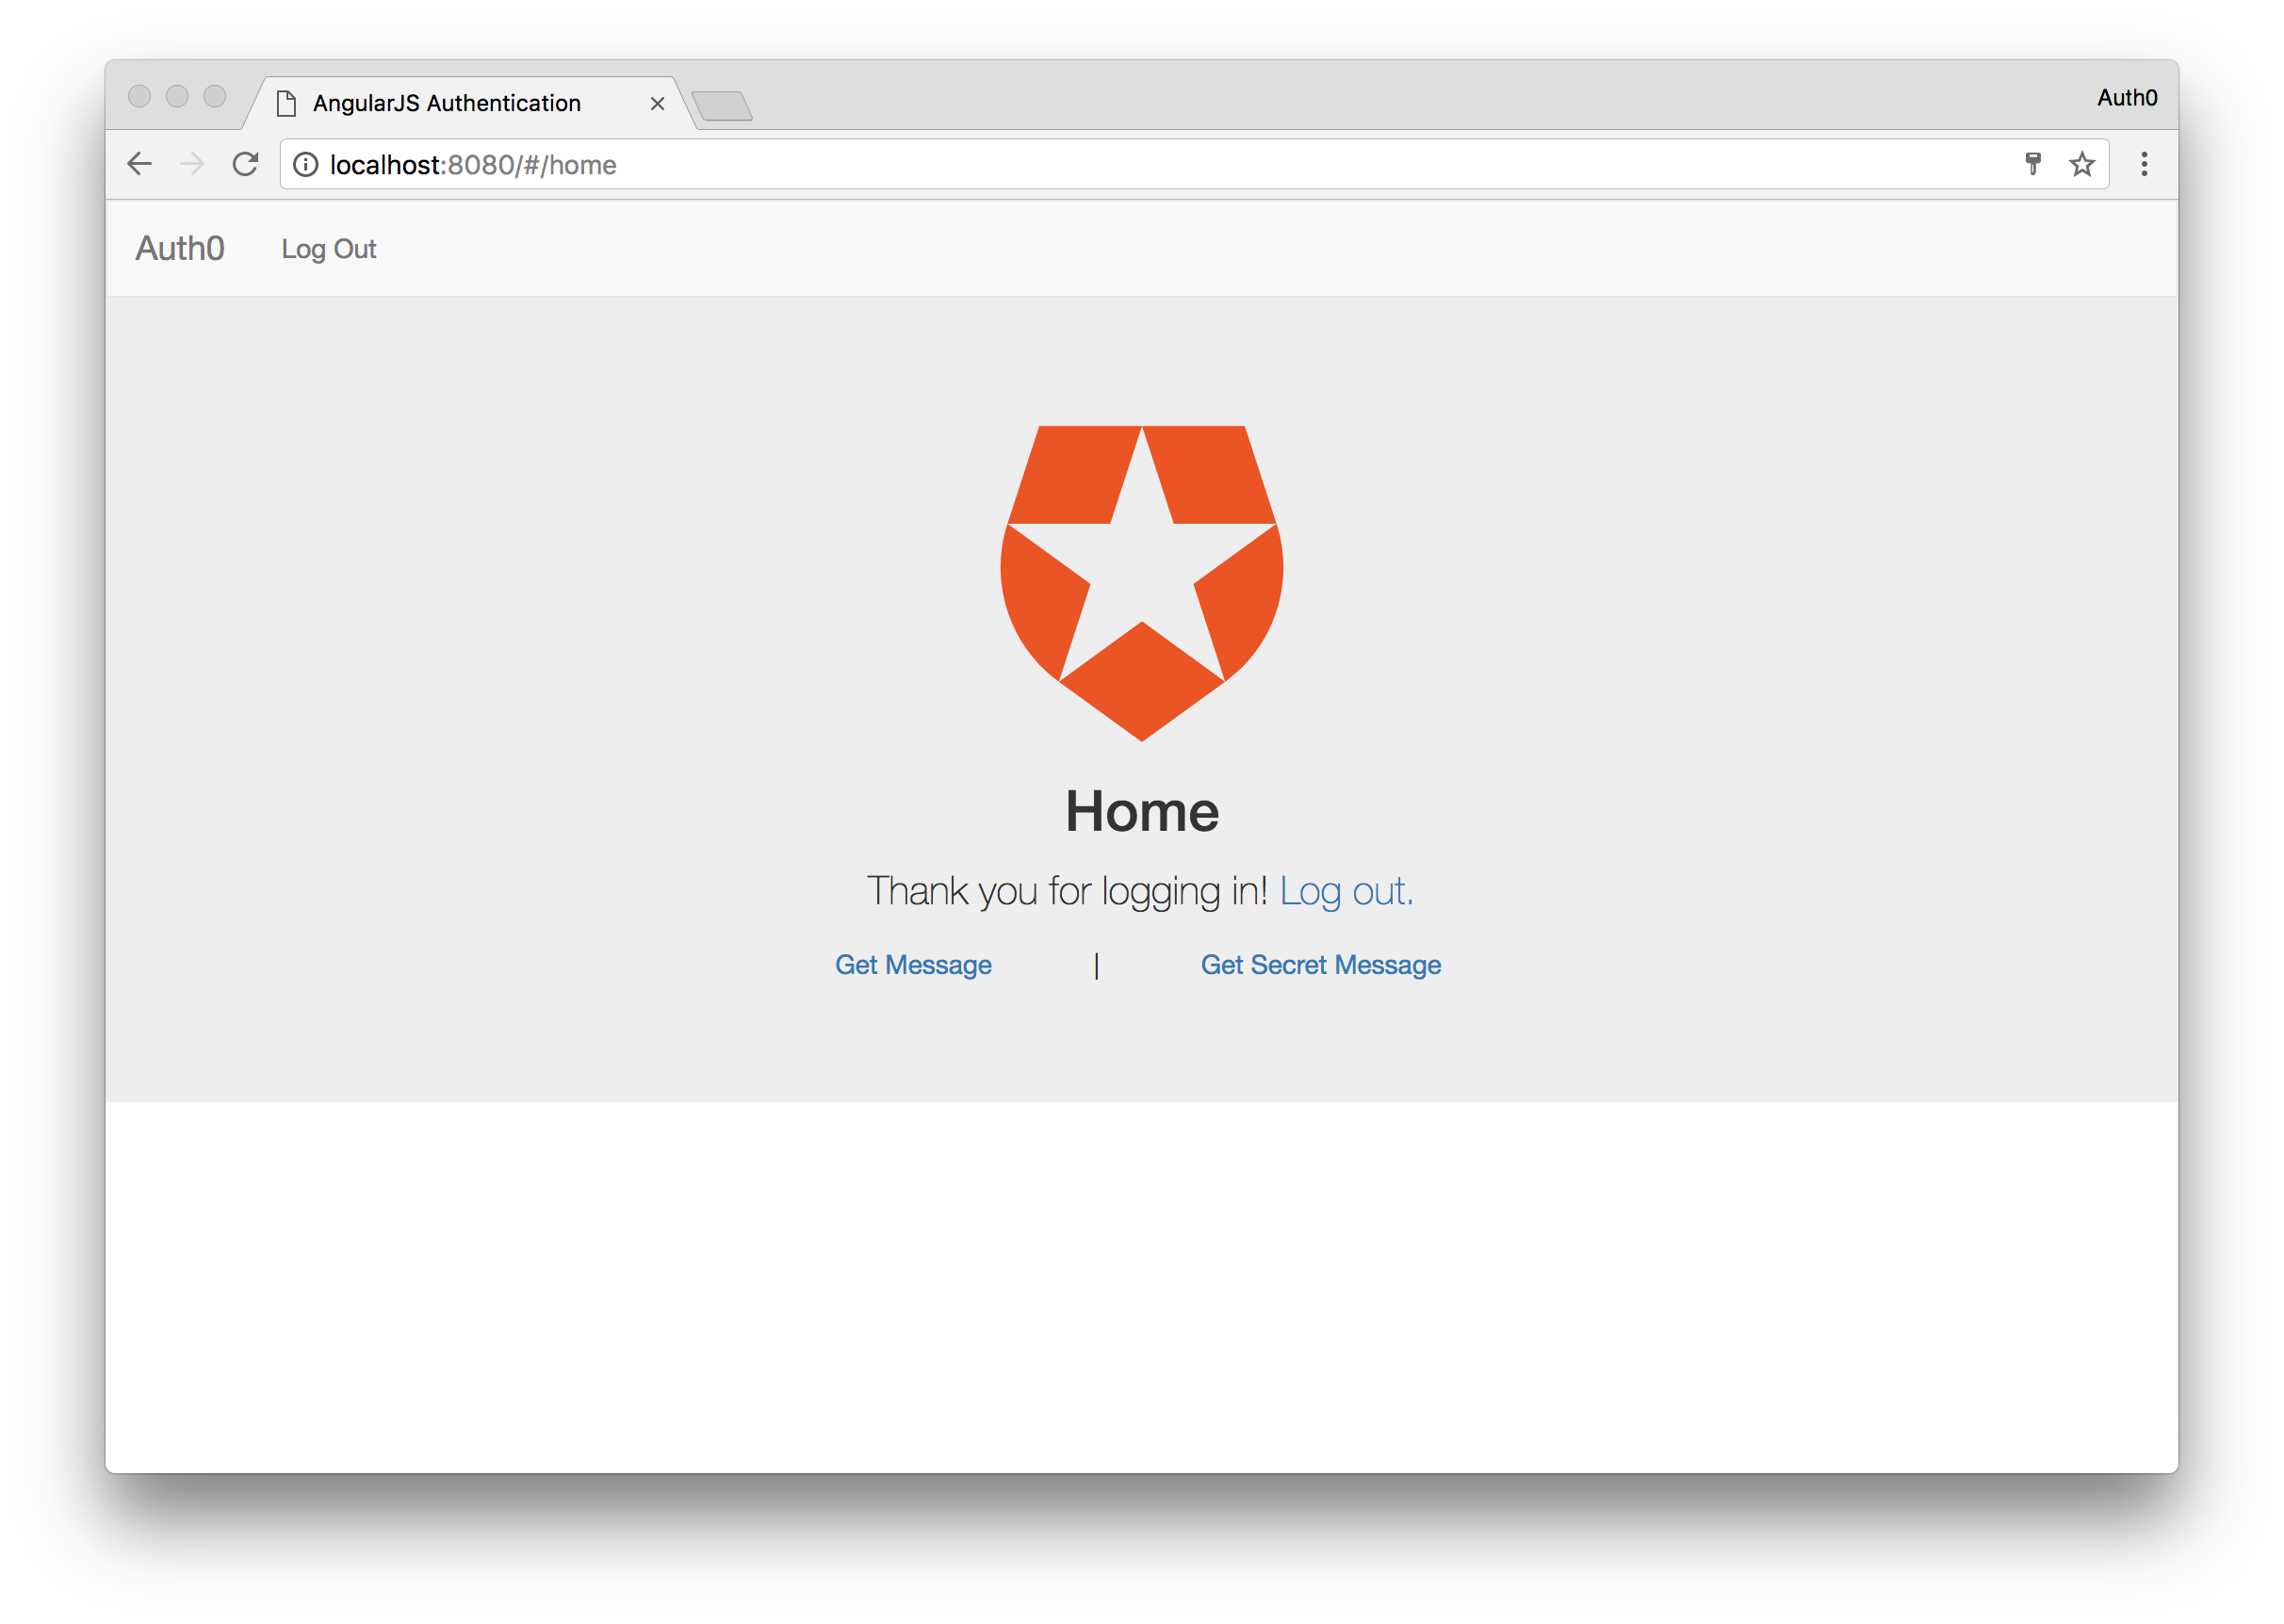
If all went well you should see the Angular application load up and you will be in the logged out state.
The two links at the bottom will not work at the moment since we haven’t deployed a server yet. We’ll do that shortly, but to make sure our app works, let’s try to login. Click either the login link in the nabar or in the main content of the page and you will be redirected to a login page on the Auth0 domain.
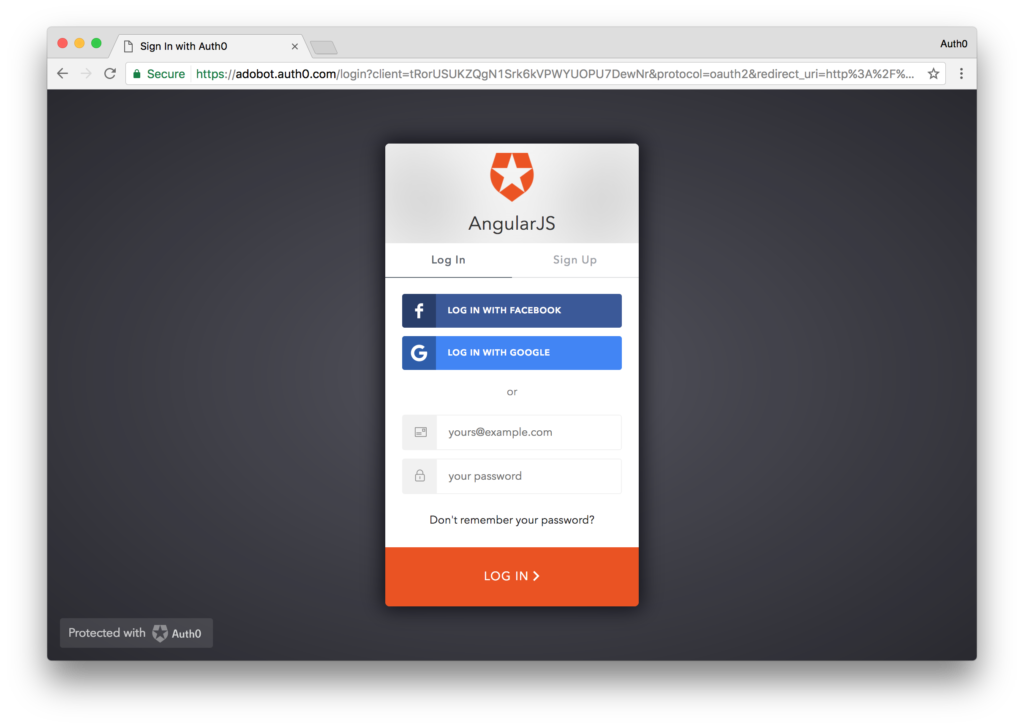
Here you can login with any connection you have setup or even sign up for a new account. Login however you want and you will be redirected back to your AngularJS application at localhost:8080 but this time you will be in a logged in state.
Excellent. For our last part of the demo, let’s write a simple Node server to handle our API calls.
Create the NodeJS Server
Let’s now quickly set up a NodeJS server so that we can make requests! Create a new directory called server and then install some dependencies.
mkdir server && cd server
npm init
npm install express express-jwt cors jkws-rsa
After installation, create an express app that uses the express-jwt middleware. You’ll need your Auth0 API information. Since we already created the API earlier, go into your dashboard, find the API, and copy it’s audience value. Take a look at the implementation below:
// server/server.js

var express = require('express');
var app = express();
var jwt = require('express-jwt');
var jwks = require('jwks-rsa');
var cors = require('cors');

app.use(cors());

var authCheck = jwt({
    secret: jwks.expressJwtSecret({
      cache: true,
      rateLimit: true,
      jwksRequestsPerMinute: 5,
      jwksUri: "https://{YOUR-AUTH0-DOMAIN}.auth0.com/.well-known/jwks.json"
    }),
    audience: '{YOUR-AUTH0-API-AUDIENCE}', // Paste your API audience here.
    issuer: "https://{YOUR-AUTH0-DOMAIN}.auth0.com/",
    algorithms: ['RS256']
});

app.get('/api/public', function(req, res) {
  res.json({ message: "Hello from a public endpoint! You don't need to be authenticated to see this." });
});

// For the private call we are using the authCheck middleware to validate the token
app.get('/api/private', authCheck, function(req, res) {
  res.json({ message: "Hello from a private endpoint! You DO need to be authenticated to see this." });
});

app.listen(3001);
console.log('Listening on http://localhost:3001');
The express-jwt middleware is used to protect endpoints from being accessed unless a valid JWT is sent. We then just need to apply the middleware to whichever routes we want to protect by passing it in as the second argument, just like we’ve done for the private route here.
Making API Requests
Start the server in a new console window/tab with the command node server.js
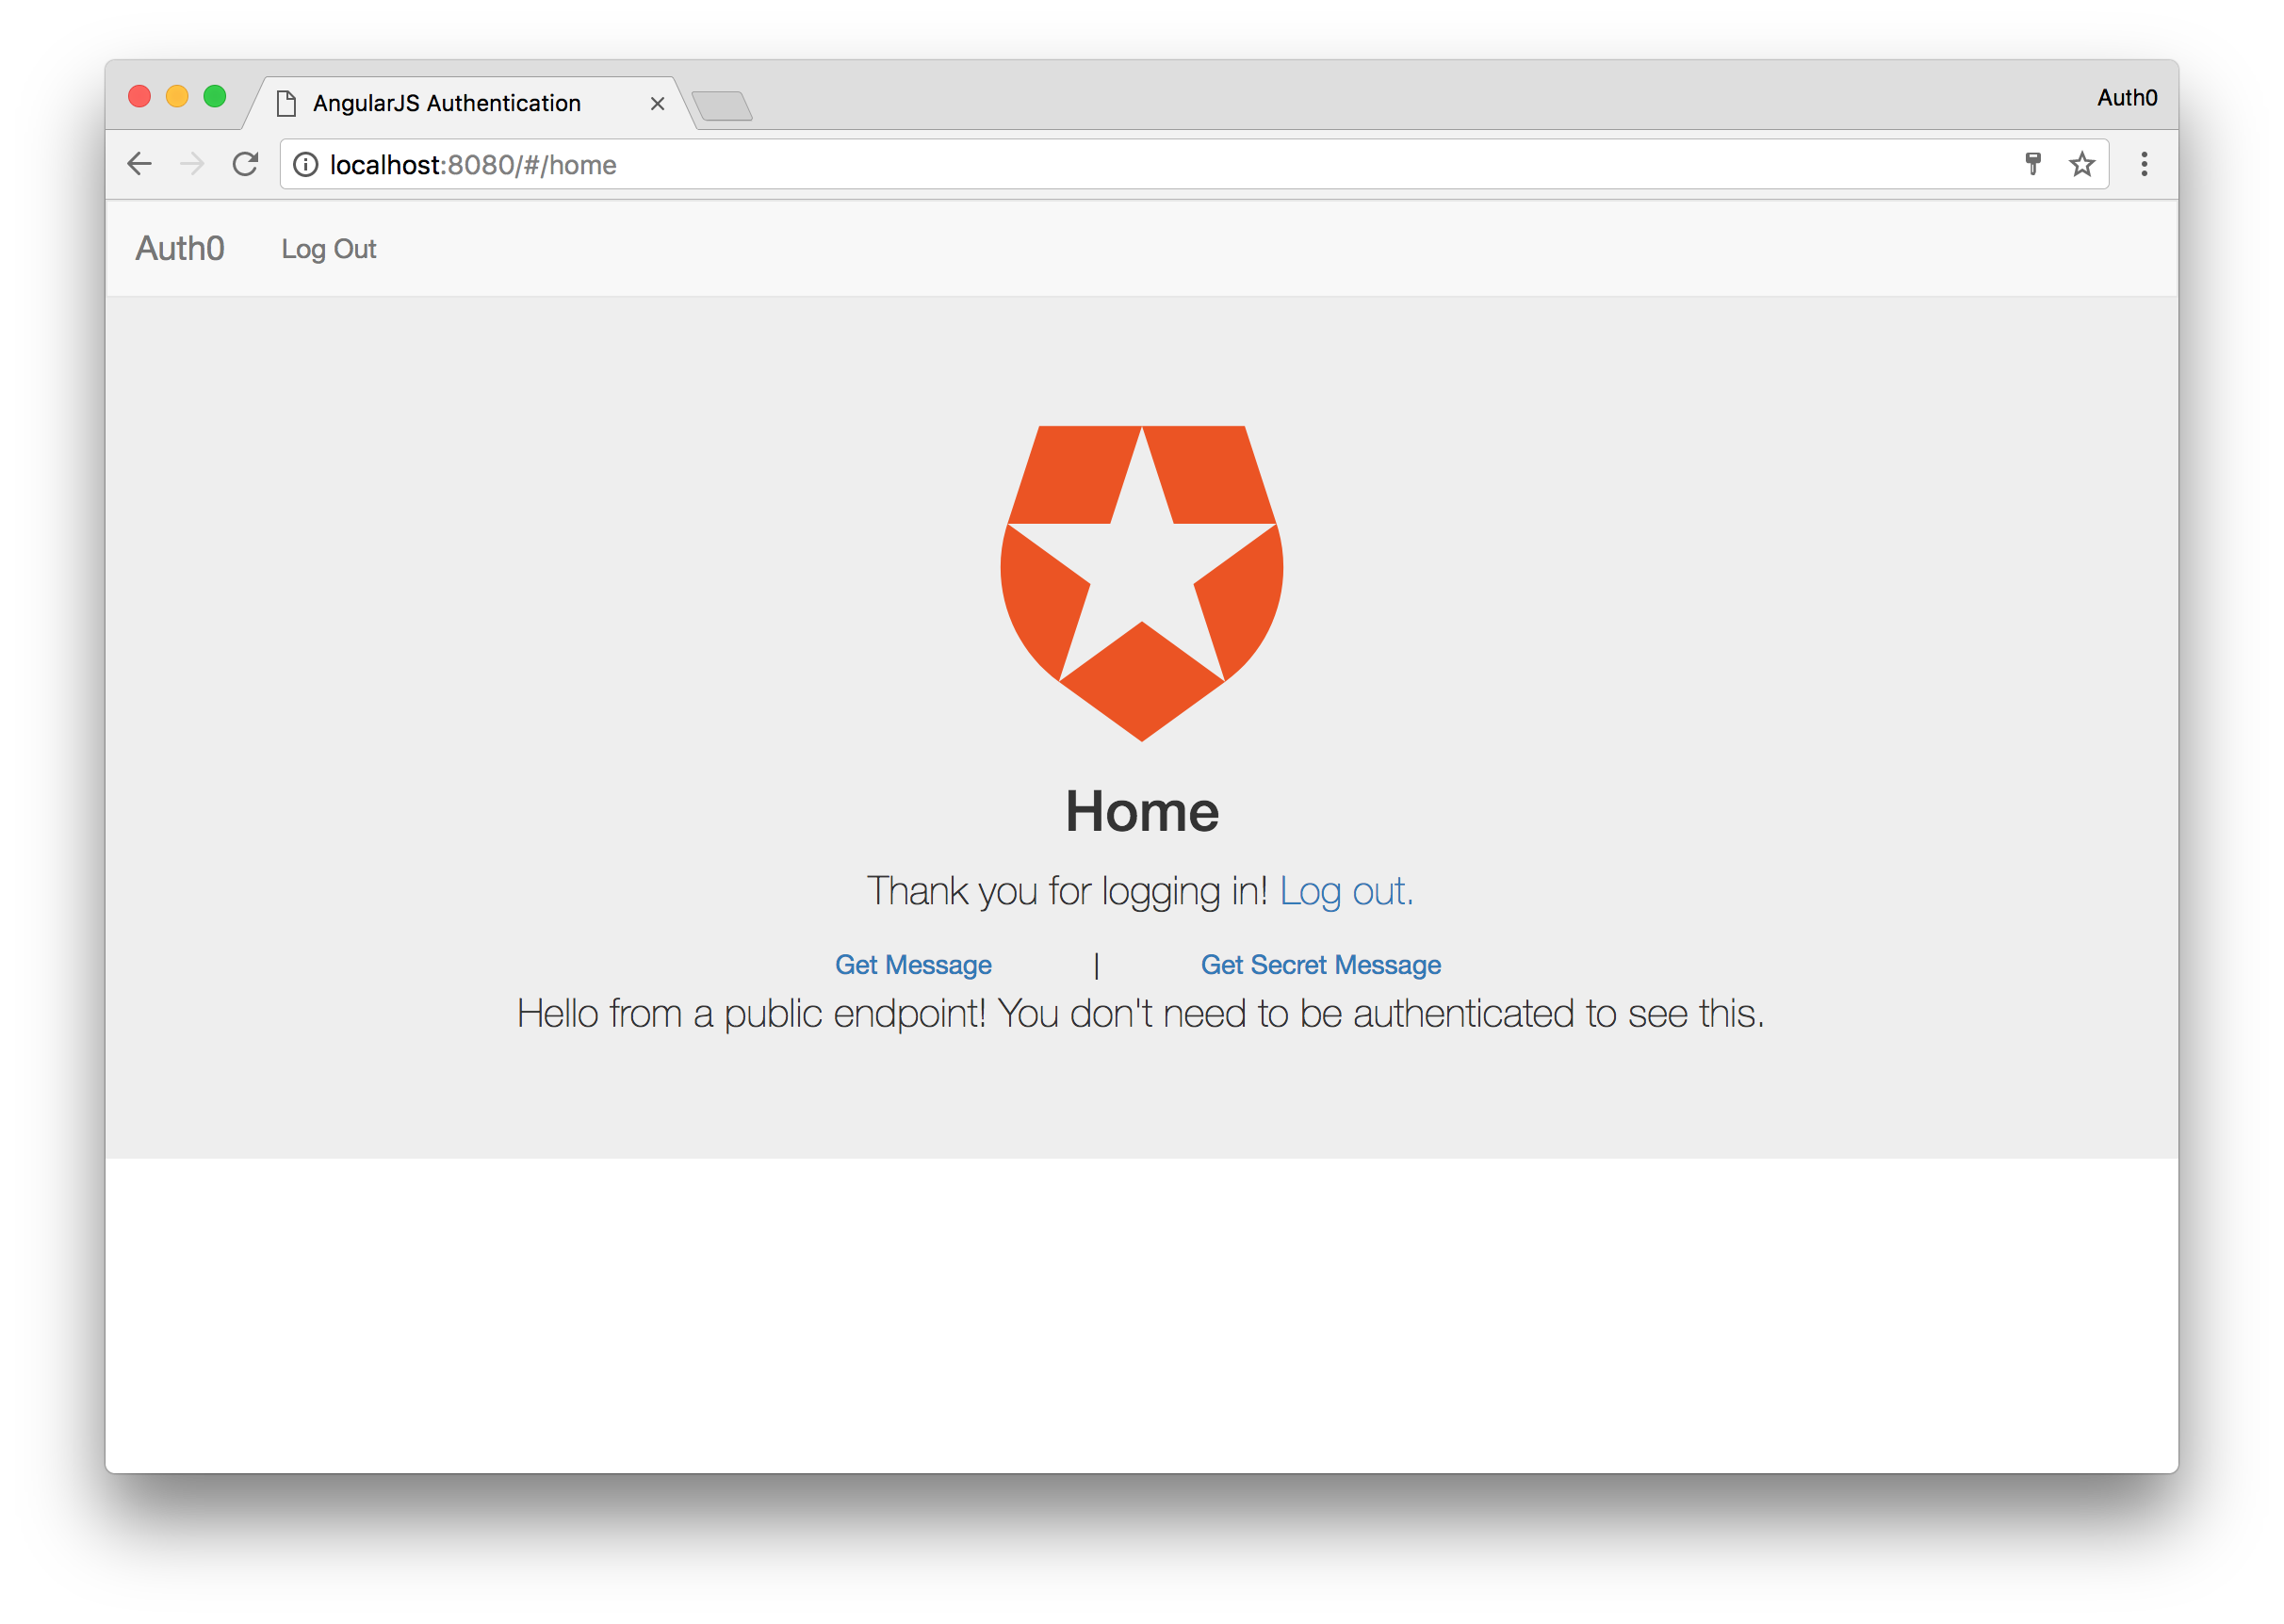
Now if we got to our AngularJS application now, and click the Get Message button, we will see a message displayed saying “Hello from the public endpoint…”. Click the Get Secret Message button next, and you should see the “Hello from private endpoint…” message displayed. This is because we logged in earlier and you are still in the logged in state.
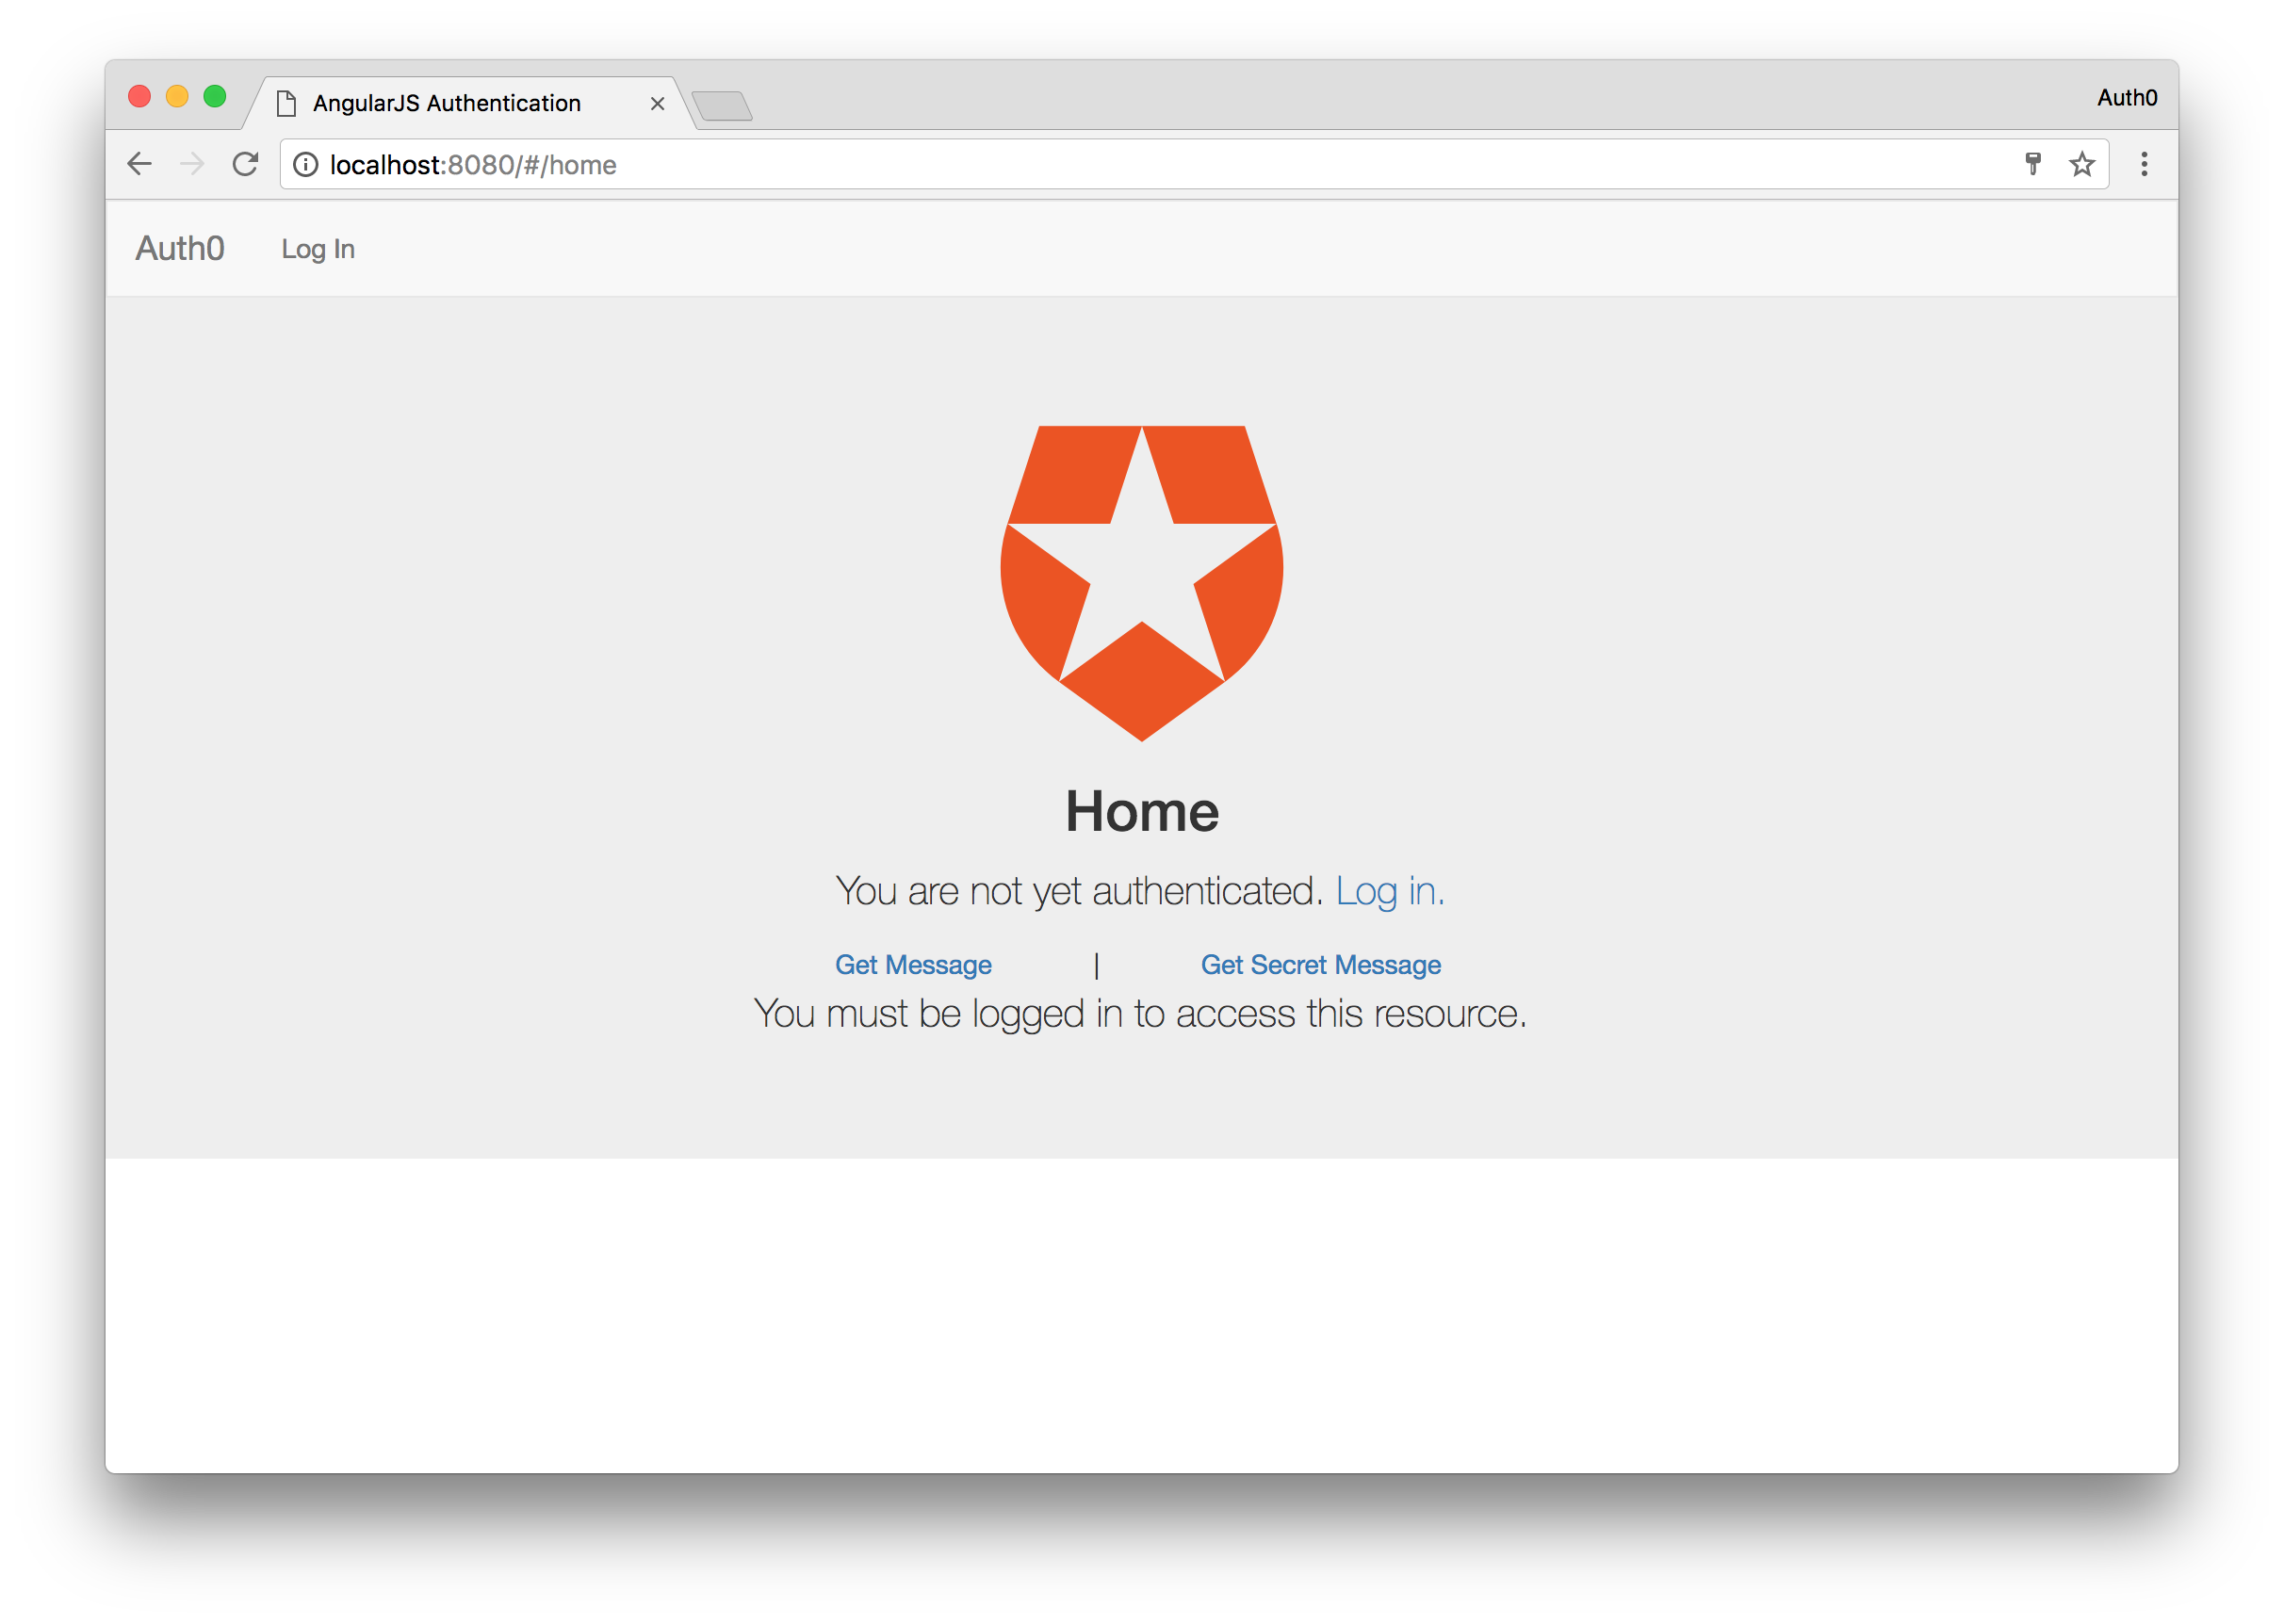
Let’s see what happens when you are not logged in and try to access the secret message. Click the Logout button from either the navbar or main content. Once you are logged out, click the Get Secret Message button and this time you will be presented with a different message saying that you must be authenticated before you can access the endpoint.
More on Auth0
Auth0 also makes it easy for us to add other modern authentication features to our apps, including single sign-on, passwordless login, and multifactor authentication.
We also aren’t limited to using NodeJS as our backend. There are SDKs available for many others, including:
There are also SDKs available for mobile development to make authentication easy:
Wrapping Up
Adding authentication to an API and sending authenticated requests to it from an AngularJS app is relatively easy, but there are quite a few steps involved in making sure the user experience is right. Auth0 does the heavy lifting for us when it comes to authentication, because we don’t need to worry about keeping our own database of users, nor do we need to put in our own login box.
From my experience, it’s much easier to implement authentication in an Angular 2 app because there are fewer things we need to worry about. If you are interested in Angular 2, you can check out this sample on how to build a working app with authentication, and also take a look at the Auth0 documentation.
Frequently Asked Questions (FAQs) on AngularJS Authentication with Auth0
How Can I Implement Social Login with Auth0 in AngularJS?
Implementing social login with Auth0 in AngularJS involves a few steps. First, you need to set up a social connection in your Auth0 dashboard. This involves selecting the social provider (e.g., Google, Facebook, etc.) and configuring the settings. Once the social connection is set up, you can then add the Auth0 lock to your AngularJS application. The Auth0 lock is a login box that provides a built-in solution for handling authentication with various providers. In your AngularJS code, you can initialize the Auth0 lock and specify the social connections you want to use.
How Can I Handle User Sessions in AngularJS with Auth0?
Handling user sessions in AngularJS with Auth0 involves using the Auth0 SDK to manage user authentication state. When a user logs in, the Auth0 SDK will store the user’s authentication information in memory. You can then use this information to manage user sessions in your AngularJS application. This includes checking if a user is logged in, getting the user’s profile information, and logging the user out.
How Can I Secure AngularJS Routes with Auth0?
Securing AngularJS routes with Auth0 involves using the Auth0 SDK to add authentication checks to your routes. This can be done by adding a resolve property to your routes that checks if a user is authenticated before allowing them to access the route. If the user is not authenticated, you can redirect them to the login page.
How Can I Refresh Tokens in AngularJS with Auth0?
Refreshing tokens in AngularJS with Auth0 involves using the Auth0 SDK’s checkSession method. This method allows you to get a new token without requiring the user to log in again. You can call this method at regular intervals or when you detect that the current token is about to expire.
How Can I Handle Errors in AngularJS with Auth0?
Handling errors in AngularJS with Auth0 involves using the Auth0 SDK’s error handling capabilities. The SDK provides a number of error codes that you can use to identify specific types of errors, such as invalid credentials or network errors. You can then handle these errors in your AngularJS code by providing appropriate feedback to the user.
How Can I Customize the Auth0 Lock in AngularJS?
Customizing the Auth0 lock in AngularJS involves using the Auth0 lock’s configuration options. These options allow you to customize various aspects of the lock, such as the theme, language, and social connections. You can specify these options when you initialize the Auth0 lock in your AngularJS code.
How Can I Implement Multi-factor Authentication in AngularJS with Auth0?
Implementing multi-factor authentication in AngularJS with Auth0 involves enabling multi-factor authentication in your Auth0 dashboard and then using the Auth0 SDK to handle multi-factor authentication in your AngularJS application. The SDK provides methods for sending and verifying multi-factor authentication codes.
How Can I Use Auth0 Hooks in AngularJS?
Using Auth0 hooks in AngularJS involves creating a hook in your Auth0 dashboard and then triggering the hook from your AngularJS application. Hooks are custom scripts that you can use to customize the behavior of Auth0 at certain points in the authentication process, such as when a user logs in or signs up.
How Can I Test Auth0 in AngularJS?
Testing Auth0 in AngularJS involves using testing frameworks like Jasmine or Karma. You can write tests to verify that your authentication logic is working correctly, such as checking that a user is redirected to the login page if they are not authenticated.
How Can I Debug Auth0 in AngularJS?
Debugging Auth0 in AngularJS involves using tools like the Auth0 logs or the JavaScript console. The Auth0 logs provide detailed information about the authentication process, while the JavaScript console can be used to log out information from your AngularJS code.
 Ado Kukic
Ado is a full-stack developer and technical writer at Auth0. Mixing his passion of programming and education, he creates tutorials, courses, and other educational content focusing on security, authentication, and much more. On the front-end, he prefers Angular 2, while on the backend he flip-flops between Node.js and Golang.