
Grial UI Kit: Building Beautiful Xamarin.Forms Apps, Faster
This post was guest authored and contributed by Leonardo Viacava. Leo is co-founder and CTO of UXDivers, creators of Grial UI Kit and Gorilla Player. UXDivers specializes in designing and coding engaging mobile experiences using Xamarin technologies.
Grial UI Kit
Grial UI Kit provides XAML templates, custom controls, helpers and resources that accelerate the creation of Xamarin.Forms apps. We make it dead simple for .NET developers to build beautiful cross-platform apps, fast.
Let’s take a look at how Grial UI Kit can help you build a great app.
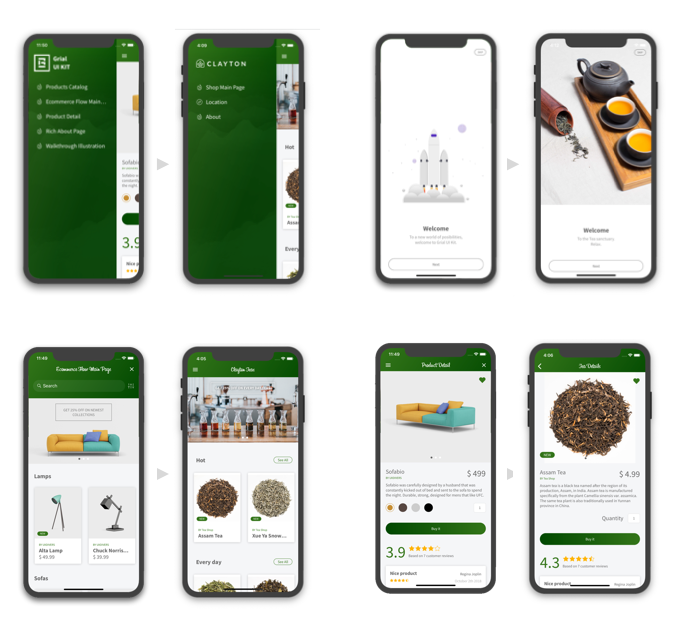
Below you can see an overview of the screens for a Tea Shop app called Clayton. The app took us 20 minutes to build, this blog took us much longer to write 🙂

After you read this blog, watch this video to see the complete process described below at normal speed.
Creating a Beautiful App in Minutes
Creating the App
Grial based apps are created with our Grial Wb Admin site, which allows you to create and manage your apps. There are 5 simple steps to create your app:
- Register your App. Select your license and create the app.
- App Name. Give your app a name 🙂
- Project Setup. Enter the solution name, project name, namespace, assembly name and bundle identifier. All of these are auto-suggested based on the app name.
- Screens. Choose any, and as many, screens from our 90+ cataloge to kick start your app.
- Icon and Theme. Upload a high-resolution image of your app icon. Grial Wb Admin automatically generates all the required icon resolutions for iOS and Android. Select a theme to use. You can use the theme as it is, or choose to customize its accent color to match your brand’s look and feel.
Now, you can download the Visual Studio solution ready to run, and you can start working on your app. The downloaded Grial solution uses your specified names, app icon and theme. It includes all your selected screens plus any accessory views used by those screens. You can add more screens later if you need to.
Watch it in Action
Watch the video below to see the 5 steps wizard creation process using Grial Web Admin and the download and running of the Clayton app with Visual Studio.
Downloading the Solution
The downloaded Visual Studio solution includes:
- XAML files for the selected screens and all accessory views
- The App Theme
- A View Model for each page
- Sample data in JSON format
- All helpers/resources required by the app to work
The solution also references a NuGet package called UXDivers.Grial that contains Grial custom controls, effects, custom renderers, and more. It also includes other popular community NuGet packages (e.g. Xamarin.Essentials, Xamarin.FFImageLoading, Newtonsoft.Json).
In the video, the downloaded app uses a master-detail navigation that includes a link for each page. You can tweak the code to add or remove links.
Using Gorilla Player
The options to customize your app pages are endless. You can remove or add sections, create new ones by combining parts of existing ones, or just keep them as they are. Preview your XAML file customizations instantly using Grial’s best friend: Gorilla Player (pre-configured for all Grial apps, read more about Gorilla in this previous post).
A note on Data: Grial pages have no hardcoded data, all data comes from View Models through data bindings. The View Models read Grial’s sample data from JSON files, which means manipulating the data of your prototypes is super easy. Once the prototype is ready, connect the View Models to the real data source with no impact to the XAML code of your pages.
Customizing the App
Watch the video below to see how we used Gorilla Player to customize the Clayton Tea Shop app. Note the following:
- XAML customization. We customized (1) the e-commerce main page
EcommerceMainPage, (2) the product detail pageProductDetailPageand (3) the walkthroughWalkthroughIllustrationPage.- The search bar from the navigation bar was removed and page title changed.
- The product color picker was also removed as it did not apply to the Tea Shop domain. Page title was changed and other minor tweaks were made.
- Adjusted images and texts.
- Data manipulation. The
DesignTimeData.jsonfile (where Gorilla Player stores its design-time data) was updated. Making the data for the e-commerce main page (EcommerceMainPage) and the product detail page (ProductDetailPage) relevant to the Tea Shop context. To get the running prototype as shown in the video, you also need to update the Grial JSON sample data files for theEcommerceMainPage. - Navigation. We removed the unnecessary screens from the master page by updating the
MainMenuViewModelclass. Set the e-commerce main page (EcommerceMainPage) as the app’s initial page. And used a modal page to display the introductory walkthrough (WalkthroughIllustrationPage) right after the app starts.
The image below gives an overview of the screens transformed by this first round of tweaks.
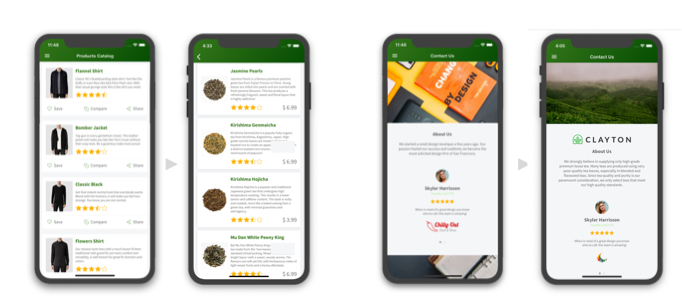
Adding a New Functionality
Let’s say you love green tea. How do you explore the full category without going into each item individually while still getting more product details than its name and photo?
You add a See All button to the categories in the main page (EcommerceMainPage) and a command to navigate to the ProductCatalogPage passing the correspondent category items. To tailor it further, we modified the XAML file of the list items template (ProductsCatalogItemTemplate) to remove the Save/Compare/Share buttons, adjust the image aspect, and include the item’s price.
Well… clearly there’s still work to do before you would consider the app done. For instance, some screens are missing and the View Models are reading sample data instead of data from a backend. In any case, what we wanted you to see is how fast you can build a beautiful, cross-platform app using Xamarin.Forms and Grial UI Kit.
For a tour of the full 20 minutes process, at normal speed, check this video.
Note: the videos show only the iOS app, but the Android app looks just as great.
Grial UI Kit 3
Grial UI Kit 3 is the latest, and greatest version of Grial yet. With over 160 fully themeable, customizable and extensible XAML files, building beautiful Xamarin.Forms apps is now faster than ever.
This version comes with:
- 15 custom controls, including data grid, video player, tab control, card view, and checkbox.
- Gradients support, everywhere.
- Animations for a more engaging experience.
- 6k scalable icons.
- Responsive Helpers to simplify building multi-form factor layouts.
- Built-in localization support, with instant runtime switch.
- Right-to-Left support for all views, with instant runtime switch.
- 6 predefined, yet customizable themes.
- Fast project setup with Grial Web Admin.
Learn More
To learn more about Grial, please visit grialkit.com, for more technical and detailed information go to docs.grialkit.com. Download the Demo app, available in iOS and Android, to experience what you can build with Xamarin.Forms and Grial UI Kit.
All the videos shown here are available in this playlist. We’d love to hear your feedback on Twitter @grialkit.
 Light
Light Dark
Dark
1 comment
Its a pitty, that it is way to expensive (for an indi dev).300$ for the “small” version if you want to develop and release an no-cost app is … well … not a good deal 🙁