
Introduction
To build reusable and developer-friendly components, we need to make them more dynamic (read more adaptable). Great news, Angular comes with some great tools for that. For instance, we could inject content to our components using <ng-content>:
@Component({
  selector: 'child-component',
  template: `
    <div class="child-component">
      <ng-content></ng-content>
    </div>
  `,
})
export class ChildComponent {}

@Component({
  selector: 'parent-component',
  template: `
    <child-component>
      Transcluded content
    </child-component>
  `,
})
export class ParentComponent {}
Although this transclusion technique is great for simple content projection, what if you want your projected content to be context-aware. For example, while implementing a list component you want the items template to be defined in the parent component while being context-aware (of what is the current item it hosts).
For those kinds of scenarios, Angular comes with a great API called ngTemplateOutlet!
In this post, we will define what ngTemplateOutlet is, then we will build the list component we mentioned above as well as a card component to see the two most common ngTemplateOutlet use-cases. We will do the implementation of these components step-by-step, so by the end of this post, you should feel comfortable using this in your Angular components :)
Definition
From the current Angular documentation ngTemplateOutlet is a directive that: Inserts an embedded view from a prepared TemplateRef.
This directive has two properties:
- ngTemplateOutlet: the template reference (type:
TemplateRef). - ngTemplateOutletContext: A context object to attach to the EmbeddedViewRef. Using the key
$implicitin the context object will set its value as default.
What this means is that in the child component we can get a template from the parent component and we can inject a context object into this template. We can then use this context object in the parent component.
If you find this too abstract, here is an example of how to use it:
<!-- Child component -->
<child-component>
  <ng-container
    [ngTemplateOutlet]="templateRefFromParentComponent"
    [ngTemplateOutletContext]="{ $implicit: 'Joe', age: 42 }"
  >
  </ng-container>
</child-component>

<!-- Parent component -->
<parent-component [templateRefFromParentComponent]="someTemplate">
  <ng-template #someTemplate let-name let-age="age">
    <p>{{ name }} - {{ age }}</p>
  </ng-template>
</parent-component>
In the code above, the child component will have a paragraph containing 'Joe - 42'.
Note that for the name (let-name) we did not specify which property of the context object we had to use because the name was stored in the $implicit property. On the other hand, for the age (let-age="age") we did specify the name of the property to use (in this case it was age).
Well, enough with the definitions. Let's start coding.
The code that will be displayed in this article could be found in this Github repository
Use case #1: Context-aware template
Let's build a list component that takes two inputs from its parent:
- data: A list of objects.
- itemTemplate: a template that will be used to represent each element of the list.
run
ng new templateOutletTutorial --minimalto generate a small Angular project to code along
Let's generate the list component using the Angular schematics (ng g c components/list). Once that's done let's implement the component which will display every item of the data property (the inputted list). On every iteration of the ng-for, it will insert an embedded view that the parent component gives us in the itemTemplate property. While doing so, the component should attach a context object containing the current item.
At the end the list component should look like this:
@Component({
  selector: 'app-list',
  template: `
    <ul class="list">
      <li class="list-item" *ngFor="let item of data">
        <ng-container
          [ngTemplateOutlet]="itemTemplate"
          [ngTemplateOutletContext]="{ $implicit: item }"
        ></ng-container>
      </li>
    </ul>
  `,
  styleUrls: ['list.component.scss'],
  changeDetection: ChangeDetectionStrategy.OnPush,
})
export class ListComponent {
  @Input() data: any[];
  @Input() itemTemplate: TemplateRef<HTMLElement>; // a template reference of a HTML element
}
Then in the parent component, we need to call the list component with a list (of objects) and a template reference:
<app-list
  [itemTemplate]="customItemTemplate"
  [data]="[{ id: 4, name: 'Laptop', rating: 3 },
    { id: 5, name: 'Phone', rating: 4 },
    { id: 6, name: 'Mice', rating: 4 }]"
>
  <ng-template #customItemTemplate let-item>
    <div style="display: flex; justify-content: space-between;">
      <span> {{ item.id }} - <b>{{ item.name }}</b> </span>
      <mark> Stars: {{ item.rating }} </mark>
    </div>
  </ng-template>
</app-list>
Note that we placed the ng-template (item template) inside the app-list component tags. This is only for readability, you could place the item template anywhere you want in the parent template.
Also, I put some inline styles in the item template, but you could also give it a class and style it in the parent component style file.
Use case #2: Template overloading
We saw how ngTemplateOutlet could help us to project context-aware templates, let's see another great use-case: template overloading.
For this, we will build a card component that consists of two parts:
- title: A title for the card.
- content: The main content of the card.
For the title, we will pass a simple string, and for the content, we can inject it using content projection. Let's do just that after creating the card component with the Angular schematics (ng g c components/card), the component should look like this:
@Component({
  selector: 'app-card',
  template: `
    <div class="card">
      <header>{{ title }}</header>
      <article>
        <ng-content></ng-content>
      </article>
    </div>
  `,
  styleUrls: ['card.component.scss'],
  changeDetection: ChangeDetectionStrategy.OnPush,
})
export class CardComponent {
  @Input() title: string;
}
We call it in the parent component template:
<app-card [title]="'hello there'">
  <p>i'm an awesome card.</p>
</app-card>
Now let's say we want to put an image (<img>) in the title, or use another component in the title template. We would be stuck because the title property only takes a string.
To solve this problem, we could implement a new behavior in our card component. We could say that the title could be a string or a TemplateRef. In case it is a string we will use string interpolation to bind it to the template, otherwise, we will use ngTemplateOutlet.
After implementing the changes, the new card component should then look like this:
@Component({
  selector: 'app-card',
  template: `
    <div class="card">
      <header *ngIf="isTitleAString(); else titleTemplateWrapper">{{ title }}</header>
      <ng-template #titleTemplateWrapper>
        <ng-container [ngTemplateOutlet]="title"></ng-container>
      </ng-template>
      <article>
        <ng-content></ng-content>
      </article>
    </div>
  `,
  styleUrls: ['card.component.scss'],
  changeDetection: ChangeDetectionStrategy.OnPush,
})
export class CardComponent {
  @Input() title: string | TemplateRef<HTMLElement>;
  isTitleAString = () => typeof this.title == 'string';
}
We call it in the parent component template like this:
<app-card [title]="title">
  <ng-template #title> <h2>Hello there</h2> </ng-template>
  <p>i'm an awesome card.</p>
</app-card>
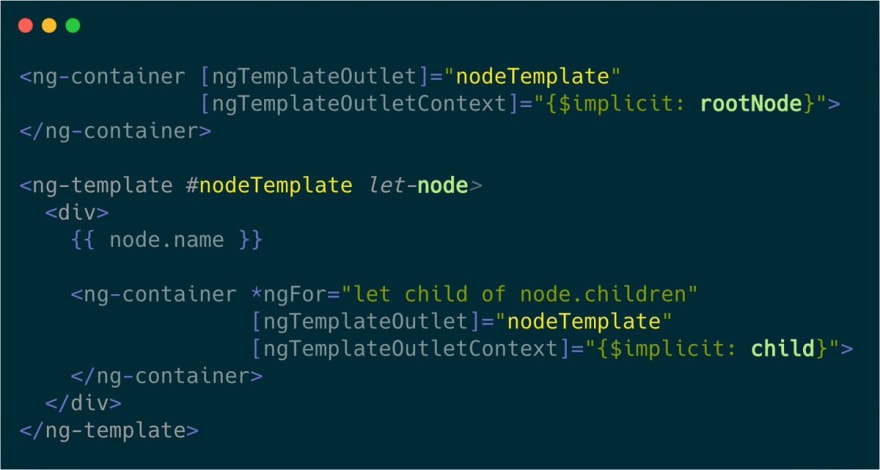
Use case #3: Tree
 Mustapha Aouas@theangularguy
 #Angular tip 🅰👨🏻💻: Using angular `templateOutlet` you can display a tree of nodes using a template that calls itself
#javascript #frontend10:32 AM - 23 Apr 2020


Wrapping up

So, we saw what ngTemplateOutlet is and how we could take advantage of it. We saw 3 of the most common use-cases, but now that you know about this technique maybe you will find another great use-case!
That's it for this post. I hope you liked it. If you did, please share it with your friends and colleagues. Also you can follow me on twitter at @theAngularGuy as it would greatly help me.
Have a good day !


Top comments (6)
Maybe worth mentioning since it's a relatively undocumented feature, but the slotting feature that comes with the transculsion api could be helpful for the 2nd scenario:
Although it doesn't cover the union-type check in your example.
Yes, the slotting feature is great an could help a lot depending on the scenario. When it comes to overloading templates and building reusable components i find the code to be easier to maintain with templateOutlet, but that’s only my two cents.
Thanks for sharing 😃
Hi Mustapha, thanks for the article. Just wondering why you didn't use @ContentChild instead of using the @Input?
eg. @ContentChild(TemplateRef, {static: false}) public itemTemplate:TemplateRef;
Hi David,
Both ways are absolutely valid and there’s not a better way to do it as both methods have their pros and cons. Also I disagree on the maintainability, if not I find using @input way more maintainable on large projects.
If you are building components for your own usage you can use contentChild as you mentioned. If you are building components for other people (other teams At your company for example), using input is more explicit and more flexible (the templateRef doesn’t have to be in the projection area for example).
For instance ng-zorro (ant design library) use this approach.
At the end of the day, it depends on what you want to achieve, one method is more declarative, the other is more imperative.
Thank you so much for the reply and sharing your knowledge. I've been using your guitar app as well, it's awesome!!!
Also, if you want to project multiple elements under the same selector(i.e transcluding a slotted ng-container), you can use ngProjectAs on the ng-container and pass in that selector.
A small example here.
Great article! Thanks for sharing!