A few weeks ago, the CNCF family was extended with a new project – Helm, the package manager for Kubernetes.
Kubernetes was developed as a solution to manage and orchestrate containerized workloads. At the same time, managing the pure containers is not always enough. At the final end, Kubernetes is being used to run applications, and having a solution that will simplify the ability to run and deploy applications with Kubernetes, was a high demand. Helm was this solution.
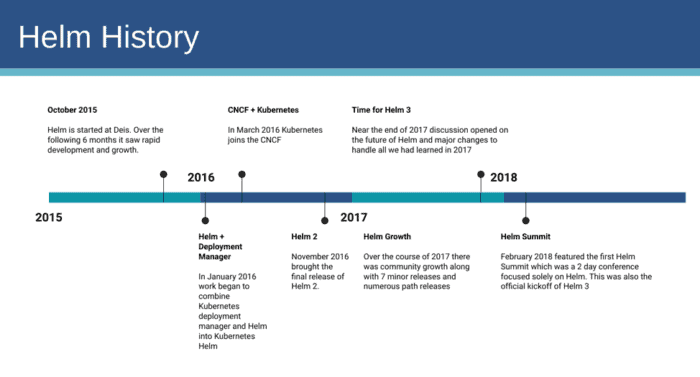
Originally developed by Deis, Helm shortly became a de-facto open source standard for running and managing applications with Kubernetes.
Imagine Kubernetes as an Operating System (OS), Helm is the apt or yum for it. Any operating system is a great foundation, but the real value is in the applications. Package managers like apt, yum, or similar, simplify the operations so instead of building the application from the source files, you can easily install it with the package manager in a few clicks.
The same approach is with Kubernetes and Helm. It’s not difficult to write a simple YAML file describing your desired deployment for Kubernetes, but it is much easier to use the application definitions, which can be easily installed in a few clicks (especially if we are speaking about the complex applications). Also, Helm makes it easier to customise an application (e.g. setting the WordPress username) compared to the raw Kubernetes manifests where you’d either have to edit the YAML or use a sed command or similar.
These predefined application definitions in the Helm world are called Charts. The Charts definition from the Helm official documentation: “A chart is a collection of files that describe a related set of Kubernetes resources. A single chart might be used to deploy something simple, like a memcached pod, or something complex, like a full web app stack with HTTP servers, databases, caches, and so on.” In other words, Charts are similar to DEB or RPM packages for the Linux operating system distributions.
Helm consists of two main components: Helm Client and Tiller Server. Helm Client is responsible for the local chart development, repositories management, and interaction with the Tiller Server, which, in its turn, handles the interaction with the Kubernetes API (installs, upgrades and uninstalls charts).
The major prerequisite for installing Helm is a Kubernetes cluster. If you don’t have it, minikube is the easiest way to get one. Helm installation is as easy as installing the binary package (there is also an option to build it from source, though) – all the possible Helm installation options are covered in the Helm documentation.
The simplest way of Helm client installation is running a script that will fetch and install the latest version of it. (This is not recommended for the production environments, but the fastest solution to have Helm installed in a few minutes for development or demo purposes):
$ curl https://raw.githubusercontent.com/kubernetes/helm/master/scripts/get | bash
% Total    % Received % Xferd  Average Speed   Time    Time     Time  Current
Dload  Upload   Total   Spent    Left  Speed<br>
100  6740  100  6740    0     0   164k      0 --:--:-- --:--:-- --:--:--  164k
Downloading https://kubernetes-helm.storage.googleapis.com/helm-v2.9.1-linux-amd64.tar.gz
Preparing to install into /usr/local/bin
helm installed into /usr/local/bin/helm
Run 'helm init' to configure helm.
After the Helm client is installed, install Tiller to have an ability to interact with the Kubernetes cluster:
helm initNow we are ready to install applications. The easiest way to list the available applications from the stable repo is to run the following command:
$ helm searchHere we’ll install WordPress, a well-known open source content management system as an application sample:
$ helm repo update #optionally, to fetch the latest data from the helm repo
$ helm install stable/wordpress
Done!
Check if the application was installed correctly using the Kubernetes command-line tools:
$ kubectl get deployments
NAME                        DESIRED   CURRENT   UP-TO-DATE   AVAILABLE   AGE
washed-tortoise-wordpress   1         1         1            0           1m
Here is a list of Kubernetes deployments, with the WordPress installation.
Also, listing the pods in the Kubernetes cluster shows the WordPress chart deployed two pods – wordpress itself, and mariadb as a database for the WordPress application.
idv@ihor:~$ kubectl get pods
NAME                                              READY     STATUS              RESTARTS   AGE
exciting-grasshopper-mariadb-0                    1/1       Running             0          8m
exciting-grasshopper-wordpress-5f666d765c-xgk85   1/1       Running             1          8m
And of course, we may check if the chart has been installed via helm command:
$ helm list
NAME            REVISION        UPDATED                         STATUS          CHART           NAMESPACE
washed-tortoise 1               Mon Jul 23 19:22:33 2018        DEPLOYED        wordpress-2.1.3 default
This was the easiest sample of what can be achieved with Helm, but it is definitely able to handle much more complex deployments. The best place to get started with Helm is the project website, where you may find all the necessary information about this amazing technology.