This article was peer reviewed by Craig Bilner and Bruno Mota. Thanks to all of SitePoint’s peer reviewers for making SitePoint content the best it can be!
React’s declarative components and virtual DOM rendering have taken the world of frontend development by storm, but it’s not the only library built on those ideas. Today we’ll explore what it’s like to build an application in three other React-like alternatives.
We’re going to assume that you’re already familiar with React and the terminology that’s used in its ecosystem. If you need to get up to scratch or just refresh, then check out one of our earlier articles.
Overview
Let’s get started with a high level overview of the libraries we’ll be comparing.
Deku (2.0.0-rc15)

Deku aims to be a more functional alternative to React. It prevents components from having local state, which allows all components to be written as pure functions that communicate with an external state management solution like Redux.
Preact (4.1.1)

Preact is an attempt to emulate the core functionality of React using as little code as possible. Assuming that you will be using ES2015, Preact takes some shortcuts and trims down React’s original feature set to produce a tiny library which weighs in at only 3KB.
Virtual-DOM (2.1.1)

Where React, Deku and Preact give you a component abstraction above a virtual DOM, the virtual-dom package gives you the lower level tools you’ll need to create, compare and render trees of virtual DOM nodes yourself. (This isn’t the same thing as the virtual DOM that React and Preact are built on!)
A low level library like Virtual-DOM might seem like an odd alternative to React, but if you’re interested in writing performant mobile web experiences, then watching Pocket-sized JS is a great place to start. In fact, this talk is the reason we’ve included Virtual-DOM as a comparison.
We’ll use each of these libraries to build a component, structure our data flow and finally look at the size and performance of each application.
Components
Here’s a React component that will render some Markdown, using the marked library.
import React from 'react';
import marked from 'marked';

const Markdown = React.createClass({
  propTypes: {
    text: React.PropTypes.string
  },
  getDefaultProps() {
    return { text: '' };
  },
  render() {
    return (
      <div
        dangerouslySetInnerHTML={{
          __html: marked(this.props.text)
        }}>
      </div>
    );
  }
});
We’re using prop validation to have the component warn us if it receives a prop of the wrong type. It also implements a getDefaultProps() method which allows us to provide default values for our component, in the event that none are passed in. Finally, we implement a render method, which returns the user interface for this component.
To prevent React from escaping our Markdown when we render it, we need to pass it to the dangerouslySetInnerHTML property.
Deku
Next up, we’ll implement the same component with Deku.
/** @jsx element */
import { element } from 'deku';
import marked from 'marked';

const Markdown = {
  render({ props: { text='' } }) {
    return <div innerHTML={marked(text)}></div>;
  }
};
The first line is a compiler pragma which tells our compiler to transform JSX like <h1>Hello</h1> into element('h1', null, 'Hello') rather than React.createElement('h1', null, 'Hello'), which allows us to use JSX with Deku instead of React. This option can also be configured with a .babelrc file.
Compared to React, our Deku component is definitely simpler. Deku components don’t have an instance you can reference with this, meaning that all the data the component might need will be passed into the method as an object called model. This object contains our component’s props and we can use destructuring syntax to extract the text prop.
Deku doesn’t have prop validation, but we can at least simulate getDefaultProps() by providing default values in these destructuring assignments.
Preact
Next up is Preact.
/** @jsx h */
import { h, Component } from 'preact';
import marked from 'marked';

class Markdown extends Component {
  render() {
    const { text='' } = this.props;
    return (
      <div
        dangerouslySetInnerHTML={{
          __html: marked(text)
        }}>
      </div>
    );
  }
}
Again, we need to tell the compiler to turn JSX into something Preact understands. Preact components are very similar to React’s ES2015 class components and we were able to copy most of our rendering code from earlier. Like Deku, Preact does not support prop validation or default properties, but we can again simulate default props with destructuring assignments.
Virtual-DOM
Finally, we’ll take look at Virtual-DOM.
/** @jsx h */
import { h } from 'virtual-dom-util';
import marked from 'marked';

function Markdown({ text='' }) {
  return <div innerHTML={marked(text)}></div>;
}
We aren’t provided with any tools for structuring our components, so you won’t see constructs like this, props or state here. In fact, these “components” are just functions which return trees of virtual DOM nodes.
The native way to create virtual DOM nodes isn’t compatible with JSX, so we’re using the virtual-dom-util package to provide us with a JSX compatible alternative. We don’t actually need to import the virtual-dom package until we render our component.
Rendering A Component
Next we’ll look at how to render a component into the DOM. All of these libraries render into a target node, so we’ll create one in our HTML file.
<div id="app"></div>
React
import { render } from 'react-dom'

render(
  <Markdown text='Hello __world__' />,
  document.getElementById('app')
);
To render a React component we need to use the react-dom package, which provides a render function that understands how to turn a tree of React components into a tree of DOM nodes.
To use it, we pass an instance of a React component and a reference to a DOM node. ReactDOM handles the rest.
Deku
/** @jsx element */
import { createApp, element } from 'deku';

const render = createApp(
  document.getElementById('app')
);

render(
  <Markdown text='Hello __world__' />
);
Deku has a slightly different way of rendering a component. Because Deku components aren’t stateful, they won’t re-render themselves automatically. Instead we use createApp() to build a render function around a DOM node, that we can call each time our external state changes.
Now we can pass instances of Deku components to render them in that node.
Preact
/** @jsx h */
import { h, render } from 'preact';

render(
  <Markdown text='Hello __world__' />,
  document.getElementById('app')
);
Preact provides us with a similar interface for rendering components into DOM nodes, however it’s found inside the core Preact package, unlike ReactDOM. Like so much of the Preact API, there’s nothing new to learn and the concepts from React are readily transferable.
Virtual-DOM
/** @jsx h */
import { create } from 'virtual-dom';
import { h } from 'virtual-dom-util';

const tree = <Markdown text='Hello __world__' />;
const root = create(tree);

document
  .getElementById('app')
  .appendChild(root);
Virtual-DOM gives us much more flexibility around how we create and use our component. First we create an instance of a virtual tree, which we realize as a DOM node with the create function. Finally we’re free to add this child to the DOM in whatever way we want.
Data Flow
Across the three libraries we’re considering, there are two distinct approaches to managing our application state.
Inside
Like React, Preact also allows components to manage their own state.

Each component keeps track of a reference to an immutable state object that can updated through a special component method called setState. When this function is called, the component will assume that something has been changed and attempt to re-render. Any components that receive props from the component whose state was updated will also be re-rendered.
Preact also provides us with a mechanism for overriding the default behaviour with fine grained control, in the form of shouldComponentUpdate.
Outside
Deku makes the deliberate decision to move state management outside of components and Virtual-DOM is too low level to be concerned with abstractions like state. This means that if we want to build applications with it, then we need to keep the state elsewhere.
When this is the case, our state moves out into an external container, which the root component uses to provide data for the rest of the application. We’ll need to re-render the whole application each time the state container updates.
To update the state, the components must communicate changes with the state container. In Flux-like systems, this communication often comes in the form of actions.
It’s important to remember that although React and Preact support component local state, they can also be used with an external state management solution too.
Application Structure
This section will look at how we implement these ideas about state, data flow and re-rendering as actual code. In the course of this we’re going to build out our Markdown component into a realtime Markdown editor. You can see a demo of the finished components in the next section.
Deku
A Deku application is usually made up of two main parts: a component tree and a store.

We’ll use Redux as a store as it works well with Deku, out of the box. The components in the tree dispatch actions which our Redux reducers will use to change the state, and we’ll use the subscribe mechanism to re-render the component tree whenever the state changes.
First we’ll set up a simple Redux store.
import { createStore } from 'redux';

const initState = { text: '' };
const store = createStore((state=initState, action) => {
  switch(action.type) {
    case 'UPDATE_TEXT':
      return { text: action.payload };
    default:
      return state;
  }
});
Without going into too much detail, a Redux store is built up of a reducer function which takes the current state and an action as arguments. The function should return a new state, based on the data in the action.
Now we’ll revisit the rendering code to let Deku know about our Redux store.
const render = createApp(
  document.getElementById('app'),
  store.dispatch
);
Because Deku is expecting you to use an external state management solution, its createApp function accepts a dispatch function as the second parameter. In turn, Deku will provide this dispatch function to all of its components, so that they can speak to the Redux store.
We’ll also pass the current state of our store into the render function. Deku will provide this value to each component as context, allowing any component in our tree to read from the store.
render(
  <MarkdownEditor />,
  store.getState()
);
We can use the store.subscribe() method to listen for changes to state, so that we can re-render our component tree.
store.subscribe(() => {
  render(
    <MarkdownEditor />,
    store.getState()
  );
});
To update the state, components should pass actions to their dispatch function. However, creating our actions inside our components can easily lead to bloated component code, so instead we’ll create middlemen functions that dispatch parameterized actions for us. These functions are often known as “action creators”.
const actions = {
  updateText: dispatch => text => {
    dispatch({
      type: 'UPDATE_TEXT',
      payload: text
    });
  }
};
The action creator takes a dispatch function and a parameter, then uses them to create and dispatch an appropriate action object. For the sake of convention, we’re designing our actions so that they comply with Flux Standard Actions.
To tie this altogether, our component will read from the state in context and dispatch actions using the new action creator.
const MarkdownEditor = {
  render({ context, dispatch }) {
    return (
      <main>
        <section>
          <label>Markdown</label>
          <hr />
          <Editor onEdit={actions.updateText(dispatch)} />
        </section>
        <section>
          <label>Preview</label>
          <hr />
          <Markdown text={context.text} />
        </section>
      </main>
    );
  }
};
Preact
Once a Preact component has been rendered, it will manage it’s own re-rendering by listening out changes to it’s internal state.
import { Component } from 'preact';
import { bind } from 'decko';

class MarkdownEditor extends Component {
  constructor() {
    super()
    this.state = { text: '' };
  }
  @bind
  onEdit(text) {
    this.setState({ text });
  }
  render() {
    return (
      <main>
        <section>
          <label>Markdown</label>
          <hr />
          <Editor onEdit={this.onEdit} />
        </section>
        <section>
          <label>Preview</label>
          <hr />
          <Markdown text={this.state.text} />
        </section>
      </main>
    );
  }
}
We use the constructor to initialize the state for this component. Then we create an onEdit method for updating the state based on a parameter. You might also notice that we’ve used a @bind decorator here.
This decorator comes from a library called Decko (not Deku!) and we’re using it to make sure that the onEdit method has the correct value of this, even when it is called from outside of the component.
Finally, we’re passing this.state.text down to our <Markdown /> component as a prop. Each time the onEdit callback is called, we’ll update the state and the component will re-render.
Virtual-DOM
Unlike React, Deku and Preact, Virtual-DOM makes no assumptions about how you manage state, or where the virtual nodes receive their data. This means we’ll have to do a bit of extra work to set this up.
Thankfully, Redux is unopinionated enough that we can use it here too. In fact, we can borrow the code for creating the store from the Deku example.
import { createStore } from 'redux';

const store = createStore((state = initState, action) => {
  switch (action.type) {
    case 'UPDATE_TEXT':
      return {
        text: action.payload
      };
    default:
      return state;
  }
});
Rather than passing our store’s dispatch function down to our components, we’ll refer to it directly from our action creators.
const actions = {
  updateText(text) {
    store.dispatch({
      type: 'UPDATE_TEXT',
      payload: text
    });
  }
}
This might feel simpler than our other action creators, but it makes them much harder to isolate and test, as they all have uninterceptable dependency on the Redux store.
We’ll pass the initial state to our component for the first render.
let tree = <MarkdownEditor state={store.getState()} />;
let root = create(tree);

document
  .getElementById('app')
  .appendChild(root);
Then we’ll make use of the subscription mechanism to listen for changes to state.
import { diff, patch } from 'virtual-dom';

store.subscribe(function() {
  let newTree = <MarkdownEditor state={store.getState()} />;
  let patches = diff(tree, newTree);
  root = patch(root, patches);
  tree = newTree;
});
Rather than simply rendering the new tree, we perform the diff manually, then we used the returned set of patches to apply the minimal number of changes necessary to make the rendered DOM nodes reflect the virtual DOM nodes in our newTree.
Finally we overwrite our old tree ready for the next render.
Demos
We put these components together and created an simple splitscreen, realtime Markdown editor with each framework. You can see the code and play with the finished editors on Codepen.
Size
When we’re developing lightweight applications designed to be used on desktop and mobile devices, the amount of data we have to transfer from the server is an important factor when picking a view layer.
In each case, we’re creating a minified bundle containing both our application code and our dependencies, for comparison.
4. React
- Lines of Code: 61
- Dependencies:
react,react-dom,marked - Bundle Size: 154.1kb
- Gzipped: 45.3kb
As per the recommendation of the React team, we’re using the prebuilt production versions of React, rather than minifying it ourselves. A standalone minified version of Marked comes in at ~17kb. Together the minified versions of React and ReactDOM clock in at ~136kb.
3. Deku
- Lines of Code: 80
- Dependencies:
deku,redux,marked - Bundle Size: 51.2kb
- Gzipped: 15.3kb
Our Deku bundle already comes in 100kb lighter than React and we’ve also included a full blown state manager in the form of Redux. Together Redux and Marked weigh in at roughly ~30kb. Leaving our application code and our dependency on Deku at ~21kb.
2. Virtual-DOM
- Lines of Code: 85
- Dependencies:
virtual-dom,virtual-dom-util,redux,marked - Bundle Size: 50.5kb
- Gzipped: 15.2kb
Despite its minimalist, low level nature, our Virtual-DOM bundle weighs in at ~50kb (roughly the same size as Deku). Again, Redux and Marked are responsible for ~30kb of that size. Together the virtual-dom packages and the application code responsible for ~20kb.
1. Preact
- Lines of Code: 62
- Dependencies:
preact,decko,marked - Bundle Size: 30.6kb
- Gzipped: 10.5kb
Staying true to its purpose, our Preact bundle comes in at an impressive 30.6kb. Together, Decko and Marked are responsible for ~19kb of that, leaving Preact and our application code at a mere 11kb.
Performance
For the mobile web we should be equally aware that not all mobile device processors are created equal. We’ll take a look at how quickly our application gets its first frame onto the screen.
4. React
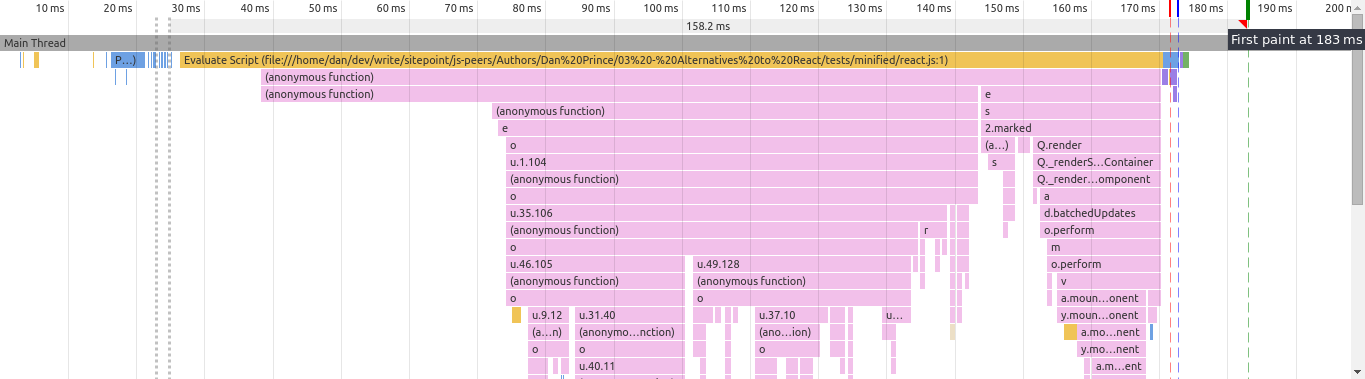
The browser starts evaluating the JavaScript at around the 30ms mark. Then after a style recalculation, a reflow and an update to the layer tree, we get a paint event at 173.6ms, then the layers are composited and finally the first frame lands in the browser at 183ms. So we’re looking at roughly a 150ms turnaround.
3. Deku

The browser starts evaluating JavaScript at around 55ms. Then we see the same style recalcuation, reflow and layer tree update, before we see the paint event at 111ms, layers are composited and the first frame lands at 118ms. Deku more than halves React’s turnaround time, bringing it down to roughly 70ms.
2. Preact

We’re seeing the browser start to evaluate the scripts at about 50ms and the paint event appears at 86.2ms, and the first frame lands at 102ms, with a turnaround time of 50ms.
1. Virtual-DOM
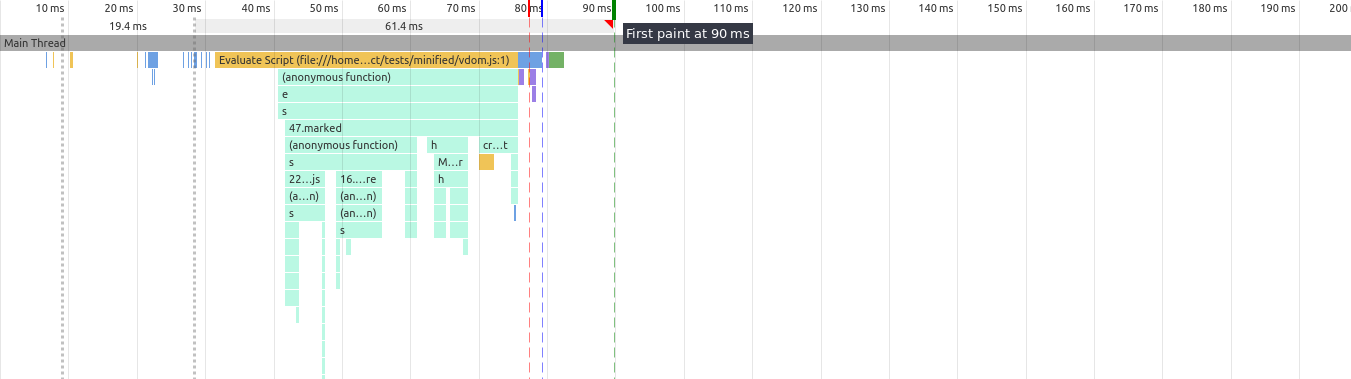
Browser starts evaluating at 32ms and the paint event lands at 80.3ms (interestingly the browser takes nearly 10x longer to composite the layer than the other frameworks) and then the frame lands at 89.9ms. The turnaround is nearly 60ms. So although Virtual-DOM has the fastest time-to-frame, it’s rendering process would seem to be slower than Preact.
Of course we’re looking a performance on a micro scale here and the overall takeaway, is that all of these libraries are very fast (for this application). They all have their first frame on screen within 200ms.
These test results were also captured on a Chromebook, not a mobile device, so they’re only designed to compare the relative performance between these libraries.
You can find the code for these tests here on GitHub.
Conclusion
React has changed the entire landscape around how we think about developing applications. Without React, we wouldn’t have any of these fantastic alternatives and it remains uncontested when it comes to ecosystem, tooling and community.
There are already hundreds if not thousands of React packages available over npm, with a ReactJS community organization created around a collection of more than 20 high quality open source projects, to ensure that they receive long term support and maintenance.
React caters for most of the programming styles we’ve seen with the other libraries. If you want to move your state out into a store like Redux and work with stateless components, React will allow you to do that. Likewise, React also supports functional stateless components.
The library itself has been battle tested, with a huge number of progressive tech companies (including Facebook) using React in production and the npm package getting hundreds of thousands of downloads each week.
But we’re here to consider the alternatives to using React. So let’s see, where, when and why you might want to consider using a different library.
Deku
If Redux is an important part of your workflow then you may want to experiment with Deku. It weighs less and (in our case) runs a bit faster than React, with an opinionated approach which allows it to cut out a lot of the original feature set.
Deku is a great fit for programmers who wish React enforced a more functional style.
Virtual-DOM
Virtual-DOM is perfect for building your own abstractions. The tools it provides out of the box are not enough to structure full applications and it’s a shame that it doesn’t support JSX by default, but these qualities make it ideal as a target for higher level abstractions that aren’t a good fit for React itself.
Virtual-DOM will continue to be a great target for language developers who want to work with declarative, component based models, without worrying about getting their hands dirty with DOM manipulation. For example, it’s currently used to great effect as part of Elm.
Preact
Preact is the surprise here. Not only does it bundle up into the smallest application, but it also has a very low turnaround for getting frames out onto the screen.
It’s lightweight, it has a small but growing ecosystem and there are an increasing number of React packages that can be used wholesale with Preact. Whether you’re building high performance apps, or pages that need to be delivered over low speed network connections, Preact is a great project to keep an eye on.
 Dan Prince
Digital Nomad and co-founder of UK based startup Astral Dynamics.