A Craft CMS Development Workflow With Docker: Part 6 - Performance
As part of my Craft CMS Development Workflow With Docker series of articles I'll be covering, from start to finish, setting up a development workflow for working with Craft CMS in docker.
- Part 1 - Local Development
- Part 2 - Buildchains in Docker
- Part 3 - Continuous Integration
- Part 4 - Docker In Production
- Part 5 - Testing
- Part 6 - Performance
- Part 7 - Multi-Developer Workflow
Now that we're able to build, test and deploy our project with relative ease we can spend a little time making sure it meets its potential with performance.
In this article we'll be looking at server side (or time-to-first-byte (TTFB)) performance as it relates to running Craft specifically in a docker container. We won't be covering general tips for optimising Craft (caching, eager loading etc) or touching any client side optimisations (css critical paths, async js etc). There are plenty of articles which exist that already discuss these things and I have another one in the works too.
Testing Performance
The first thing that we need is a method of testing our performance so that we're able to establish a benchmark that we can then try to improve upon. We can use this same method to test out the limits of our project once it reaches our production environment.
My tool of choice for this type of testing is Locust, a scriptable load tester which allows us to simulate user behaviour and then gradually ramp up the number of simulated users until things start to break. It also does fancy master/slave distributed testing which we won't cover here but might be useful for big projects.
As always, we'll be running Locust inside a docker container because we don't like installing things.
The only thing we need to do before we can get started is to create a script which Locust can use to simulate user behaviour. Create a file at locust/locustfile.py in the root of your project directory. We'll add a super simple Locust script written in Python to get started:
from locust import HttpLocust, TaskSet

def index(l):
    l.client.get("/")

class UserBehavior(TaskSet):
    tasks = {index: 1}

class WebsiteUser(HttpLocust):
    task_set = UserBehavior
    min_wait = 5000
    max_wait = 9000
This file defines a single interaction with our project get("/"), defines a UserBehaviour which specifies the set of tasks a user might perform, and finally defines a user type to which we apply the behaviour.
You can read a lot more about locustfiles in the Locust docs. It's quite flexible so there's a lot you can do including walking through complex sets of actions, logging in/out, generating API keys etc.
We're going to stick with our super simple example for now but feel free to embellish to suit your project.
In order to run our load testing tool we'll first need to make sure that our project is up and running.
Ready?
Now we can run a dockerised version of Locust and mount in our locustfile.
From the root of your project run:
docker run --rm -v $(pwd)/locust:/locust --network craft-in-docker_default -p 8089:8089 christianbladescb/locustio --host http://nginxYou might need to alter the name supplied after the --network flag. This is the name of the network created by docker compose for your project and depends on the name of the directory that holds your project. You can run docker network ls to list all of your docker networks if your aren't sure what it's called.
Once your locust docker container is up and running you should be able to visit http://localhost:8089 and see the Locust dashboard.
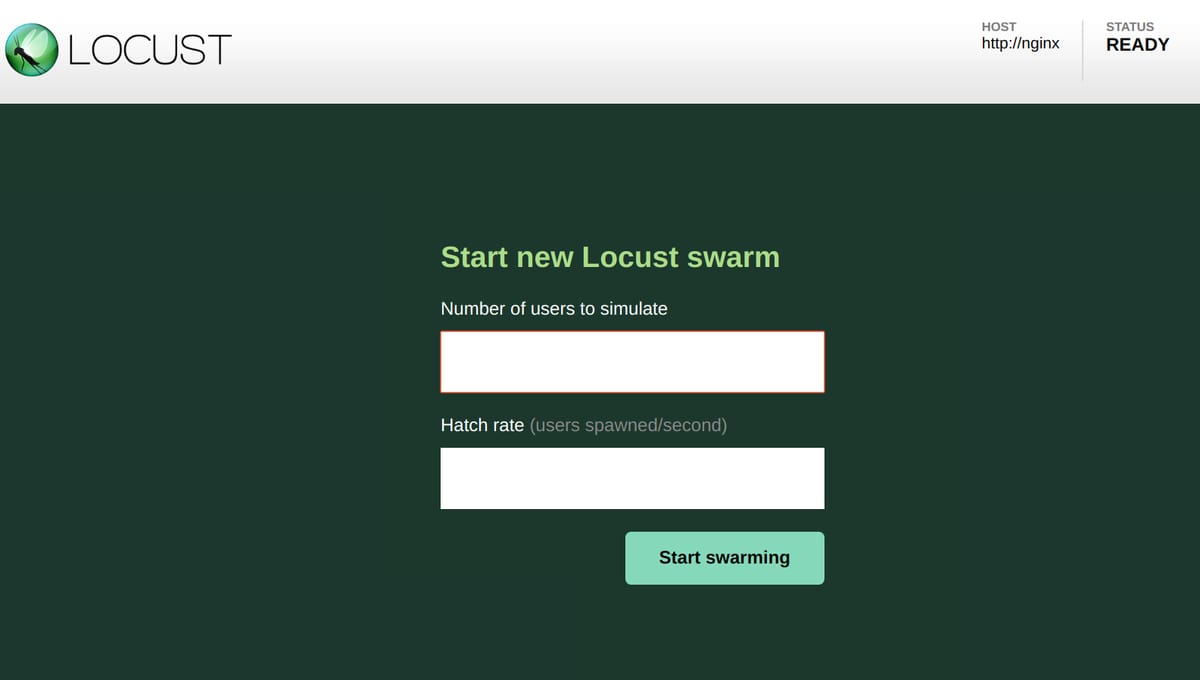
Let's give this thing a test. Set the number of users to 10 and the hatch rate to 1 and click 'Start Swarming'.
You should see Locust begin to spawn virtual users and present you with some statistics about how your site is performing!
Upping The Complexity
If you've been following along with this series without diverging, your current Craft project will be pretty boring - in fact, it'll just be a default Craft install only showing the welcome page.
In order to get our load tests to actually show us some useful information we should increase the complexity of our project a bit.
Feel free to do this yourself by adding a section, some fields and creating a few entries then output some of this content in the template files. Alternatively you can copy some settings from an existing project. For this article I have just recreated mattgrayisok.com by taking a database dump and copying over the template files.
Once you've done this you might want to add some additional get() tasks to your locustfile so that you can test hist against multiple different pages.
Initial Benchmark
An initial execution of Locust against my personal site across multiple pages with caching disabled provides us with the following:
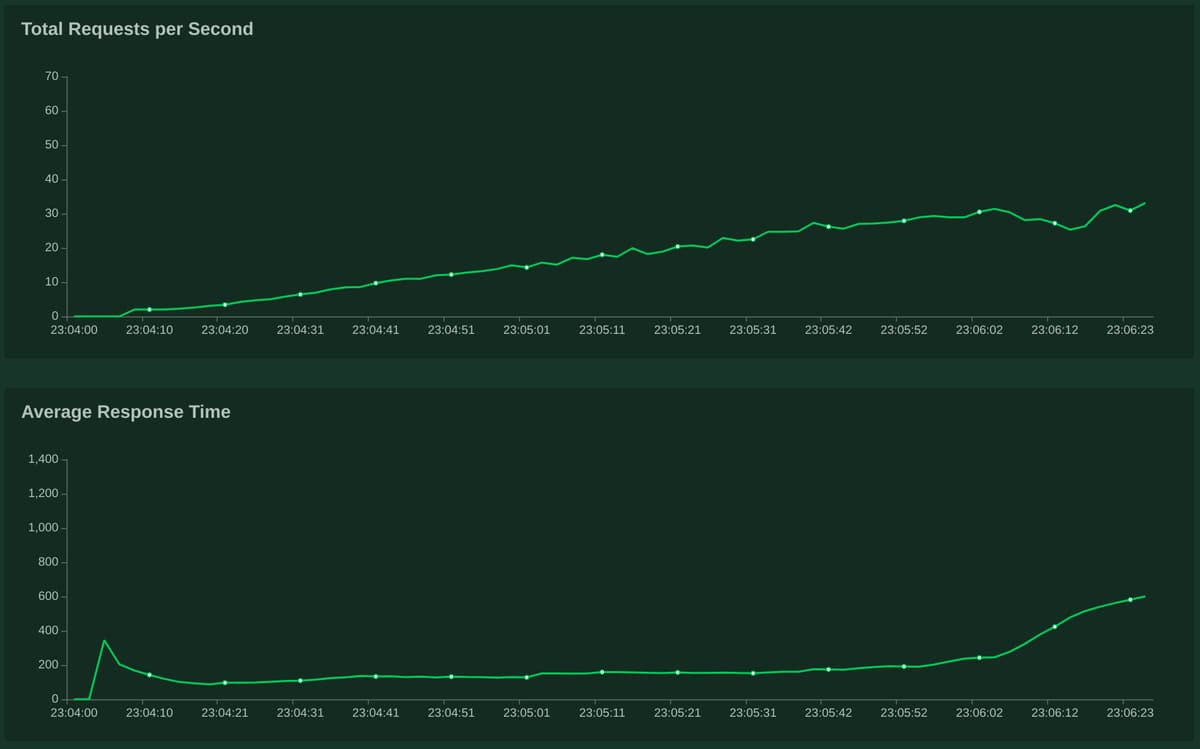
That's actually not too bad. We managed to achieve 31 requests per second with an average TTFB of 200ms before all hell broke loose.
The Max Children Fiasco
Before I go any further I want to call attention to one particular performance tweak which has been necessary to resolve some potential pain due to the default way that Craft operates.
If you've used Craft for any length of time you will have seen background tasks being performed when you log into the control panel. Because PHP doesn't have any native method of firing off tasks on a schedule, or outside of the scope of an incoming web request, P&T made the decision to run background tasks in an interesting way...
When a user logs into the control panel some JS will make an ajax request to the back end which is essentially used as a trigger to run whatever task is at the head of the background tasks queue. This ajax request fires on every control panel page load and, because it's an ajax request whose response can be ignored, it doesn't impact the user's overall experience.
This seems sensible until you run into the specific issue that I have discovered a couple of times now. These asynchronous background tasks, initiated by ajax requests, consume a PHP-FPM worker process for the length of time that they're running. If a user visits several control panel pages this can cause multiple tasks to begin running simultaneously, each consuming a PHP-FPM worker process. The default maximum number of simultaneous PHP-FPM worker processes in the official PHP docker container is set to a somewhat conservative 5. So if we end up in a situation where 5 slow background tasks have all started running - each consuming a worker process - PHP will start refusing to serve any more requests, including legitimate requests from end users who are just trying to visit our website!
I first encountered this with a Craft site that was using a custom module to fetch data from a 3rd party API. One day the API went down and the module didn't have a timeout set when requesting data from it so, every time someone logged into the control panel, these background tasks would start, consume all available PHP-FPM worker processes (which were all just sat waiting for a broken API to respond) and the entire site would go down!
This particular problem can be diagnosed by looking for a line in the PHP logs which looks something like:
WARNING: [pool www] server reached pm.max_children setting (5), consider raising itIf you aren't running any long background tasks you might still bump into this issue if user requests are performing any blocking tasks such as big I/O writes or API calls. If your average request takes one second to process, and you have 5 PHP workers available, you'll only be able to handle 5 requests per second, even if those 5 requests aren't maxing out your server's resources.
We can bump up this value by tweaking the PHP configuration.
Create a new file at docker-config/php/zzz-docker.conf. We're using that name because PHP loads in its config files in alphabetical order and we want ours to be loaded in last:
[www]
pm.max_children = 10
pm.process_idle_timeout = 10s
pm.max_requests = 1000
We're simply telling PHP-FPM to:
- Increase our maximum simultaneous workers to 10 to avoid the problems we've just been discussing.
- Increasing the time that an idle worker can stay alive before it is cleaned up which helps during traffic spikes.
- Telling PHP to kill each worker after it has served 1000 requests which prevents any memory leaks from building up over time.
We can add this to our container by editing docker-config/php/Dockerfile and adding the following immediately after the php.ini file appends:
COPY ./docker-config/php/zzz-docker.conf /usr/local/etc/php-fpm.d/zzz-docker.confRebuild your php image and replace the currently running container:
docker-compose build php
docker-compose up -d
If in your previous tests you were able to get Locust to hit a request rate ceiling before your CPU maxed out you might want to try running it again now to see if your max request rate has increased.
You can obviously change these values however you see fit, but be aware that each worker process that runs will consume memory so you need to balance the maximum potential throughput of your application with the resources that are available on your server.
OpCache Tweaks
We already have PHP OpCache installed and working in our image - it has been in our Dockerfile since Part 1. OpCache caches your PHP functions as bytecode in memory so that your PHP files don't need to be read from disk and interpreted on every request. It speeds up PHP a lot, which is why it's part of my standard PHP-FPM Docker base image.
One feature of OpCache is pretty useless to us in production though. It has the ability to occasionally check the files that it has cached for changes. This ensures that if you update a PHP file on your server, any functions that you've changed will be flushed from the cache and replaced.
In our world of immutable Docker containers this is completely unnecessary because we'll never be editing PHP files directly on the server. Each update that we push will refresh the entire cache because the PHP container will have been replaced.
Because of this we can speed up OpCache a little by disabling this functionality.
In docker-config/php/Dockerfile update the following around the php.ini additions:
...

ENV PHP_REVALIDATE=0

RUN echo "upload_max_filesize = 10M" > /usr/local/etc/php/php.ini && \
    echo "post_max_size = 10M" >> /usr/local/etc/php/php.ini && \
    echo "max_execution_time = 300" >> /usr/local/etc/php/php.ini && \
    echo "memory_limit = 256M" >> /usr/local/etc/php/php.ini && \
    echo "opcache.revalidate_freq = 0" >> /usr/local/etc/php/php.ini && \
    echo "opcache.validate_timestamps = \${PHP_REVALIDATE}" >> /usr/local/etc/php/php.ini

...
Here we've added the appropriate configuration to php.ini in order to disable OpCache checking for updates to our PHP files. There's a pretty significant side-effect to this though: changes made during local development won't be picked up without restarting the container.
In order to mitigate this I've pulled the PHP_REVALIDATE flag out into an environment variable which you can override as needed.
In docker-compose.yml add the following environment variable to the php container:
PHP_REVALIDATE: 1Now you have the best of both worlds: OpCache timestamp checking is disabled by default (always default to production settings), but can easily be switched back on by setting a simple environment variable when the container is started.
Fast CGI Cache
We've made a few tweaks to provide a modest improvement to our PHP processing times, but if there's one optimisation the rules them all it's full page response caching.
Nginx comes with a built in module which can provide us with this functionality with only a few additions to our config files.
It's important to be aware of what this is doing though - it is simply capturing a snapshot of one request that is returned from Craft and then serving that for all subsequent requests for the same URL. If you have any content on your pages which is user specific this will break that functionality. But for sites which have content that is the same for all users this can be a great addition.
In docker-config/nginx/default.conf add these lines to the top of the file, outside of the server{} block:
fastcgi_cache_path /etc/nginx/cache levels=1:2 keys_zone=craftindocker:100m inactive=60m;
fastcgi_cache_key "$scheme$request_method$host$request_uri";
fastcgi_cache_use_stale error timeout invalid_header http_500;
add_header X-Cache $upstream_cache_status;
Here we're setting up our caching rules by defining a name for the cache (craftindocker), a maximum cache size of 100MB and a 60 minute cache removal timeout for inactive files.
We're also defining a string which will be used to generate a unique hash for the cache files. You can add or remove variables in this string to make your caches dynamic on different properties. For instance you could use the UserAgent string to detect mobile devices and include this in the hash string in order to serve different content to mobile and desktop devices.
A really useful piece of functionality that nginx offers is defined on the next line: fastcgi_cache_use_stale. When this is enabled nginx will serve the most recent cache for a URL if it encounters a 500 error when talking to Craft. This ensures that if your site goes down for some reason, nginx will continue to serve the most recent 'good' content, even if it is a little out of date.
Finally we're adding a header to all of our responses which indicates whether or not the cache was used.
As well as declaring our cache settings we also need to activate them. Inside our location ~ \.php$ {} block add the following:
fastcgi_cache craftindocker;
fastcgi_cache_valid 200 60m;
Including these lines will activate our cache rules for this location but only for requests which have a 200 response code. We're also setting the default cache TTL to 60 minutes.
You can try this out now. Rebuild your nginx image and restart your containers and then load up localhost in your browser. In the developer tools' network panel you will be able to see a new response header called X-Cache. It should say MISS because there's no cache currently available for the page you loaded. Hit refresh a few times and it's likely that this value won't change. This is because nginx Fast CGI Caching respects the Cache-Control header which is also sent back by Craft, and Craft defaults to disallowing any caching!
A quick way to fix this is to open your base template file, for me that's src/templates/_layout.twig, and add the following near the top somewhere:
{% set expiryTime = expiryTime ?? 3600 %}

{% if currentUser or preventAllPageCaching is defined %}
    {% header "Cache-Control: no-store, no-cache, must-revalidate" %}
{% else %}
    {% set expiry = now|date_modify('+' ~ expiryTime ~ ' seconds') %}
    {% header "Cache-Control: public, max-age=60, s-maxage=" ~ expiryTime %}
    {% header "Pragma: cache" %}
    {% header "Expires: " ~ expiry|date('D, d M Y H:i:s', 'GMT') ~ " GMT" %}
{% endif %}
By adding this code we're defaulting all pages which extend from this file to send back headers which allow caching by proxys for one hour (3600 seconds). We're also disabling all caching for requests made by a user who's logged in or when the extending template has set the preventAllPageCaching variable.
Preventing caching for logged in users is intended to prevent any admin-only functionality from accidentally being cached and served to all users.
Templates which extend from this base template are also able to disable caching entirely by setting preventAllPageCaching or set a custom cache TTL by setting expiryTime.
Save this and refresh your browser. If you are logged into the control panel you should see the no-cache headers are returned and X-Cache will continue to state MISS. If you open an incognito window and load up your site you should see the first request saying MISS and subsequent requests saying HIT. It's working!
The cache will be used until the expiry time which is set in your templates is reached.
Disabling The Cache For Specific Paths
There are often times that we want to disable full-page caching for specific paths. In the case of Craft sites we certainly want to disable caching for anything under /admin or whatever you've set as your control panel URL.
To do this we need to add a few more bits to our nginx config. In docker-config/nginx/default.conf add the following inside the server{} block:
set $no_cache 0;
if ($request_uri ~* "/admin")
{
    set $no_cache 1;
}
Then add the following inside the location ~ \.php$ {} block:
fastcgi_cache_bypass $no_cache;
fastcgi_no_cache $no_cache;
We can now set this variable to 1 based on whatever logic we need. We've included a single case which disables caching for any URL which begins with /admin to prevent our control panel pages from being cached.
You might also want to include one for /actions so that calls to plugins are ignored too.
My general approach is to cache liberally and then add rules to scale back as required.
Purging
When content is edited in the CMS you will probably want to purge any associated cache files so that those changes appear on the site immediately. There are two ways to purge the cache for specific URLs:
- Create a script which has access to the nginx cache files on the file system and is able to receive purge requests and delete the appropriate cache files.
- Use a custom nginx cache purging extension.
There's quite a bit to go over in order to get either of these working well with Craft. So I'll cover them in a followup article.
Let's Test
Now that we've made lots of improvements to our projects it must be time to run another load test.
Fire up locust and hammer your project to see what we get. Remember to remove the PHP_REVALIDATE environment variable from your PHP container before starting the test to get that little extra bit of performance.
docker run --rm -v $(pwd)/locust:/locust --network craft-in-docker_default -p 8089:8089 christianbladescb/locustio --host http://nginx
You can see a big spike at the beginning of the test as all of my page caches are being generated and then again after one minute when my page caches expired (I had my cache TTL set to 60s for all pages).
I stopped the test when we comfortably hit 150 requests per second with an average response time of about 15ms. I'm sure we could have gone a lot higher but to be honest my blog isn't that popular anyway.
What Next?
You can use your locustscript to test your project in any environment. It might be worth running it against your production servers in order to locate any unexpected bottlenecks before a site goes live. You could also make it part of your deployment process to run load tests against your staging environment to ensure that any significant changes haven't introduced issues before they go live.
If you can use nginx full page caching then do it. If you can't because your page contains user-specific content then consider loading that content in asynchronously using javascript so that the initial page load can be cached.
Every project will need slightly different rules setting up for cache headers and paths to ignore so it's worth learning about the syntax for both of those things.
In the next article I'm going to be moving slightly away from the nuts and bolts of our project to look at how multi-developer workflows can be organised using GitLab and our container based deployment mechanism.
Feedback
Noticed any mistakes, improvements or questions? Or have you used this info in one of your own projects? Please drop me a note in the comments below. 👌