
This article was originally published on OKTA Developer Blog. Thank you for supporting the partners who make SitePoint possible.
AngularJS reigned as king of JavaScript MVC frameworks for several years. However, when the Angular team announced they would not provide backwards compatibility for their next version, there was a bit of a stir in its community, giving opportunities for frameworks like React and Vue.js to flourish. Fast forward a few years and both Angular 2 and Angular 4 have been released. Many developers are trying its TypeScript and finding the experience a pleasant one. According to JAXenter, it’s doing a pretty good job, and holding strong as the third most popular UI framework, behind React and HTML5.
In this article, I’ll show you a quick way to get started with Angular, and add user authentication with Okta’s Sign-In Widget. If you’re just getting started with Angular, you might want to read my Angular tutorial. If you’d like to get the source code used in this article, you can find it on GitHub.
Why User Authentication with Okta?
Okta provides an API service that allows developers to create, edit, and securely store user accounts and user account data, and connect them with one or multiple applications. We make user account management easier, more secure, and scalable so you can get to production sooner.
The Okta Sign-in Widget provides an embeddable JavaScript sign-in implementation that can be easily customized. The Sign-in Widget carries the same feature set in the standard Okta sign-in page of every tenant – with the added flexibility to change the look-and-feel. Included in the widget is support for password reset, forgotten password and strong authentication – all of which are driven by policies configured in Okta. Developers don’t have to write a single line of code to trigger these functions from within the widget. For consumer facing sites, social providers are also supported in the widget.
Create an Angular Application
Angular 4 was recently released, as well as Angular CLI 1.0. To see how you might use Okta’s Sign-In Widget in a simple Angular application, create a new application with Angular CLI. First, you’ll need to install Angular CLI.
npm install -g @angular/cli
After this command completes, you can create a new application.
[mraible:~] $ ng new angular-okta-example
  create angular-okta-example/README.md (1034 bytes)
  create angular-okta-example/.angular-cli.json (1255 bytes)
  create angular-okta-example/.editorconfig (245 bytes)
  create angular-okta-example/.gitignore (516 bytes)
  create angular-okta-example/src/assets/.gitkeep (0 bytes)
  create angular-okta-example/src/environments/environment.prod.ts (51 bytes)
  create angular-okta-example/src/environments/environment.ts (387 bytes)
  create angular-okta-example/src/favicon.ico (5430 bytes)
  create angular-okta-example/src/index.html (305 bytes)
  create angular-okta-example/src/main.ts (370 bytes)
  create angular-okta-example/src/polyfills.ts (2498 bytes)
  create angular-okta-example/src/styles.css (80 bytes)
  create angular-okta-example/src/test.ts (1085 bytes)
  create angular-okta-example/src/tsconfig.app.json (211 bytes)
  create angular-okta-example/src/tsconfig.spec.json (304 bytes)
  create angular-okta-example/src/typings.d.ts (104 bytes)
  create angular-okta-example/e2e/app.e2e-spec.ts (302 bytes)
  create angular-okta-example/e2e/app.po.ts (208 bytes)
  create angular-okta-example/e2e/tsconfig.e2e.json (235 bytes)
  create angular-okta-example/karma.conf.js (923 bytes)
  create angular-okta-example/package.json (1325 bytes)
  create angular-okta-example/protractor.conf.js (722 bytes)
  create angular-okta-example/tsconfig.json (363 bytes)
  create angular-okta-example/tslint.json (2968 bytes)
  create angular-okta-example/src/app/app.module.ts (314 bytes)
  create angular-okta-example/src/app/app.component.css (0 bytes)
  create angular-okta-example/src/app/app.component.html (1120 bytes)
  create angular-okta-example/src/app/app.component.spec.ts (986 bytes)
  create angular-okta-example/src/app/app.component.ts (207 bytes)
You can `ng set --global packageManager=yarn`.
Installing packages for tooling via npm.
Installed packages for tooling via npm.
Successfully initialized git.
Project 'angular-okta-example' successfully created.
[mraible:~] 2m6s $
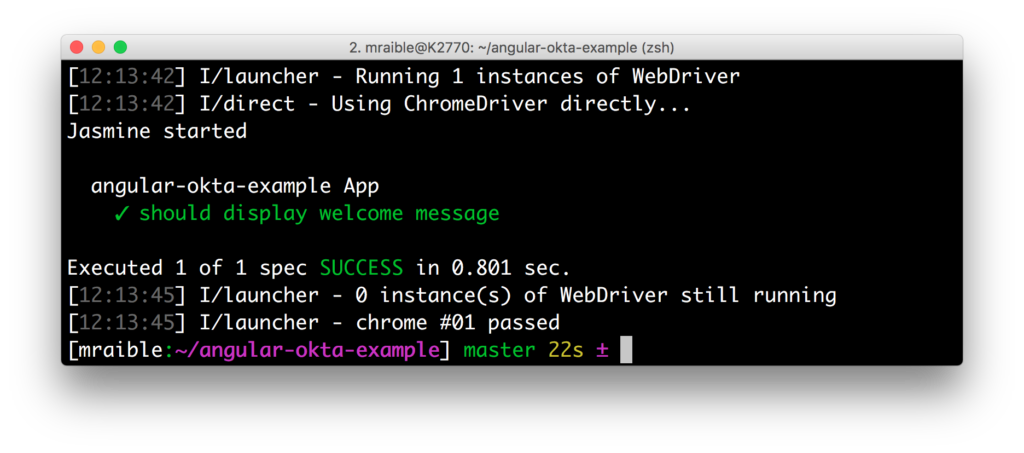
This will create a new angular-okta-example directory and install all the necessary dependencies. To verify everything works, run ng e2e in a terminal window. All tests should pass and you should see results like the following.
Integrate Okta’s Sign-In Widget in Angular
Now we’re going to leverage Okta’s Sign-In Widget for an easily customizable login view. To start, install the Okta Sign-In Widget using npm.
npm install --save @okta/okta-signin-widget
Add the widget’s CSS to src/styles.css:
@import '~https://ok1static.oktacdn.com/assets/js/sdk/okta-signin-widget/2.1.0/css/okta-sign-in.min.css';
@import '~https://ok1static.oktacdn.com/assets/js/sdk/okta-signin-widget/2.1.0/css/okta-theme.css';
Create src/app/shared/okta/okta.service.ts and use it to wrap the widget’s configuration and make it an injectable service.
import { Injectable } from '@angular/core';
import * as OktaSignIn from '@okta/okta-signin-widget/dist/js/okta-sign-in.min.js';

@Injectable()
export class Okta {
  widget;

  constructor() {
    this.widget = new OktaSignIn({
      baseUrl: 'https://{yourOktaDomain}.com',
      clientId: '{clientId}',
      redirectUri: 'http://localhost:4200'
    });
  }

  getWidget() {
    return this.widget;
  }
}
To make this service available to all components in the application, modify app.module.ts and list Okta as a provider.
import { Okta } from './shared/okta/okta.service';

@NgModule({
  ...
  providers: [Okta],
  bootstrap: [AppComponent]
})
Before this will work, you’ll need to create an OpenID Connect (OIDC) application in Okta so you can replace the {yourOktaDomain} and {clientId} references when initializing the widget.
Create an OpenID Connect App in Okta
OpenID Connect is built on top of the OAuth 2.0 protocol. It allows clients to verify the identity of the user and, as well as to obtain their basic profile information. To learn more, see http://openid.net/connect.
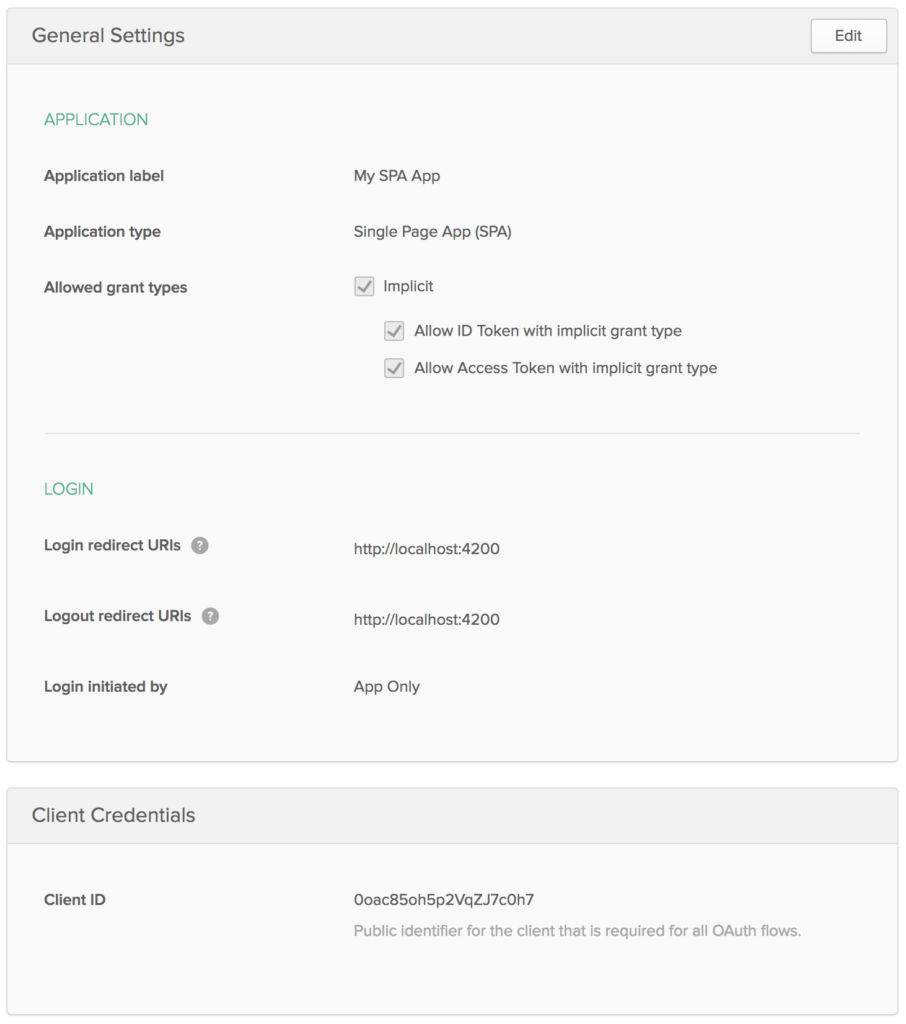
Login to your Okta account, or create one if you don’t have one. Navigate to Applications and click on the Add Application button. Select SPA and click Next. On the next page, specify http://localhost:4200 as a Base URI, Login redirect URI, and Logout redirect URI. Click Done and you should see settings like the following.
Show the Sign-In Widget
After making these changes, copy the your Client ID and Platform ID into okta.service.ts. Then modify app.component.ts to use the Okta service and the widget to login/logout.
import { Component, OnInit } from '@angular/core';
import { Okta } from './shared/okta/okta.service';

@Component({
  selector: 'app-root',
  templateUrl: './app.component.html',
  styleUrls: ['./app.component.css']
})
export class AppComponent implements OnInit {
  title = 'app works!';
  user;
  oktaSignIn;

  constructor(private okta: Okta) {
    this.oktaSignIn = okta.getWidget();
  }

  showLogin() {
    this.oktaSignIn.renderEl({el: '#okta-login-container'}, (response) => {
      if (response.status === 'SUCCESS') {
        this.user = response.claims.email;
      }
    });
  }

  ngOnInit() {
    this.oktaSignIn.session.get((response) => {
      if (response.status !== 'INACTIVE') {
        this.user = response.login
      } else {
        this.showLogin();
      }
    });
  }

  logout() {
    this.oktaSignIn.signOut(() => {
      this.showLogin();
      this.user = undefined;
    });
  }
}
And modify app.component.html to have a <div> with id="okta-login-container" and a place to show the logged in user’s email.
<div *ngIf="!user" id="okta-login-container"></div>

<div *ngIf="user">
  Hello {{user}}

  <button (click)="logout()">Logout</button>
</div>
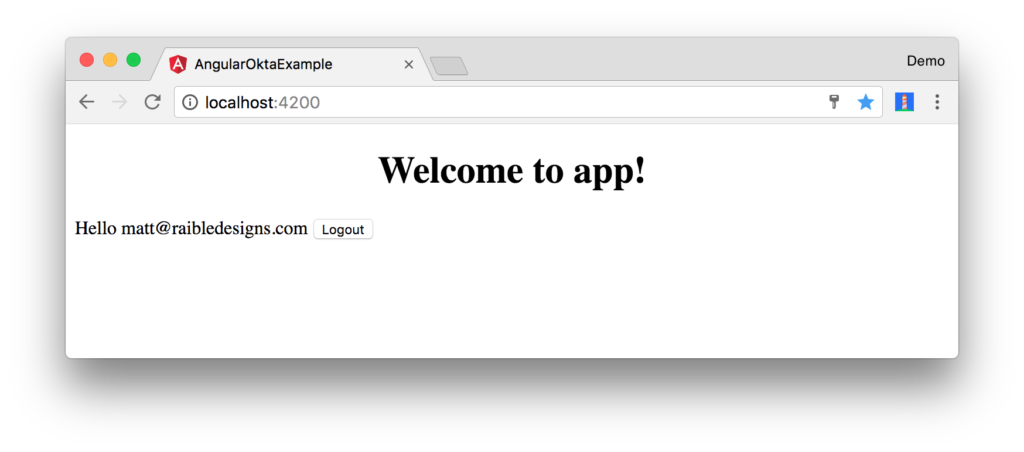
Run ng serve, and open your browser to http://localhost:4200. You should see the sign-in widget. Enter one of
your user’s credentials to login. You should see a “Hello {email}” message with a logout button.
NOTE: You may experience an issue where the sign-in process seems to hang. Clicking anywhere in the browser window seems to solve this problem. I’m not sure why this happens. You can track this issue here.
If it works – congrats! If it doesn’t, please post a question to Stack Overflow with an okta tag, or hit me up on Twitter.
Customize the Widget CSS
If you’d like to customize the widget’s CSS, the easiest way is you write your own CSS. Remove the CSS @import statements you added to src/styles.css. Add an @import for Bootstrap 4 and a few style rules to position elements. Copy the following code into src/styles.css.
@import url(https://maxcdn.bootstrapcdn.com/bootstrap/4.0.0-beta/css/bootstrap.min.css);

#okta-login-container {
  margin: 0 auto;
  max-width: 400px;
  border: 1px solid silver;
  padding: 20px;
  box-shadow: 5px 5px 5px 0 silver;
}

#okta-login-container input {
  margin-bottom: 5px;
  width: 100%;
  padding: 5px;
}

#okta-login-container input[type=checkbox] {
  width: 25px;
}
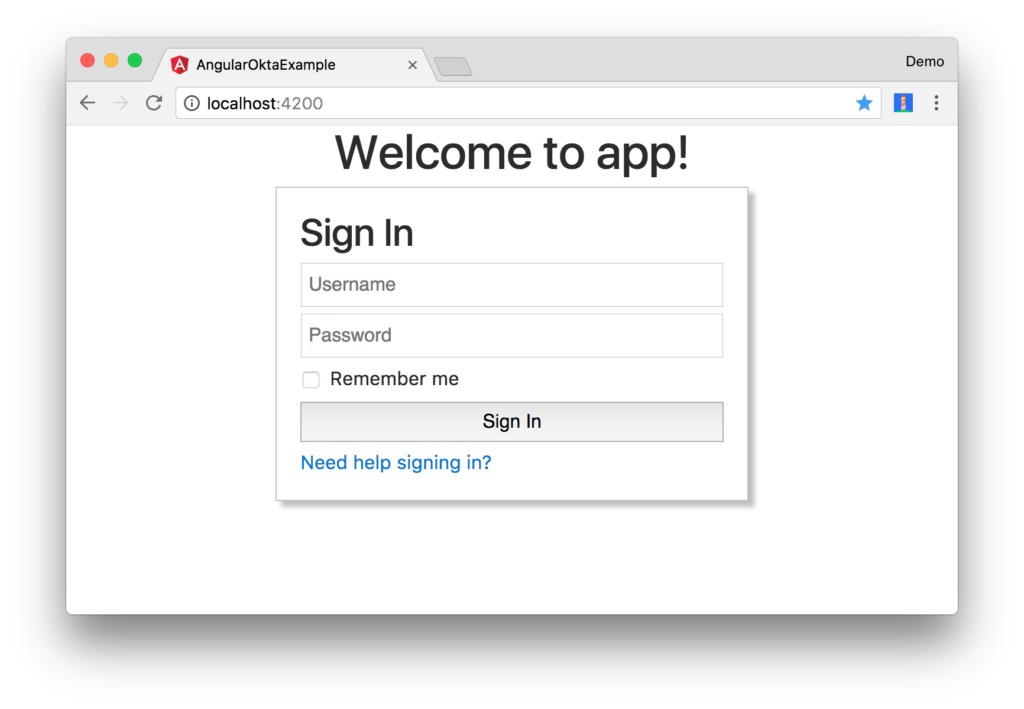
After making these changes, the sign-in widget will look like the following screenshot.
Fix Your Tests
If you try to run npm test or ng test, tests will fail:
Chrome 61.0.3163 (Mac OS X 10.12.6): Executed 3 of 3 (3 FAILED) (0 secs / 0.157 secs)
Chrome 61.0.3163 (Mac OS X 10.12.6) AppComponent should render title in a h1 tag FAILED
    Failed: No provider for Okta!
To fix this, specify Okta as a provider in src/app/app.component.spec.ts.
import { Okta } from './shared/okta/okta.service';

describe('AppComponent', () => {
  beforeEach(async(() => {
    TestBed.configureTestingModule({
      declarations: [
        AppComponent
      ],
      providers: [Okta]
    }).compileComponents();
  }));
After making this changes, you should see the sweet smell of success.
Chrome 61.0.3163 (Mac OS X 10.12.6): Executed 3 of 3 SUCCESS (0.77 secs / 0.759 secs)
Protractor tests should still work as well. You can prove this by running ng e2e in a terminal window.
Angular + Okta
You can find a completed version of the application created in this blog post on GitHub. In a future post, I’ll show you how to create a more Angular-native experience, where you control the HTML for the login form.
Building authentication in an application is hard. It’s even less fun to build it over and over again in each application you build. Okta does the hard part for you and makes it a lot more fun to be a developer! Sign up for a forever-free developer account and try Okta today!.
I hope you’ve enjoyed this quick tour of our Angular support. If you have questions about Okta’s features, or what we’re building next, please hit me up on Twitter, post a question to Stack Overflow with an “okta” tag, or open a new issue on GitHub.
Frequently Asked Questions (FAQs) about Angular App Sign-In
How can I integrate Okta with Angular for user authentication?
Okta provides an authentication service that can be easily integrated with an Angular application. To do this, you first need to install the Okta Angular SDK using npm. Once installed, you can import the necessary Okta modules into your Angular application. You will also need to configure the Okta service with your Okta domain and client ID. After this, you can use the Okta service to authenticate users, manage sessions, and secure routes in your Angular application.
What is the purpose of the OktaAuthService in Angular?
The OktaAuthService is a service provided by the Okta Angular SDK. It provides methods for managing user authentication in an Angular application. This includes methods for signing in and out users, checking if a user is authenticated, handling callbacks from the Okta sign-in page, and managing user sessions. By using this service, you can easily add secure user authentication to your Angular application.
How can I secure routes in my Angular application using Okta?
Okta provides a way to secure routes in your Angular application using the OktaAuthGuard. This guard can be added to any route in your application to ensure that only authenticated users can access it. If a user tries to access a secured route without being authenticated, they will be redirected to the Okta sign-in page.
What is the Okta callback component in Angular?
The Okta callback component is a component provided by the Okta Angular SDK. It handles the callback from the Okta sign-in page after a user has been authenticated. This component parses the tokens from the callback URL and stores them in the Okta token manager. After this, the user is redirected to a specified route in your Angular application.
How can I customize the Okta sign-in page in my Angular application?
The Okta sign-in page can be customized to match the look and feel of your Angular application. This can be done through the Okta admin dashboard. Here, you can change the logo, colors, and text of the sign-in page. You can also add custom HTML and CSS to further customize the page.
How can I handle user sessions in my Angular application using Okta?
Okta provides methods for managing user sessions in your Angular application. This includes methods for creating a new session, checking if a session exists, renewing a session, and closing a session. By using these methods, you can ensure that users remain authenticated as they navigate through your application.
How can I use the Okta token manager in my Angular application?
The Okta token manager is a service provided by the Okta Angular SDK. It provides methods for managing tokens in your Angular application. This includes methods for adding, getting, removing, and renewing tokens. By using this service, you can securely manage user tokens in your application.
How can I handle errors in the Okta Angular SDK?
The Okta Angular SDK provides error handling capabilities. If an error occurs during a method call, the SDK will throw an error that you can catch and handle in your application. The error object will contain information about the error, such as the error message and error code.
How can I test the Okta Angular SDK in my application?
The Okta Angular SDK can be tested in your application using unit tests. The SDK provides mock services that you can use to simulate the behavior of the Okta services in your tests. This allows you to test your application’s interaction with the Okta services without making actual calls to the Okta API.
How can I update the Okta Angular SDK in my application?
The Okta Angular SDK can be updated in your application using npm. To do this, you can run the npm update command in your project directory. This will update the SDK to the latest version, ensuring that you have access to the latest features and bug fixes.
Matt is a Java Champion, web developer, and Developer Advocate at Okta. He likes to code in both Java and Javascript, but has also had a lot of fun with TypeScript lately.